How to Replace Combination Switch 1997-2003 Chevy Malibu
Created on: 2011-09-28
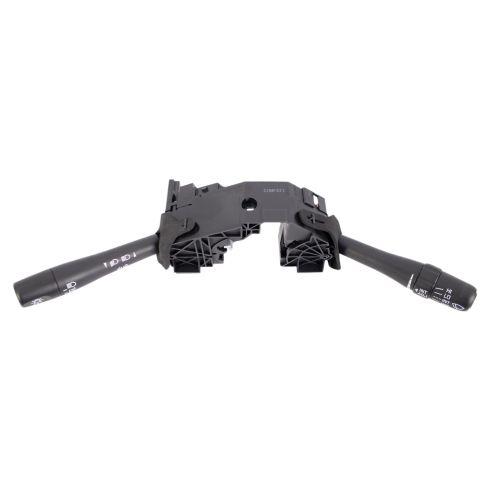
Watch this video to see how to replace the combination switch (turn signal stalk, high beam and wiper switch) on your 97-03 Chevy Malibu.
-
step 1 :Disconnecting the Battery
- Disconnect the negative battery cable with an 8mm wrench
-
step 2 :Accessing the Combination Switch
- Raise the steering wheel
- Remove the three 7mm bolts underneath the steering column
- Separate the top of the steering column cover from the bottom
-
step 3 :Removing the Combination Switch
- Remove the 7mm bolt from the top of the combination switch
- Pull the combination switch off the steering column
- Disconnect the three wiring harnesses from the combination switch
-
step 4 :Installing the New Combination Switch
- Connect the wiring harnesses to the new combination switch
- Use a flat blade screwdriver to push in the combination switch button
- Slide the switch into place
- Insert the 7mm bolt into the switch
-
step 5 :Reconstructing the Steering Column Cover
- Put the top of the steering column cover into place using its hooks
- Snap the top and bottom of the steering column cover together
- Insert the three 7mm bolts into the bottom of the steering column
-
step 6 :Reconnecting the Battery
- Reconnect the negative battery cable
Tools needed
-
Socket Extensions
Flat Blade Screwdriver
8mm Wrench
7mm Socket
Ratchet
Brought to you by 1AAuto.com, your source for quality replacement parts and the best service on the Internet.
Hi, I'm Mike Green. I'm one of the owners of 1A Auto. I want to help you save time and money repairing or maintaining your vehicle. I'm going to use my 20-plus years experience restoring and repairing cars and trucks like this to show you the correct way to install parts from 1AAuto.com. The right parts installed correctly: that's going to save you time and money. Thank you and enjoy the video.
In this video we show you how to replace the combination switch, which is the turn signals, high beams and wipers on this 2001 Chevy Malibu, same as a '97-'03. The only tool you'll need is a 7mm socket with a ratchet and an extension and if you like you can disconnect the battery which would take an 8mm wrench but it's not necessary. The only reason you might want to do it is so your interior lights don't run your battery down.
Let your steering wheel come all the way up, underneath there are three 7mm bolts, and also a T20 Torx driver will work They're those three right there. We'll remove those. I'll fast forward as I use a socket, ratchet and extension to remove those 7mm screws. Pull your steering wheel down, and you can separate the top and then pull the top up and out. Now, there's another 7mm screw right on top here. Now, your whole switch will come right out. There are three connectors, one right here. Lift up on this tab and that comes off. Then, this one right here is a little more difficult. You pull up on this tab, and then pull the connector out. Then, over on this side, there's another connector right here. Again, pull the tab up and push the connector out. Then, your switch assembly comes right out.
Here's our old switch and the new switch from 1A Auto. You want to take the covers off. All the graphics are the same. Everything is the same. Its going to fix your problem, whether it's that your lights aren't working or your return on your blinkers or something. That's all going to go in here. Putting it in is pretty simple. To put it down, well hook this connection on first. It plugs right in. This lower connection plugs right in. Then, this upper connection right in. Now, set it carefully down just about in place. As you're putting it down on, for this little button here, just use a regular flat-blade screwdriver, and push it in as you put it down so it goes behind this wheel. Push your button in, then down and on. Well speed it up here as we put that 7mm screw back in. Use your socket, ratchet, and extension. Tighten it up nice and firm. Don't over-tighten it, though.
Now for this, there are two ears right here that go into little hooks in the back. These ears here, you have to guide back into these hooks. It's difficult to film because this steering wheel gets in the way. You want to put this down in there. You can just look right through here. Usually, I can get one side back in and hook the other side back in. Then, just push it back a little bit and bring the two halves together. Make sure that everything lines up, and then push it together. Then, we can fast-forward as we put those three 7mm screws in from the bottom, and use our socket ratchet and extension to tighten them up. Again, tighten them up firm. Do not over-tighten them.
We hope this video helps you out. Brought to you by www.1AAuto.com, your source for quality replacement parts and the best service on the Internet. Please feel free to call us toll-free, 888-844-3393. We're the company that's here for you on the Internet and in person.
Shop Products

How to Replace Turn Signal Switch 2007-13 Chevy Silverado
Check out this video to learn how to replace the combination turn signal switch on your 07-13 Chevy Silverado!
