How to Replace Camshaft Position Sensor 2001-07 Toyota Highlander L4 2-4L
Created on: 2018-01-23
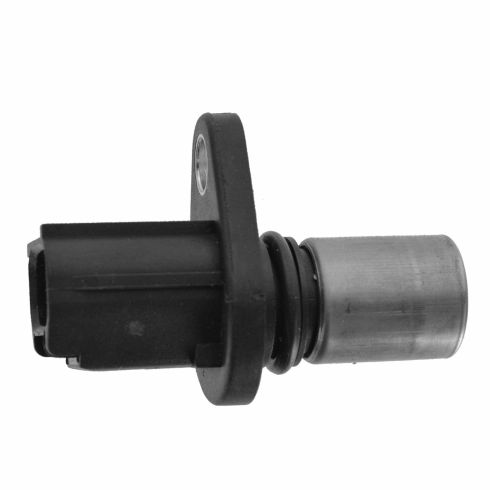
New Camshaft Position Sensor from 1AAuto.com How to repair, install, fix, change or replace a broken, worn out, or damaged camshaft position sensor on 01, 02, 03, 04, 05, 06, 07 Toyota Highlander L4 with the 2.4L engine
-
step 1 :Removing the Camshaft Position Sensor
- Remove the two 10mm bolts from the engine cover
- Remove the engine cover
- Disconnect the sensor
- Remove the 10mm bolt from the sensor
- Remove the sensor
-
step 2 :Installing the Camshaft Position Sensor
- Apply white grease or engine oil to the threads
- Insert the sensor into place
- Tighten the 10mm bolt to the sensor
- Connect the sensor wiring harness
- Replace the engine cover
- Tighten the two 10mm bolts to the engine cover
Tools needed
-
Socket Extensions
Flat Blade Screwdriver
White Grease
10mm Socket
Ratchet
Engine Oil
Hi, I’m Mike from 1A Auto. We’ve been selling auto parts for over 30 years!
Open the hood. We have to pull the release inside the car. It's just inside, right around your left knee on the driver side. We need to release the secondary or safety release. Just kind of feel around for it. This one is right here, squeeze up. Going to remove these two top nuts that hold on the appearance cover. They are 10 millimeter so I'm using a 10 millimeter socket, ratchet, and extension. Now, these should just thread off real easily.
There's our appearance cover. It's got some foam inside. That's just for noise, just keeps the noise down from the valve train. Cam position sensor is located on the side of the head towards the air box. This one is kind of covered in oil, it's a little hard to see. There's a single 10 millimeter bolt that holds it in, and electrical connection. You've got to push in on the electrical connector to release the lock. This was so gummed up with oil, it's hard to push the lock in. Had to work at it a little bit. Pulled it out, so now it's unlocked and removed. Now I can work on getting the bolt out of there. Use a 10 millimeter socket, extension, and ratchet and get it broken free. Take the ratchet out. I'll use just the socket and extension to remove the bolts. Carefully take the bolt out so I don't drop it.
With the bolt removed I need to get it out of the head, and it's got kind of a seal, just kind of grab it and wiggle it back and forth. There's an O ring in there and it might be stuck on the O ring. Just kind of wiggle it back and forth and you got to kind of work it out. It's loose but I can't quite get it, so I'm going to carefully use a flat bladed screwdriver and try to pry against the head and to pop the sensor out. There it is.
This is the old cam sensor we pulled from our vehicle, brand new one from 1AAuto.com. Similar design, same mounting hole, same connector style. Put a new O ring on here. This should fit in there and work great for us. You can use a tiny amount of white grease or engine oil, you just want to put it on that O ring so it slides into place and doesn't rip.
Now I'm going to put it back into the same opening this side of the head. I'll just push it in, just try to snap into place. I'm going to turn it and looks like it's lined up. Just slide the bolt in, slide it up. Now I got lined up in the hole, the mounting hole. Thread the bolt down in. Just threading it by hand. This is a cross thread, just want to get it nice and smooth. Torque is 7 foot-pounds, it's real, real light. It's basically just a little more than hand tight. I'm going to get it snug and then just go a little bit more. That's installed.
Now you just reconnect the electrical connector. Push that on until it locks. There it is. Push it a little more and it clicked. I can reinstall the plastic engine cover. I wiped it down with a rag, cleaned some of the dirt off of it, make it look a little nicer. Get it lined up over those studs, it'll sit right down. Reinstall the nuts. You can actually just do these hand tight, they don't need to be super tight. The job is complete.
Thanks for watching. Visit us at 1AAuto.com for quality auto parts, fast and free shipping, and the best customer service in the industry.
Shop Products
How To Replace Camshaft Position Sensor 2000-06 Chevy Tahoe
Watch this video to learn how to install a new camshaft position sensor on your 2000-06 Chevy Tahoe.
