How to Replace Camshaft Position Sensor 2007-13 Toyota FJ Cruiser
Created on: 2019-08-02
Watch this video from 1A Auto to learn how to replace the camshaft position sensor on your 07-14 Toyota FJ Cruiser. You'll see how to do it, step by step!
-
step 1 :Removing the Air Box
- Remove the two 10 mm nuts to remove the engine cover
- Release the two air filter housing retaining clips
- Disconnect the air filter housing from the air box and set it aside
- Disconnect the Mass Airflow Sensor (MAF) electrical connector
- Pry off the two MAF wiring retaining clips
- Remove the two 10 mm air box mounting bolts
- Loosen the 10 mm air box clamp at the throttle body
- Loosen the spring clamp to remove the air hose from the air box
- Move the air box aside, being careful of the other hoses still attached
-
step 2 :Removing the Camshaft Position Sensor
- Remove the 10 mm bolt securing the Camshaft Position Sensor
- Remove the sensor
- Disconnect the sensor electrical connector
-
step 3 :Installing the Camshaft Position Sensor
- Clean the area around the camshaft position sensor mounting hole
- Install the sensor into the mounting hole
- Install the 10 mm bolt to secure the sensor
- Reconnect the sensor electrical connector
-
step 4 :Installing the Air Box
- Reposition the air box and slide the connection onto the throttle body
- Install the two 10 mm mounting bolts
- Tighten the 10 mm clamp around the throttle body
- Reconnect the air hose and reposition the spring clamp
- Reconnect the Mass Airflow Sensor (MAF) electrical connector
- Reinstall the two MAF wiring retaining clips
- Reinstall the air filter housing by engaging the rear tabs first
- Secure the air filter housing with the two retaining clips
- Reinstall the engine cover by seating the two rear tabs and then lowering it
- Reinstall the two 10 mm nuts to secure the engine cover
Tools needed
-
Socket Extensions
10mm Socket
Ratchet
Pocket Screwdriver
Hey friends, it's Len here at 1AAuto. Today, I'm working on a 2007 Toyota FJ Cruiser, and I'm going to be replacing the cam position sensor. It's going to be a very easy job and I want to be the one that shows you how to do it. If you need this or any other part, you can always check us out at 1AAuto.com. Thanks.
Okay, so we've got the hood up. Now what we're going to do is we're going to remove this 10 millimeter nut and this 10 millimeter nut. Grab our cover, lift it straight up and pull away. There's our cover, we'll set this aside. We'll move ahead to the next step.
Okay, so now that we're under here, we're going to need to remove this air filter box. This whole unit right here is the air filter box. To get started, we're going to unclip these, pull the outer housing away. Now's a great time to check your air filter if you wanted to. You just pull it out, take a peek, it's brand new, slide it in.
We're going to release the mass airflow sensor right here. Just squeeze the tab, pull it out. There's a little clip right here, that should be in there, this one pops out nice and easy. This one right here, let's see. Not so much. I'm going to grab my tool real quick, just pop that right up. Now our mass air flow sensor wiring harness is out of the way, we'll just take a peek at it, make sure there's no funny colors. This looks great. We'll set it aside.
Okay, so we have two mounting bolts. You've got one here, one here. You also have a clamp, one right there, and then you have a hose that we're going to remove, right here. Okay? The majority of this is going to be done with a 10 millimeter, so if you have a ratchet or an electric gun, whatever you've got. It's a 10 millimeter.
We'll remove that bolt. Both bolts are the same. 10 millimeter again. We're just going to loosen that up. We'll set this stuff aside. Now grab this right here, you can usually squeeze them with your fingers, slide it down and out of the way. Grab your hose, slide it off of there and down and out of the way. Now we're just going to grab our air filter housing unit, give it a little wiggle. If this is loose enough, you should be able to slide it off, and we'll slide this right out of the way.
You don't want to try to pull too much because there is still another hose attached back there. If you pull it off, you need to make sure that you remember to put that hose back on. That's a vacuum hose. We'll just set it aside, we're not even going to touch that hose.
Okay, so we got our sensor right here. Okay? It's right up along the top near the valve cover. Got a 10 millimeter bolt there. The electric gun's not going to get in there, but I'm just going to use a ratchet. I'm going to break this free. Cool, so we know that's going to break free.
On the wiring itself, there should be a little push button. See if I can grab it. Okay, I cannot, that's fine. So what I'm going to do, I'm just going to fully take this out and then I'm going to get a better view of it, and probably an even better grip.
There's our bolt, we'll set this aside. Grab our sensor, give it a little wiggle. It should be wanting to come out. You might have to use a pocket screwdriver. Just try to pry a little bit. They have a little rubber O-ring on them, and a lot of times the O-ring likes to stay in there and that's kind of what holds it all together right here. So if it seems like it's being kind of hard to pry, well that's probably why. It's coming though.
You can do something like use a little bit of penetrant spray if you wanted to. Just wiggle it around, see if that helped us any. Oh yeah, so there we go. There's our cam sensor. Okay. There's a little push button that I was talking about. You squeeze that, it lifts up this tab end right here, and then you should be able to slide the sensor out.
If for some reason you can't squeeze it hard enough to do it, just stick your pocket screwdriver in there, lift that. Once it gets up, you should be able to pull this off. It's really sticking in there. It is what it is. Nothing's really easy, right? Try to get that to stay for a second. There we go. Cool, so there's our sensor. Let's move ahead to the next step.
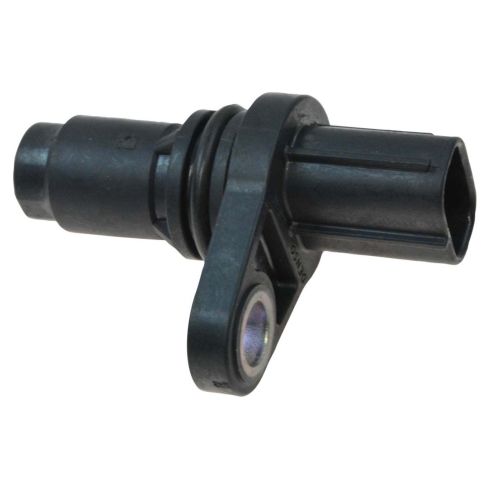
Okay friends, a quick product comparison for you. Right here we have our original 2007 Toyota FJ Cruiser cam sensor, and right here we have our brand new quality 1A Auto part. These two parts are the exact same. They have the same shape, same mounting hole, and of course the same internals for plugging in your wiring harness. Okay? This has everything that you need. With that said, I don't see any reason why I wouldn't want to use this in this vehicle, so I'm going to do it.
If you need this or any other part, you can always check us out at 1AAuto.com. Thanks.
Okay, so now I'm just going to take a nice clean rag, or pretty clean rag, just going to try to clean up in and around that hole. There we are, nothing too crazy. I don't need to spend all day there.
I've got my new sensor. I used a little bit of silicone paste, that's just going to help it slide in nice and easy. Slide it right in, there it is. We'll take our bolt, the shorter of the three that we have. Going to line this up. There we are. I'm just going to snug it up. I don't want to break the plastic for the sensor, so all I'm going to do is tighten it until I feel it bottom out like that, and just give it a teeny bit more and that's it. Tight enough.
We've got our sensor, or sensor wiring of course. Sorry, the sensors are obviously in. Just take a peak, it looks like it's good to go. Just going to take it, connect it in there, give it a nice little tug. It's not going anywhere, it's locked in. We can move ahead to the next step.
Okay, so now we're just going to grab our box, being careful for that hose that's behind there. Like I said, if that comes disconnected, just reconnect it. Okay? If you don't, you're going to have a running issue.
I'm going to take this and I'm going to slide it right up on here. Just give it a nice little wiggle. Wiggle, wiggle. There we are. We've got our two bolts. One goes right up top obviously, just got to get it lined up. Be helpful if I could reach it. The other one, right here. All right, just go ahead and tighten up those two bolts. There it is. This one.
Okay, we're going to do our clamp. It's important to make sure that you don't have your clamp up like this, because if you do, the cover won't sit down on there. So I'll just bring it down, have it sitting so it's pretty much going to sit semi level. There we are.
You want to make sure that you can't move the clamp around. This doesn't move around at all. You don't want any air getting sucked in between here and here, because that would be unfiltered air and unmetered air, which would be very bad. You'll have a runnability issue.
Put this up on here. There it is. Grab our clamp, it's easy to squeeze. It goes right up on there. Looks good. Grab our mass airflow sensor wiring, connect this in. Listen for a click. Very nice. We've got this right here, there. This right here, there. Cool.
Grab this. This slides in from the rear first, and then the front. When you're sliding it in you just want to make sure you have these clips right here facing out. Getting it started is the hardest part, because if you don't have it sitting in there just right, then it's not going to sit in right. There we go. Give it a nice tug, just in case. I like to pull forward to back like this, in case these aren't clipped in like I think that they are, and I go like this, it'll probably go pop, and open up. Okay? That way there I know that's not closed. I know that it's definitely closed. We can move ahead to the next step.
We're going to take this, put it right up on here. Bring it down. We've got our two studs, just going to grab our two nuts. Snug these up. Tight, tight. All right, easy peasy.
Thanks for watching. Visit 1AAuto.com, your place for DIY auto repairs, for great parts, great service, and more content.
Shop Products

Pulley Problems Diagnose Noise Under Your Truck Cars Hood
This video shows you how to diagnose squealing and chattering noises coming from pulleys in your vehicle.
