How To Replace Broken Side Rear View Mirror Nissan Murano 2003-07
Created on: 2011-10-24
Need to replace the side view mirror on your 03-07 Nissan Murano? Learn how in this video!
-
step 1 :Removing the Door Panel
- Pry out the trap door behind the door handle and in the pull cup.
- Remove the two uncovered 10mm bolts.
- Pull up on the switch panel.
- Disconnect the harnesses.
- Pry out the door handle bezel.
- Remove all the uncovered 10mm bolts.
- Pry the door panel out around each edge to release the clips.
- Life the door panel up and off.
- Pull the cables out from the door panel and detach.
- Disconnect the courtesy light connector.
- Any clips left in the door, remove with pliers and put back into the door panel.
-
step 2 :Removing the Side Mirror
- Pull off the triangular trim panel.
- Disconnect the mirror harness.
- Pull the harness clips from the door.
- Remove the three 10mm nuts securing the mirror.
- Pull the three tabs on the weather strip from the mirror.
- Pull the mirror out and off.
-
step 3 :Replacing the Side Mirror
- Remove the weather strip pins from the old mirror.
- Feed the harness through the door.
- Line up the mirror and push it into place.
- Replace the three 10mm nuts.
- Replace the harness clips.
- Reconnect the harness.
- Replace the triangular trim panel.
- Replace the weather strip clips.
-
step 4 :Replacing the Door Panel
- Reconnect the courtesy light harness.
- Replace the lock and door handle cables.
- Run the harnesses through the door panel.
- Put the door panel up and into place.
- Push the clips in around the door panel.
- Replace the 10mm bolts in the door panel.
- Reconnect the switch panel and push it into place.
- Replace the 10mm bolt in the pull cup.
- Replace the bolt covers.
Tools needed
-
Socket Extensions
Flat Blade Screwdriver
10mm Socket
Ratchet
Needle nose pliers
Brought to you by 1A Auto.com, your source for quality replacement parts and the best service on the Internet.
Hi I'm Mike Green. I'm one of the owners of 1A Auto. I want to help you save time and money repairing and maintaining your vehicle. I'm going to use my 20+ years' experience restoring and repairing cars and trucks like this, to show you the correct way to install parts from 1A Auto.com. The right parts installed correctly; that's going to save you time and money. Thank you, and enjoy the video.
In this video, we're going to show you how to replace the side view mirror on this 2006 Nissan Murano; same as any 2003 through 2007, and in the video, we show you driver's side. The passenger side is basically the same procedure as well. Tools you'll need for the job are a small flat blade screwdriver, a 10mm socket with a ratchet and extension, and a pair of pliers.
Okay, I'm going to start out. There's a little trap door thing here. Pry that out. Okay, a 10mm screw right behind there, another one right down here; same thing; a 10mm screw, a 10mm bolt, or a Phillips screw there. First, we're going to remove this 10mm bolt here. Okay, now we're going to pull up on our switch. Okay, retrieve that bolt out of there, and from up here, and you pull up on that whole panel. Right in behind there's two tabs, you kind of press them with your thumb. I'm sorry, there's a tab on each connector. Press that with your thumb, pull the connector out. Okay and there's your switch panel off. Okay, now up here, I'm going to use our screwdriver and lightly pry out on the corner. Okay, then pry right around here. Okay, now kind of push down. You can almost see in here. It comes out. Okay, 10mm bolt or Philips screw in back in there. One down there, one down there, in addition to the one in the door handle.
I fast forward here as I remove those four screws. I'm using a socket with a ratchet and extension as well as a Philips screwdriver would work. Okay, now you want to start over in the far corner. Try and work your fingers underneath. You'll kind of notice there is a spot right here that doesn't really move, pull on that. You pull the clip free. Okay. It feels like my door panel's been pried off because it's coming off a little easy, but you just got to work your way around and pull the door panel off, free, and then it comes up and off.
Okay, now behind, you got these two cables. You pull the cables out away from your door handle first. Okay, and then they spin and you can pull the connectors out and then way down at the bottom, another connector for your courtesy light, press the tab and disconnect it. Door panel, a couple of these may have kind of stayed behind. Okay, we will put these back on the bottom of our door panel.
Mirror obviously mounts right here. There's this little piece of trim just work your fingers underneath it; pop it off. Okay, connector right here Push on a tab. Disconnect it, and then we have a little tab right there that holds it in. There's another one up here, and now there are three 10mm nuts that hold the mirror in place. We'll speed it up as I just use my socket ratchet and extension to remove those three nuts. Okay, the mirror is not connected to this weather strip, so just carefully going to peel it off; those three tabs. Okay, there's the mirror out.
Here's our original mirror. Okay, here's how the new mirror from 1A Auto comes, and the most important thing I'm going to show you is that the connection is right, and you'll notice that my original mirror has the painted back. If your old mirror is wiped out and you can get the back off, then it should snap onto the new one. If your back is damaged because most of the time they are damaged, the new mirror comes with a black back, and you can generally just paint that to match and snap it on there.
Okay, obviously, my original mirror is fine, but I did want to just show you a new mirror from 1A Auto. It comes with everything you need to put it together. You will want to take these little pins from your original. They probably need a pair of pliers or maybe just your fingers. Okay, you pull those pins out and you use them to mount the weather strip onto the new mirror. I'm going to reinstall my original one because it's fine. It's not broken. Okay, mirror on. Put it in place.
I'm going to fast forward here a little bit as I just put those three 10mm nuts back on, then tighten them up with my socket ratchet and extension. Tighten them up firm, but don't over tighten them. It's possible to reset these clamps; you want to. Okay, quick test of the mirror. Now, put this back on. Okay, and make sure we get this weather strip in place. Hold the door real close. Okay, the one panel with the L is the lock; that goes up higher; kind of bend it. Put it in there, and lock it; same thing here. Okay. Pull the panel up. Push it against the window and down. Okay, you can look right back in here and pretty much see that that clip is lined right up with the hole.
Okay, now the door panel is in place. We'll speed it up here. I'm just putting the bolts back in; the one at the top of the door pull, then the ones kind of down and inside. Then I put my switch plate in and bolt that down, and when you're tightening these bolts, you want to get them firm, but don't over tighten them. Finish up here as we put the bolt into the door handle. Then we put the little covers on each of the screws down in the cup in the door handle itself and then put that bezel back on.
We hope this helps you out; brought to you by www.1AAuto.com, your source for quality replacement parts and the best service on the Internet. Please feel free to call us toll-free 888-844-3393. We're the company that's here for you on the Internet and in person.
Shop Products


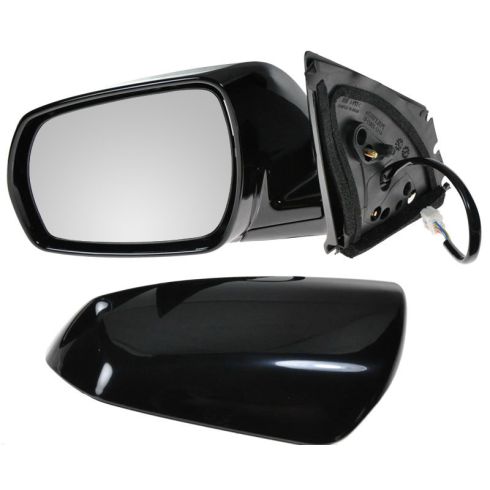
2005-07 Nissan Murano Driver Side without Smart Entry System Power Heated Paint to Match Mirror with Heat TRQ MRA05903
Part Details:
- No
- Black
- 5
- No
- No
- No
- Plastic
- Flat
- No
- Black
- No
- No
- No
- No
- No
- No
- No
- Manual
- No
- Clear
- No
- 3
- Yes
- Electric
- No
- No
- Paint to Match
- Features and Benefits
- 13.39 in
- Smooth
- Smooth
- Yes

How to Replace Side Rear View Mirror 1992-99 Buick LeSabre
Find out how to replace the door panel and the side view mirror with this how-to video
