
How to Replace Blower Motor with Fan Cage 1998-2002 Honda Accord
Created on: 2011-06-17
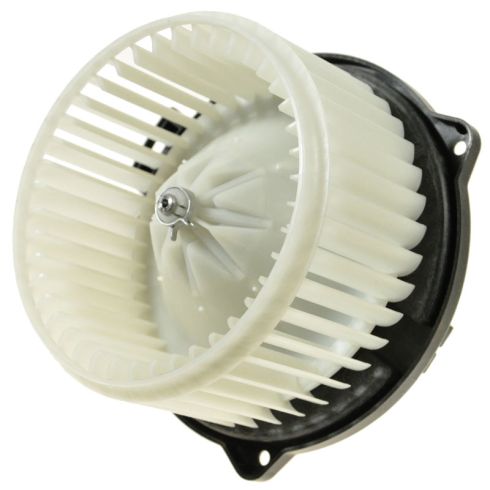
Check out this video to learn how to replace the heater and AC blower motor on your 98-02 Honda Accord. 1A Auto shows you how with this video.
-
step 1 :Remove the AC heater blower motor
- Under the passenger side dash, remove the three T25 screws using your driver.
- Unplug the wiring harness.
-
step 2 :Install the new AC heater blower motor
- Plug in the wiring harness
- Anchor the new AC Heater blower motor by screwing in the three T25 Torx screws.
Tools needed
-
T15 Torx Driver
8mm Socket
Ratchet
Flashlight
Brought to you by 1AAuto.com, your source for quality replacement parts and the best service on the internet. In this video we're going to show you AC and heater fan replacement on this 2000 Honda Accord. Only tool you'll need is an 8-millimeter socket with a ratchet and extension and actually a flashlight would probably help as well.
Okay, your blower motor is up and underneath your glove compartment. The fan is held in by three T25 screws, one there, one over here, and one right there. You can see there's a few harnesses running across it, and here's the plug and the tab on the side closest to your kick panel. Press the tab and unplug it. Okay, and then you can unplug this one as well, the tab right here.
Now, I've got my harness connection undone. I've undone this connector that goes up to the resistor and I've pulled this harness free. You can see right here there's a little tab that went up into that hole. Eight-millimeter socket with a ratchet and extension. Okay, I'm going to fast-forward here as I remove those three 8-millimeter bolts that hold the fan up and you can see that this isn't that difficult of a project. The problem is that all the screws are either blind or you have to contort yourself to try and see them. Here's your motor out, so on your left is the new motor from 1AAuto, old motor from vehicle. You can see the connections are the same.
Everything in the bottom is the same. New one from 1AAuto is going to bolt right in. You want to start your new one in. Have the harness connection closer to the outside or passenger side of the vehicle and you pull; there's a harness right here, you kind of pull to the side. Make sure your harness doesn't get caught up in there. Pull everything to the side. Put it up in. Again, there's the harness that runs along there is just kind of getting caught a little bit. Pull that to the side, get it up in. Okay and it's pretty easy to locate the right position. Again, check to make sure that harness runs, doesn't get caught. It's kind of caught in the front. All right and now I can start with the screw that's closest and easiest.
Okay and I'm going to fast-forward as I start the other screws and then use the 8-millimeter socket with the ratchet and extension to tighten them up. You can get the fan in slightly wrong which causes it to make a load noise. You just pull it back out and reinstall it a little more carefully to get it right. One quick test.
We hope this helps you out. Brought to you by www.1AAuto.com, your source for quality replacement parts and the best service on the internet. Please feel free to call us toll-free, 888-844-3393. We're the company that's here for you on the internet and in person.
Shop Products

How to Replace Heater Blower Motor 1992-96 Toyota Camry
If your 92-96 Toyota Camry is blowing weak or not at all, watch this video to learn how to replace the blower motor! 1A Auto experts will guide you
