How to Replace Blower Motor with Fan Cage 1982-88 Chevy Camaro
Created on: 2011-07-21
Need to replace the blower motor on the 82-88 Chevy Camaro. This video will help you do it yourself
-
step 1 :Removing the Blower Motor
- Remove two 7mm bolts from the blower motor bracket
- Disconnect the blower motor ground
- Disconnect the blower motor lead
- Pull the bracket up and out of the way
- Pull the vent hose out of the blower motor
- Remove the five 7mm bolts from the blower motor, using a flexible joint for the lower bolts
- Pull off the blower motor brace
- Pull out the blower motor
-
step 2 :Installing the New Blower Motor
- Push the new blower motor into place
- Put the blower motor brace into place
- Start the 7mm bolt into the blower motor brace
- Start the remaining four 7mm bolts into the blower motor
- Tighten the five 7mm bolts into the blower motor
- Put the ground strap into place
- Push the vent hose into the blower motor
- Connect the blower motor ground
- Connect the blower motor lead
- Put the blower motor bracket into place
- Insert the two 7mm bolts into the bracket
Tools needed
-
Socket Extensions
7mm Socket
Ratchet
Swivel
Brought to you by 1AAuto.com, your source for quality replacement parts and the best service on the Internet.
Hi, I'm Mike Green. I'm one of the owners of 1A Auto. I want to help you save time and money repairing or maintaining your vehicle. I'm going to use my 20-plus years experience restoring and repairing cars and trucks like this to show you the correct way to install parts from 1AAuto.com. The right parts installed correctly: that's going to save you time and money. Thank you and enjoy the video.
In this video, I'm going to show you how to replace the blower motor, the A/C and heater fan motor, on this 1986 Camaro IROC, same as pretty much any '82 to '92 Camaro or Firebird. The only tool you'll need is a 7mm socket with a ratchet and extension. You'll also need a flexible joint. You'll see how I use that.
The blower motor's located on the passenger side of the firewall. It's right here. You can see there's some wiring and different stuff around it. First thing I'm going to do is just clear out some of this stuff. There's a bracket right over here. It's held in by two 7mm bolts. I'm just going to remove those 7 mm bolts. Now, I'm going to unplug the ground here. You pinch a little tab, pull it off, and your lead for the motor. Pull this up and out of the way. Now, we can see in here, better, two of the bolts: one here, two and three. There's this hose. I'm just going to pinch it, and gently pull it out of the motor. You'll see another bolt down in there. There's one last one right down there. These three, up here, are easy to get to. For these two down there, you're going to need an extension and flexible joint.
Let's do the lower ones first. I've got a ratchet and extension. This flexible joint lets me get the extension down in there with a 7mm socket. Feed the ratchet down in there. Feel for the head of the bolt with your finger. Then, put the ratchet extension and socket down in there. With one hand, I'm holding it on to the head of the bolt. Obviously, with the other, I'm turning the wrench. This is probably the more difficult of the two. I'm actually going to lift this harness up. The angle's not as steep. I'm going to fast forward as I finish getting that bolt out. Then, I take off the flexible joint, and I'm able to get the other three bolts that hold the motor to the firewall off fairly easily. Once I have those five bolts out, then I basically just pull on the motor to break it free. After that, you need to remove another bolt, and I'll show you that, to remove another bracket.
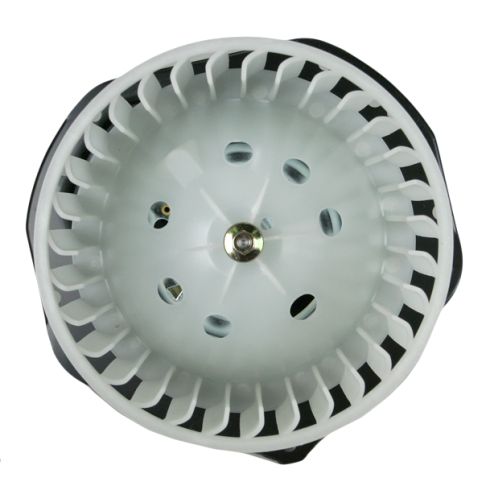
There's a piece on here and then one more bolt here. Once you remove this piece, get that extra piece. That allows the fan to come up and out.
Here's the new fan from 1A Auto. I'm just going to feed it down in here past all the wiring and stuff. Put this down past this brace. To get it past that brace, just make sure the lower harness is not in your way. I've got the flat section facing down right now to get it past all this wiring. It's somewhat in. Take this piece. Just to note, I am holding it wrong right there. I do flip it around as I put it in, but it's a little tough to see. The larger or thicker section goes to the outside and more towards the bottom. This piece goes on just like that. I'm going to speed it up here as I . I don't quite tighten that one yet. Then, I start all the other three screws at the top of the motor into the firewall. Then I am able to reach down and start the screw that is closer to the engine of the vehicle. You can reach down by hand and start that one, but for the one that is closer to the outside of the vehicle or to the fender, I'll show you a little more detail on how to get that one going.
To get this last one in, what I did is, I took a little bit of glue, just a little bit, put it on the head of that screw so it will stay in there no matter what angle I have it at. I'm going to just narrate this because you can't really film it, because it's such closed quarters. What I basically ended up doing is "gluing" the screw in there into the socket, feeding it down in there. Then once I got it into place, I was able to twist it just a little bit, enough to hold it into place. Then I took the socket off, and I was able to reach my hand down in there barely enough and start the screw with my hand a little bit, and then, go back with the flexible joint and the socket. Quite honestly, I wouldn't think any less of anyone if they didn't get this screw in because it did take me about five tries. Really, the motor's not going to perform worse if you don't get that last screw in there. There's four other ones holding it. If you want to try it, and you're persistent like I am, and you get it in there, then all the power to you. We'll fast forward again as I just tighten up the rest of the bolts. Make sure you tighten up all five of the bolts that hold the motor on, then that bolt that holds the piece that allows you to pull the motor up and out, as well as put your ground strap back on with a 7mm bolt. Once your motor's all bolted correctly then make sure you reconnect that vapor hose. Then connect your ground and your main lead. Then bolt that resistor and bracket back up to the firewall.
We hope this video helps you out. Brought to you by www.1AAuto.com, your source for quality replacement parts and the best service on the Internet. Please feel free to call us toll-free, 888-844-3393. We're the company that's here for you on the Internet and in person.
Shop Products
How to Replace Blower Motor 1992-2000 Chevy Tahoe
If you need a new blower motor, watch this video to learn how to install one in your 1992-2000 Chevy Tahoe.
