How to Replace Blower Motor Resistor 1995-2001 Ford Explorer
Created on: 2010-10-05
Watch this video to learn how to replace the blower motor resistor on your 95-01 Ford Explorer. 1A Auto will show you how!
-
step 1 :Accessing the Blower Motor
- Remove the 10mm bolt on the cruise control motor.
- Pull the motor aside.
- Undo the clips on the air box.
- Slide the box over, up and to the side.
- Lift the air filter out.
- Lift the bottom half of the box up and pry it out and up.
- Put the grommets back into place.
- Remove the bolts securing the washer bottle.
- Lift the bottle up and forward.
-
step 2 :Removing the Resistor
- Disconnect the harness on the blower motor.
- Disconnect the tube.
- Remove the four 8mm bolts.
- Pull the motor out.
- Remove the two 8mm bolts securing the resistor.
- Disconnect the harness.
-
step 3 :Replacing the Resistor
- Push the resistor into the harness clip.
- Replace the resistor and the two bolts that secure it.
- Push the blower motor into place.
- Replace the four 8mm bolts
- Reconnect the tube.
- Reconnect the harness.
-
step 4 :Replacing the Moved Items
- Put the washer bottle back into place. Replace the bolts that secure it.
- Push the bottom of the air box into place.
- Replace the air filter.
- Put the top of the air box back into place and push the clips back down.
- Replace the cruise control motor and the bolt that secures it.
Tools needed
-
Socket Extensions
Flat Blade Screwdriver
8mm Socket
10mm Socket
Ratchet
11mm Socket
Brought to you by 1AAuto.com, your source for quality replacement parts and the best service on the Internet.
Hi, I'm Mike Green. I'm one of the owners of 1A Auto. I want to help you save time and money repairing and maintaining your vehicle. I'm going to use my twenty-plus years experience restoring and repairing cars and trucks like this to show you the correct way to install parts from 1AAuto.com. The right parts, installed correctly that's going to save you time and money. Thank you, and enjoy the video.
In this video, we're going to replace the blower motor resistor in this Explorer. You know if you're having a resistor problem if your fan works , you know, say it works on low, but it doesn't work on two and three, and then it works on high, that's usually a sign that your resistor's gone bad. Or it works on some speeds except for high or low, or something like that.
The tools you'll need are basically the same as for the blower motor. You got to remove the blower motor and then get the resistor.
Okay, so we're looking under the hood here, at the passenger side. And first thing we're going to do is remove this little guy, which I believe is a servo motor for your cruise control. Just a 10mm socket or wrench. Once you get the bolt out, kind of shake it out. Put it right up there for now. Now that you have that aside, you're actually going to want to unbolt your radiator bottle and washer fluid bottle, which means that, first, you have to remove your air box.
So first you just want to undo the clips here on each side. And your air box comes up and slides over, and then you can lift it up and out. I'm just going to kind of move it over here a little bit. Now you can just lift your air cleaner up and out. Okay, and then your air box is actually just into some rubber grommets here and here, and also, you can see, right into the fender here and here. So to get your air box out, what you're going to want to do is just grab hold of it and you pull up really firmly and one will pop. And now take a screwdriver and put it under here and that'll help you to pop this one out. Kind of loosen on that screwdriver. Loosen up my air box. And another one pops. Okay, and now you pull it out this way from the fender. Okay. Then you got to take out, off these rubber grommets. And you can see here's the things on the bottom that hold it into the bottom. And I'm going to take these grommets and just going to put them back into the fender here.
Okay, now we're going to remove the four nuts and bolts that hold the washer and radiator bottle in place. One there, one there. Okay, one right in there, and then one right down there.
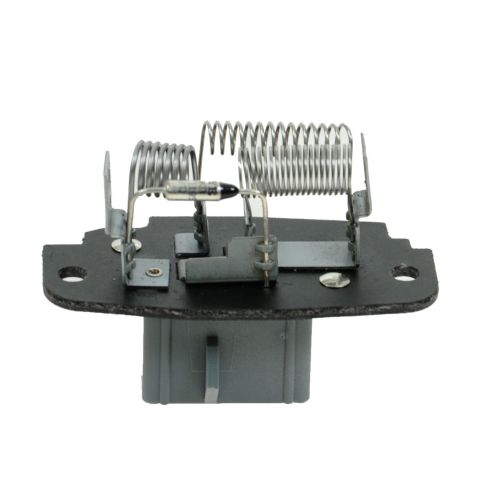
Okay, and interesting to note that the nuts that go down onto the fender, the lower nuts, are 11 mm, and then the two bolts that go into the side of the fender are actually 10 mm. So I'll quickly just remove those. And once you have them unbolted, you just want to lift it up. Pop the studs. And then just slide forward some just to give yourself a little more room to get to the blower. Okay, now here's your blower motor. You want to disconnect your harness here, just like that. Then this tube here, just a rubber band, kind of, that goes like that and comes away, and then you have four 8mm bolts: one, two, three, and then way down there, four. Now you can pull your motor right up. Get your harness out of the way. And it comes up and out. Okay, now with the motor out of the way, you can see right down here is your resistor, and there's an 8mm bolt right here that you want to take off. Okay and there's another bolt right over here.
Okay, now your resistor comes up and out, and basically the harness is pronged with two tabs, and you want to just kind of pull. Try and work your thumb underneath each tab, and pull. And then on the opposite side, you may want to use, take a screwdriver, work it under one of the tabs. Pull some. Get your finger under the other tab, and pull. Okay, and there are a few adjectives and adverbs I used during this, but really it's just a matter of working it in there and pulling it really hard and then you'll eventually get it apart.
Should just be, the plastic is coming out but the, there we go.
Okay, looking inside the contacts in this resistor, you can see, especially this one up here getting pretty rusty. And that's what happens, they get pretty rusty and then they take too much, they give too much resistance, and the fan doesn't work at certain speeds. Now this one is still working okay, so I'm going to put it back in. Okay, and you can see, can't really do this incorrectly. Plug it back in. Okay, and I'm going to just kind of speed up through putting it back in 'cause it's just a matter of plugging it back in and then putting it down in there and bolting it up. And then once you get them pretty close.
Okay, tighten them up. They don't have to be incredibly tight, but they should be nice and snug. Okay, and I'm going to kick it into lightning speed here and just fast forward through reinstalling the blower motor and getting everything back in place. If you want to see this in regular speed, just check out our video on removing and replacing the blower motor in an Explorer. Or, if you want, you can just follow my lightning fast hands and probably glean enough information from this to do it. But, yeah, once this is done in a little bit, we appreciate it, and we hope this helps you out.
We hope this helps you out. Brought to you by www.1AAuto.com, your source for quality replacement parts and the best service on the Internet. Please feel free to call us toll free: 888-844-3393. We're the company that's here for on the Internet and in person.
Shop Products


How To Replace Blower Motor Resistor 2001-03 Dodge Grand Caravan
How to repair, install, fix, change or replace a bad or broken blower motor fan speed resistoron Dodge Grand Caravan, Plymouth Voyager, and Chrysler Town & Country
