How To Replace Blower Motor 1999-2005 Volkswagen Jetta
Created on: 2014-04-08
Watch this video to learn how to fix your heat or A/C if the fan won't blow. The experts at 1A Auto show you how to replace the blower motor in your 99-05 Volkswagen Jetta.
-
step 1 :Accessing the Blower Motor
- Remove the three T20 Torx bolts from underneath the glove box
- Open the glove box
- Remove three T20 bolts from the top of the glove box
- Pull off the glove box side panel by hand
- Remove the T20 Torx bolt from the side console panel
- Pull the glove box panel back
- Lift the glove box panel up and out
- Disconnect the wiring harness from the glove box
-
step 2 :Removing the Blower Motor
- Pull the soundproofing aside
- Pull away the insulation below the blower motor
- Disconnect the blower motor resistor wiring harness
- Remove the two 6mm bolts from the blower motor resistor
- Pull the wiring harness out of its clip
- Disconnect the blower motor wiring harness
- Pull the blower motor resistor down and out
- Slide the blower motor down and out
-
step 3 :Installing the New Blower Motor
- Push the new blower motor up into place
- Push the blower motor resistor into place
- Insert the two 6mm bolts into the blower motor resistor
- Connect the blower motor resistor wiring harness
- Push the insulation into place
- Push the wiring harness onto its clip
- Connect the blower motor wiring harness
- Pull the soundproofing into place
-
step 4 :Reinstalling the Glove Box
- Connect the wiring harness to the glove box
- Slide the glove box panel under the console side panel
- Insert the T20 bolt into the console side panel
- Insert the three T20 bolts into the bottom of the glove box
- Open the glove box
- Insert the three T20 bolts into the top of the glove box
- Push on the side glove box panel
Tools needed
-
T20 Driver
6mm Socket
Ratchet
Brought to you by 1AAuto.com, your source for quality replacement parts and the best service on the Internet.
Hi, I'm Don from 1A Auto. I hope this how-to video helps you out, and next time you need parts for your vehicle, think of 1AAuto.com. Thanks.
In this video, we're going to show you how to replace the blower motor on this 2004 Volkswagen Jetta, and it's the same part and similar process on these Jettas, from 1999 to 2008. The items you'll need for this are a new blower motor from 1AAuto.com, a T20 Torx driver, and a 6mm socket and ratchet.
Start off by removing these three T20 Torx bolts underneath your glove box. We will just fast forward as Don does that. Pull down your glove box, and then remove these three T20 Torx bolts right here. Now just pull off the side panel and remove this T20 Torx bolt right over here. This will allow you to be able to pull this panel back so that you can get our glove box panel out of the way. Just pull your glove box panel back, and then pull that panel back and then lift the glove box panel up and out. Now push the tabs on either side of this harness and disconnect it and your glove box is free. If one of these speed nuts falls off, just push it back into place.
Now, tuck your soundproofing out of the way, and your blower motor's right here. To get to it, we're going to need to remove the blower motor resistor. Just pull this insulation around that clip and then remove these two 6mm bolts that hold in your resistor. It helps to get the other one if you first disconnect this harness by just pushing both tabs, pulling it free, and then pulling the harness up and out of the way. We will just fast forward as Don just removes those two 6mm bolts. Pull the resistor down, and now you can just slide your blower motor down and out.
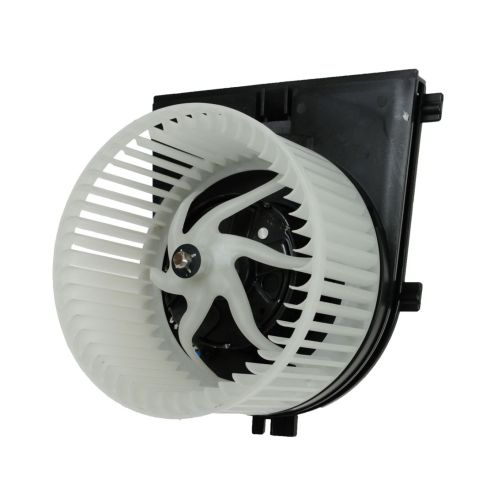
On the left is the old blower motor. On the right is the new one from 1A Auto. You can see that they are very similar and they'll fit exactly the same. Feed your new blower motor up into place, and once you've got it up into place, just hold it there and then take your resistor and put that into place. Once your resistor is lined up in place, then just replace those two 6mm bolts. Reconnect your harness and then tuck this insulation panel back up and around that clip, and then tuck it in on the sides. Push the harness clip back into place and then reconnect your blower motor harness.
Then, pull this insulation back down into place, reconnect this harness, and then pull back that lower panel and tuck the tab on your glove box panel down into it. Then line up your glove box, push in the side, and then push the panel back into place. Now, replace this T20 bolt right here, and we will fast forward as Don replaces the three T20 bolts along the bottom of the glove box panel. Put down your glove box and then replace these three T20 bolts up along the top of your glove box panel. We will fast-forward as Don this. Now, push in the back of this panel first, and then line up the clips and push in the front. Then, close your glove box and you're all set.
We hope this video helps you out. Brought to you by www.1AAuto.com, your source for quality replacement parts and the best service on the Internet. Please feel free to call us toll-free, 888-844-3393. We're the company that's here for you on the Internet and in person.
Shop Products
How to Replace Blower Motor with Fan Cage 1996-2013 GMC Savana
Follow along to learn how to replace the blower motor on your 96-13 GMC Savana or Chevy Express.
