How to Replace Ball Joint 1999-2005 Volkswagen Jetta
Created on: 2014-03-30
If your 98-10 Volkswagen Golf, Jetta, or Beetle needs a new ball joint, check out this 1A Auto how-to video, and you can learn to replace it yourself!
-
step 1 :Removing the Wheel
- Remove the lug nut covers with a 7mm Allen bit
- Push the lug nut key into the special lug nut
- Loosen the lug nuts with the vehicle on the ground
- Raise the vehicle with a floor jack
- Secure the vehicle on jack stands
- Remove the lug nuts
- Pull off the wheel
-
step 2 :Removing the Lower Control Arm
- Remove the first 18mm bolt from the control arm with a ratchet and pipe for leverage
- Loosen the second 18mm bolt with the ratchet and pipe
- Hold the bolt with an 18mm wrench
- Remove the second 18mm bolt with the ratchet
- Remove the 16mm bolt from the sway bar link
- Attach locking pliers between the wheel knuckle and the ball joint nut
- Remove the ball joint nut with a 19mm wrench
- Pull the wheel aside
- Pull the control arm down and out
-
step 3 :Removing the Ball Joint from the Control Arm
- Remove the three 13mm bolts that hold the ball joint in place
- Pull the ball joint out of the control arm
-
step 4 :Attaching the New Ball Joint to the Control Arm
- Put the new ball joint into place on the control arm
- Put the ball joint bracket into place
- Thread the 13mm bolts through from the bottom
- Tighten the 13mm bolts to 40 foot-pounds of torque
-
step 5 :Installing the Lower Control Arm
- Push the control arm into place
- Tap it into place with a hammer if necessary
- Push the 18mm bolts and associated nuts into place
- Push the ball joint into the wheel knuckle
- Put the 19mm nut onto the ball joint
- Tighten the 19mm nut
- Tighten the 18mm bolts to 70 foot-pounds
- Insert the 16mm bolt into the sway bar link
-
step 6 :Reattaching the Wheel
- Slide the wheel into place
- Start the lug nuts by hand
- Tighten the lug nuts preliminarily
- Lower the vehicle to the ground
- Tighten the lug nuts to 100 foot-pounds in a crossing or star pattern
- Reattach the lug nut caps
Tools needed
-
Hammer
Torque Wrench
18mm Wrench
16mm Socket
17mm Socket
Jack Stands
19mm Wrench
18mm Socket
Ratchet
Floor Jack
7mm Allen Wrench
13mm Wrench
Brought to you by 1AAuto.com, your source for quality replacement parts and the best service on the Internet.
Hi, I'm Don from 1A Auto. I hope this how-to video helps you out, and next time you need parts for your vehicle, think of 1AAuto.com. Thanks.
In this video we're going to show you how to replace a front lower ball joint on this 2004 Volkswagen Jetta. We show you on the passenger's side, but the driver's side is the same procedure. The items you'll need for this are a new ball joint from 1AAuto.com, 16, 17, and 18mm socket and ratchet; 13, 18, and 19mm wrenches, 7mm Allen bit, locking pliers, torque wrench, jack and jack stands, and a hammer.
Start off by using a 7mm Allen bit, and just prying out these lug nut caps. We'll fast forwards as he does the rest of those. You'll notice that this lug nut is a little different than the others. You're going to need a key to remove it, and that key can be found right here next to your jack stand in your truck. You can just push it into that lug nut, and now it removes just like a regular lug nut. If you don't have the benefit of air power tools, then loosen up the lug nuts while the vehicle is on the ground. Raise and support the vehicle and them remove them the rest of the way. Once the lug nuts are removed, the wheel will pull right off.
Your lower control arm is located right here, and you want to start off by removing these two 18mm bolts. You're going to see on the first one we use a socket and ratchet and a piece of pipe for some extra leverage to get it going. For this bolt, you're going to need both hands to remove, so first just break it free. Then you're going to want to put an 18mm wrench on the top of it. Then use your socket and ratchet for the bolt itself. We'll just fast forward as Don does this. Next, remove this 16mm bolt in your sway bar link. At the top of this ball joint there's a 13mm nut, and you want to go ahead and remove that. To do that, you want to put some locking pliers in between the gasket on the ball joint and the wheel knuckle. Using a 13mm wrench remove the nut at the top. We'll just fast forward as Don does this. Once that's removed just pull the wheel away, and then pull the control arm down and out. Next, remove these three 13mm bolts that hold the ball joint in place. Once those are removed your ball joint pulls right out.
On the left is your old ball joint, on the right is the new one from 1A Auto. You can see they're identical and they're going to fit exactly the same. Take your new ball joint, and you can see we're using a new control arm just because of the condition of our older one. You just put that bracket into place and then put the bolts up through the bottom. We'll just fast forward as Don does this, and then tightens those up. Then torque each of these to 40 foot-pounds.
Push the lower control arm back into place. You may need a hammer to help push it back. Then put one of your bolts in, and if doesn't fit, hammer it back a little further. Push the bolt in all the way, and then put the nut on the other side of it. Just make sure the other side lines up, push that bolt back into place. Now you can line up your ball joint and push that up into the wheel knuckle. Then just replace that nut at the top of the ball joint. We'll fast forward as Don tightens up those two bolts and that nut at the top of the ball joint. The nut on our new ball joint was 19mm. Now torque those two 18mm bolts to 70 foot pound. Replace that 16mm bolt and your sway bar link, and tighten it up. Push the wheel back into place and line up the holes for the lug bolts. Then replace the lug bolts. If you don't have air powered tools, you want to tighten these preliminarily, lower the vehicle and then tighten them the rest of the way. Then lower the vehicle and torque each lug nut to 100 foot pounds in a crossing pattern. Replace your lug nut caps and you're all set.
We hope this video helps you out. Brought to you by www.1AAuto.com, your source for quality replacement parts and the best service on the Internet. Please feel free to call us toll-free, 888-844-3393. We're the company that's here for you on the Internet and in person.
Shop Products


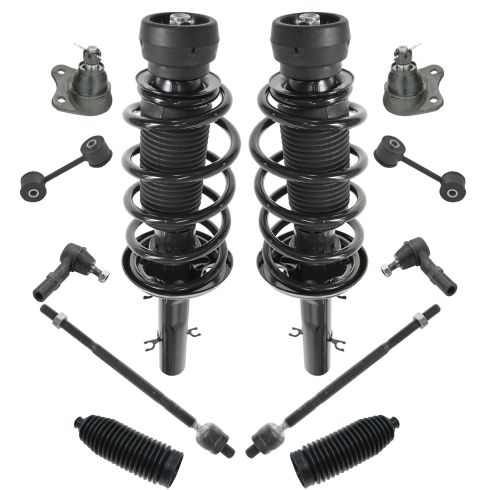
VW Beetle Golf Jetta Front 12 Piece Steering & Suspension Kit TRQ PSA59611
Part Details:
- (2) Front Lower Ball Joints
- (2) Front Outer Tie Rods
- (2) Front Sway Bar Links
- (2) Front Steering Rack & Pinion Bellows
- (2) Front Strut & Spring Assemblies
- (2) Front Inner Tie Rods
- 12 Piece
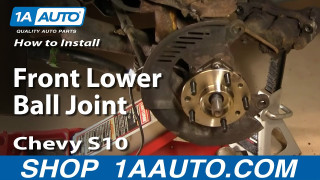
How to Replace Ball Joint 1997-2004 Chevy S10 Pickup Part 2
In this video, 1A Auto shows you how to replace the front lower ball joint in a 1997-04 Chevy S10 pickup.
