How to Replace Ball Joint 1997-2004 Chevy S10 Pickup Part 2
Created on: 2010-05-04
In this video, 1A Auto shows you how to replace the front lower ball joint in a 1997-04 Chevy S10 pickup.
-
step 1 :Clean up the top of the upper control arm
-
step 2 :Install the ball joint
- Line up the boot on the ball joint and put the ball joint in place and put the nut on it.
- Bolt the ball joint in with the four nuts and bolts.
- Torque them to 25 ft lbs
-
step 3 :Install the tie rod.
- Put the tie rod in place
- Bolt it in at 55 ft lbs.
- Put in the cotter pin, hammer it through and bend it with a pair of pliers.
- Fill the tie rod end with grease.
-
step 4 :Install the hub
- Put the O ring into the hub.
- Mount the hub and thread the ABS harness into place.
- Bolt the hub into place and make sure the shield is in the correct position.
- Use a star like pattern when bolting in the hub and torque the bolts to 65 ft lbs.
- Clip and bolt the ABS harness in and connect it.
-
step 5 :Install the brakes
- Mount the rotor and caliper
- Bolt the caliper bolts in and torque to 50-60 ft lbs.
- Use a rubber mallet to help get the caliper on.
-
step 6 :Install the hub nut and wheel.
- Before putting the wheel on, put the hub nut on and tighten but do not torque.
- Put the wheel back on and lower the car.
- Torque the hub nut to 90 ft lbs.
- Using a star pattern, torque the wheel lug nuts to 75 ft lbs.
- Put the cap and lug nut covers on.
Tools needed
-
20mm Socket
24mm Socket
35mm Socket
Hammer
Socket Extensions
Pry Bar
Jack Stands
Grease Gun
Rubber Mallet
Chisel
Ratchet
Floor Jack
13mm Wrench
11mm Socket
12mm Socket
13mm Socket
14mm Socket
Torque Wrench
15mm Socket
Rust Penetrant
18mm Wrench
16mm Socket
17mm Socket
18mm Socket
19mm Socket
21mm Socket
Flat Blade Screwdriver
10mm Socket
22mm Socket
Brought to you by 1AAuto.com your source for quality replacement parts and the bet service on the internet.
Hi I'm Mike Green; I'm one of the owners of 1A Auto. I want to help you save time and money repairing and maintaining your vehicle. I'm going to use my twenty plus years experience restoring and repairing cars and trucks like this to show you the correct way to install parts from 1AAuto.com. The right parts installed correctly that's going to save you time and money. Thank you and enjoy the video.
Okay this is kind of part two we are going to install the ball joint on this S-10 four by four the same as any S-10, S-15, Blazer or Jimmy. The tools you're going to need are various size metric sockets including a thirty five millimeter socket for the hub, jack, jack stands, screwdriver, pry bar, cold chisel, air chisel if you're replacing your original ball joints, some penetrating oil, torque wrench and also a rubber mallet and a hammer.
Okay we are going to start out just to clean up the top of the upper control arm just to get some of the dirt and stuff off of it and now here I'm just lining up the boot on the ball joint and then I'm going to put the ball joint down into the steering knuckle and push down and then put the nut onto the ball joint. Okay and once I tighten that up a little bit by hand and then I just push the steering knuckle down onto the control arm so it's in place.
Okay and now what I'm going through in fast motion here is I'm just putting the four bolts, the ball joint comes with brand new bolts I'm putting the four bolts down in and the nuts on and then I'm starting them with my ratchet so I'm just putting the bolts down in and starting the nuts on the other end and then once this slows down I will be torqueing them and you torque these nuts to about twenty five foot pounds. So you can see here I'm torqueing them and then I go across and torque one on the front and torque one on the back and then torque the other back and then torque the front. So you kind of go in a criss-cross motion. Okay I'm finishing up here torqueing it.
Okay and now I'm going to put the tire rod end down in and put the bolt on. Okay and I'm torqueing the bolt to about fifty five foot pounds and then I basically look to see where the hole is because the nut has ridges in it for the cotter pin to go through and I can see that I just need to tighten it up here just a little bit more so that the cotter pin will go through. So now I'll knock the cotter pin through. It shouldn't take much if you're doing it right to get the cotter pin through and then bending it with some pliers. Okay and then I'm going to repeat that procedure for the lower ball joint. I'm putting it on and torqueing the nut to fifty five foot pounds and checking it out to see where the cotter pin is lined up and tighten it up a little bit more so you have a clear shot. Okay not the best shot of this here but down on the bottom right you can see a little socket I'm just putting the grease fitting in right there.
Okay no is as good of a time as any to grease the lower ball joint, the tire rod end and then the upper ball joint. Okay here I'm actually putting the jounce bumper back in. You just put it up in and put the bolt on top and tighten it up. Okay preparing to put the hub on just putting the O-ring on the hub. This goes on here like that and put it through and the connector is going to be where that big gap is. I'm just going to get this up in here and get it somewhat lined up, grab one of our bolts and make it one of the easy ones down here and thread it through and torque it in and get it going a little bit.
Okay now I'm going to speed it up a little bit and I'm just going to work the other two bolts in and then I'm going to use the ratchet and socket and tighten them up shifting the steering a little bit to get to them and you do want to try to tighten them up evenly. You don't just want to tighten one all the way up you want to pull the hub into the steering knuckle pretty much evenly so I'm just kind of rotating around and tightening and then after this I will set my torque wrench to sixty five foot pounds and torque them up.
Now you take it up to about sixty five foot pounds. Now we are going to put the harness back in. Okay so remember here you have a little ten millimeter bolt on that first clip and then you've got a thirteen millimeter bolt and nut on that second clip and you have to clip it in together with the brake line. The hub harness goes in behind the brake line so the bolt goes through the hub harness first and then the brake line harness and then it's opposite on the frame connector the brake line goes onto the frame and the hub harness goes on top of it. Okay so tighten up that bolt, tighten up the frame and then you can take the clip and put it onto the frame and connect them together and then once they're connected pull your flap back down and then you're all set.
Okay here I'm putting the rotor back on and I apologize for the poor camera work here I didn't realize that I wasn't shooting it very well. I'm putting the lug nut just one on just to kind of keep the rotor in place it makes it easier to get the caliper on. Okay now I'm grabbing the caliper. I'm also not touching the disc or the brake pad services. You want to try to keep them clean it keeps your brakes working better. If you do hit them just use a little linseed oil or brake parts cleaner and then I use a rubber mallet to try to persuade the caliper on there, put the bolts in for the caliper they should be torqued to fifty to sixty foot pounds. The top I didn't get a torque wrench on so I used my well calibrated arm and hand as you'll see. After that, torque up the bottom one correctly.
Okay so I'm going to tighten the hub nut with an impact wrench and I'm going to watch back here and you can see that there's a little gap right here this shiny ring and that will close up as I tighten and I will just stop before that closes all the way because I want to tighten that with a torque wrench when the car is on the ground.
So I re-did my lower ball joint those four bolts are done and the bottom one is torqued with a cotter pin and I had this apart and that's torqued with a cotter pin. Okay I replaced my hub and those three bolts have been torqued. Okay I put my brake back on and those bolts have been torqued and I re-installed my line here. Okay and that's all tight so now I can put my wheel back on and I'm going to torque the hub nut to ninety foot pounds. Okay and now I'm going to torque the wheel lug nuts to seventy five foot pounds. I put my cap back on and the lug nut covers.
We hope this helps you out. Brought to you by www.1AAuto.com your source for quality replacement parts and the best service on the internet. Please fee free to call us toll free 888-844-3393. We are the company that's here for you on the internet and in person.
Shop Products


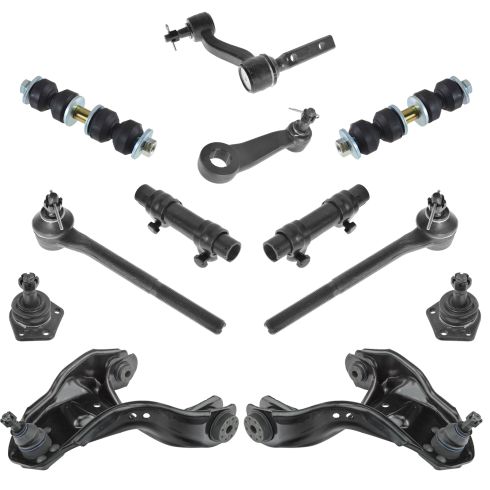
Chevrolet GMC Olds Isuzu Front 12 Piece Steering & Suspension Kit TRQ PSA58998
Part Details:
- (2) Front Lower Ball Joints
- (2) Front Upper Control Arms with Ball Joints
- (1) Pitman Arm
- (2) Front Outer Tie Rods
- (2) Front Sway Bar Links
- 12 Piece
- (2) Front Tie Rod Adjusting Sleeves
- (1) Idler Arm & Bracket Assembly

How to Replace Lower Ball Joint 2007-14 Toyota FJ Cruiser
Watch this video to learn how to replace the lower ball joint in your 07-14 Toyota FJ Cruiser. 1A Auto guides you through the job step by step!
