How to Replace Axle Shaft 1999-2004 Chevy Silverado
Created on: 2014-05-30
If you need to replace a bent or snapped axle shaft, you can watch this video from 1A Auto to learn how to replace the one on your 00-06 Chevy Silverado.
-
step 1 :Removing the Rotor
- Loosen the lug nut covers and pull the hub cap free
- Remove two 12mm bolts from the brake caliper
- Use either a C-clamp to squeeze the rotor or a screwdriver to pry the brake caliper off
- Pry out the brake pads with a flat head screwdriver
- Use a piece of pipe to remove two 18mm bolts from the caliper bracket
- Pull the caliper bracket and rotor off
-
step 2 :Removing the Differential Cover
- Remove 10 to 12 13mm bolts from the differential cover
- NOTE: Use an extension for the higher bolts-if rusty, use a cold chisel to knock the rust off each side
- Place a drip pan below the differential cover before removing the bottom bolts
- Using a chisel, hammer out one side on the bottom of the differential cover
- Replace the bolt at the top of the differential cover
- Using a chisel, hammer out the other side on the bottom of the differential cover
- Let the fluid drain out
- Once drained, pry out on the bottom and remove the top bolt
- Pull the cover down and out
-
step 3 :Cleaning the Differential
- Vacuum the differential for any debris
- Clean the differential with a rag, leaving the rag there when finished
- Using a razor blade cut off the differential gasket
- Wire-brush any leftover residue from the gasket and remove the rag
-
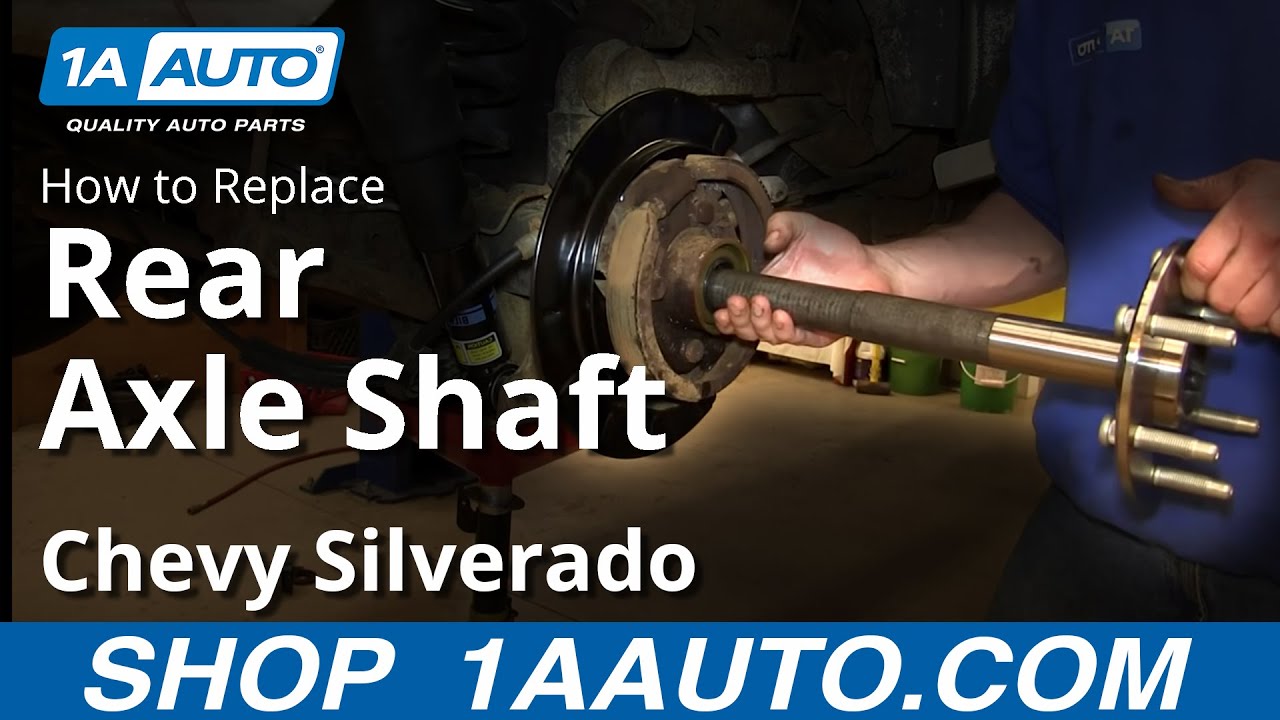
step 4 :Removing the Axle
- Put the vehicle in neutral and rotate the chuck to find and remove the 8mm bolt
- Pull the differential pins down and out
- Push the axle in
- Rotate the chuck around using the dry shaft to find the C-clamps
- Use a stick magnet to pull the C-clip out of the axle you want to replace
- Pull the axle free
-
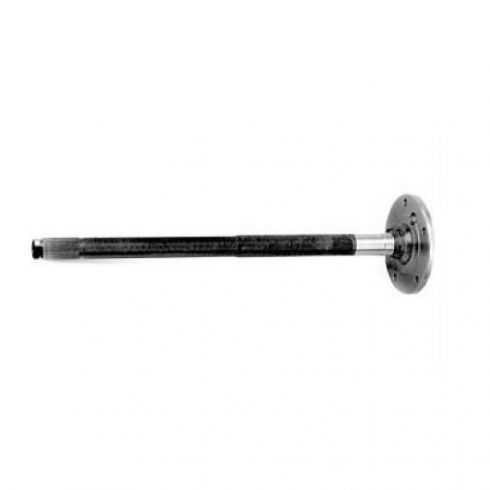
step 5 :Installing the Axle
- Lift the axle up and try not to drag it on the seal
- Find the carrier bearings and push the axle into place, further than it should go
- Put the C-clip back in place and pull the axle back out, placing the C-clip into place
- Replace the differential pins
-
step 6 :Reinstalling the Differential Cover
- Place RTV all around with no gaps unless using a new differential cover
- Circle RTV around each bolt hole
- Put the differential cover into place and replace the top bolt to hold it
- Replace all of the 13mm bolts
- Put the harness back into place for the top bolt
- Tighten the bolts and torque each to 15ft/lbs in a crossing pattern
-
step 7 :Replacing the Differential Fluid
- Remove the filler plug with a 3/8 inch ratchet
- Replace the differential fluid until it pours over the side
- Make sure the fluid is to the top of the filler hole
- Replace the cap and tighten with a 3/8 inch ratchet
-
step 8 :Reinstalling the Rotor
- Twist on a lug nut to hold the rotor
- Put the caliper bracket into place using two 18mm bolts
- Torque the 18mm bolts to 85 ft/lbs
- Push the brake pads back into place
- Put the caliper back into place and replace the two 12mm bolts
- Torque the 12mm bolts to 30ft/lbs
- Put the wheel back into place and replace the lug nuts
- Torque each lug nut to 100 ft/lbs in a crossing pattern
- Replace the hubcap and tighten each lug nut cover
-
step 9 :Testing the Vehicle
- Before driving on the road, pump the brake pedal until it firms up
- Do a stopping test from 5mph and 10mph
Tools needed
-
Razor Blade / Gasket Scraper
12mm Socket
13mm Socket
A Piece of Pipe (for leverage)
Large C-Clamp
Socket Extensions
Torque Wrench
Hammer
Jack Stands
18mm Socket
Magnet - Extendable
3/8 Inch Drive Ratchet
Gear Oil
Vacuum
Flat Blade Screwdriver
Chisel
Drain Pan
Ratchet
Wire Brush
Cloth Rags
22mm Socket
Brought to you by 1AAuto.com, your source for quality replacement parts and the best service on the Internet.
Hi, I'm Don from 1A Auto. I hope this how-to-video helps you out, and the next time you need a part for your vehicle, think of 1AAuto.com. Thanks.
In this video, we're going to show you how to replace a rear axle on this 2002 Suburban. It's pretty much the same for any 2000 to 2006 Suburban, Tahoe, GMC, Yukon, as well as the 1500 Silverado and Sierra. The process is the same for both sides; we'll show how to take the brakes apart on the passenger's side and the axle on the left side. A lot of different tools are needed.
Start off by loosening up these lug nut covers. We'll fast forward as Don does this. Once those are all loosened up, you can pull the hub cap free. Now, you want to loosen the lug nuts preliminarily, raise the vehicle and remove them the rest of the way, unless you have air powered tools. Now, remove these two 12mm bolts, and we'll fast forward as Don does that. To loosen up your rotor either use a C-clamp to squeeze it or a screwdriver through the middle of it and pry between the caliper and the brake disc that loosens up the caliper so it comes off easier. Now, pry out the brake pads. Now, remove these two 18mm bolts using a piece of pipe to help break it free. We'll just fast forward as Don removes those two bolts. Now, pull your caliper bracket off, and pull the rotor off.
On the differential cover, there are either 10 to 12 bolts, and ours are pretty rusty so we use a cold chisel to knock the rust off of each side. These should be 13mm bolts if they're in good shape. We actually end up using a half inch socket because the rust has reduced their size just a little bit. You'll see later, we pound a half inch socket on there and are able to get them all off. We'll just fast forward here as Mike removes that bolt the rest of the way. Then he's just going to repeat the procedure on each of those other bolts all the way around the differential cover. For the higher ones, it does get a little more difficult and you will need an extension for your socket and ratchet to actually remove those bolts. Make sure you have a drip pan below the differential cover before you remove the last of the bottom bolts. You just want to remove those. Now, using your chisel, just hammer out on the bottom of the differential cover. Then replace the bolt at the top of the differential cover. Then use your chisel and hammer again on the other side and just let the fluid drain out. After it's drained for awhile, just pry out on the bottom and then remove that bolt and pull the cover down and out.
Now, if any debris falls down inside of here, as you can see right there, you just want to vacuum all of it out. Then take a rag, make sure it's somewhat clean, and just wipe everything down and stick the rag back in there. Then, using a razor blade, just cut off that old gasket along the outside. Use a wire brush to get any leftover residue of the gasket. At this point, you'll probably want to have your vehicle in neutral and rotate the chuck around so you can see that 8mm bolt. Remove the 8mm bolt and this pin will come down and out. Now, push your axle in, and, again, you're going to want to have your vehicle in neutral so you can use the drive shaft and rotate the chuck around so you can see where the C-clamps are. You can see that there's a clip on either side that holds either axle in. What you want to do is just use a stick magnet to pull the clip out on the axle you want to replace. There it is. Then the axle will just pull free.
As you slide your axle into place, you want to lift it up, and be careful not to drag it on the seal too much because you don't want to prematurely wear out the seal. Once it gets in, into the machined area, grab the axle. I'm actually lifting up the inside of the axle where it goes into the carrier bearings on the inside. You just got to find the right spot. Once you do, it goes right in and then make sure you push it all the way in so you can get the C-clamp on the other side. Now, put the C-clip back in place, you'll have to make sure the axle is pushed in further than it should go, and then once you have it in place, you'll want to pull the axle back out and the C-clamp goes into place. Now, we're using a new differential cover so we have a separate gasket, but if you're using your old differential cover you want to make sure the RTV goes all the way around and that there's no gaps in it. You can see ours does have a gap, but because of the other gasket that won't matter. Make sure you circle each bolt hole. Make sure there's no fluid on the outside here. Then take your differential cover and feed it up into place. You just want to replace the top bolt to hold it in. We'll just fast forward as he replaces the rest of the bolts. Make sure for this top bolt that you put this harness back into place, then let the gasket sit for a minute if you used RTV, and then tighten each of those bolts up. Then you want to just torque each of these to 15 foot pounds in a crossing pattern.
Next, remove this filler plug using your 3/8 inch ratchet. Ours is in rough condition so we're just going to hammer the ratchet into place and then remove that plug. Now, replace the differential fluid, and you want to just do this until it starts to pour over the side. When it starts to pour over the side, you can just put your pinky in there and make sure that the fluid is right to the top of the filler hole. You can just reach in there with your pinky. If it is, then you are all set. If it's all the way up there you can replace your cap. Now, just tighten it up with your ratchet and you're all set.
Slide your new rotor into place and then twist on a lug nut to just hold the rotor in place while you put the caliper bracket back on. Then put your caliper bracket back into place and replace those two 18mm bolts. You've got to back up a little bit. We'll fast forward as Don tightens those up. You want to torque these to about 85 foot pounds. Push your brake pads back into place. Then put your caliper back down into place and replace those two 12mm bolts. We'll just fast forward as Don does this and tightens them up. You want to tighten these to about 30 foot pounds. Put your wheel back into place and then replace your lug nuts and tighten them preliminarily. We'll fast forward as Don does this. Then torque each of the lug nuts to 100 foot pounds in a crossing pattern. Then replace that hub cap and tighten up each of your lug nut covers.
Before taking the vehicle out on the road, you want to pump the brake pedal until it firms up and try a stopping test of five miles per hour and ten miles per hour. Then you're all set.
We hope this video helps you out, brought to you by 1AAuto.com, your source for quality replacement parts and the best service on the Internet. Please feel free to call us toll-free, 888-844-3393. We're the company that's here for you on the Internet and in person.
Shop Products

How to Replace Front Passenger CV Axle 2011-14 Hyundai Sonata
New CV Axle Shaft from 1AAuto.com. How to replace the front passenger CV Axle on the 11-14 Hyundai Sonata.
