How to Replace Axle Disconnect Housing 2002-09 GMC Envoy XL
Created on: 2014-08-30
Watch this video to learn how to replace the front axle disconnect housing on your 02-09 GMC Envoy or Chevy Trailblazer.
-
step 1 :Removing the Wheel
- Pry off the center cap with a flat blade screwdriver
- Remove the 35mm hub nut
- Loosen the lug nuts with the vehicle on the ground
- Raise the vehicle with a floor jack
- Secure the vehicle on jack stands
- Remove the lug nuts
- Pull off the wheel
-
step 2 :Removing the Brake Pads
- Remove the two 17mm bolts from the brake caliper, using an 18mm wrench to hold the slide bolts
- Pry the brake pads into the caliper with a flat blade screwdriver to push in the pistons
- Pull the caliper aside
- Secure the caliper with wire ties
-
step 3 :Removing the Brake Rotor
- Remove the two 18mm bolts from the brake caliper bracket
- Pull off the brake caliper bracket
- Strike the rotor with a hammer to loosen it
- Pull the rotor off
- Press the rotor off with two M12 bolts, if necessary
-
step 4 :Removing the CV Axle
- Remove the hub nut if you have not done so already
- Separate the axle from the transmission with a pry bar and a hammer
- Remove the 15mm bolt that holds the control arm to the steering knuckle
- Strike the control arm with a hammer to separate it from the steering knuckle
- Pry the brake line out of its clips with a flat blade screwdriver
- Secure the brake caliper to the backing plate with wire ties
- Remove the two 10mm bolts from the brake line bracket
- Push the axle out of the hub
-
step 5 :Removing the Axle Disconnect Housing
- Disconnect the axle actuator wiring harness
- Remove the three bolts from the axle housing
- Pull the brake lines aside with a pry bar as necessary
- Tap the housing with a hammer to loosen it
- Pull off the housing
-
step 6 :Preparing the New Axle Housing
- Remove the two 8mm bolts that hold the actuator to the old housing
- Put the actuator onto the new housing
- Insert the 8mm bolts into the actuator
-
step 7 :Installing the New Axle Housing
- Feed the housing into place
- Insert the three bolts into the housing
- Tighten the bolts to 40 foot-pounds of torque
- Connect the actuator wiring harness
-
step 8 :Reinstalling the Axle
- Feed the axle into the hub
- Feed the axle into the transmission
- Lift the steering knuckle into place
- Push the control arm onto the steering knuckle
- Put the brake line bracket into place
- Insert the two 10mm bolts into the brake line bracket
- Clip the brake line into its clips
- Tap the control arm onto the steering knuckle with a hammer
- Fasten the 15mm bolt and nut that holds the control arm to the steering knuckle
-
step 9 :Reinstalling the Brake Rotor
- Slide the rotor on
- Thread on one lug nut to hold the rotor in place
- Check that the caliper bracket slides are greased
- Apply grease to the slides if necessary
- Put the bracket back into place
- Start the 18mm bolts by hand
- Tighten the 18mm bolts to 110 foot-pounds
-
step 10 :Reinstalling the Brake Pads
- Apply grease to the brake pads
- Install the brake pads into the bracket
- Put the caliper on
- Thread the two 17mm bolts by hand
- Tighten the 17mm bolts to 40 foot-pounds
-
step 11 :Reattaching the Wheel
- Thread the hub nut by hand
- Remove the placeholder lug nut
- Slide the wheel into place
- Start the lug nuts by hand
- Tighten the lug nuts preliminarily
- Lower the vehicle to the ground
- Tighten the lug nuts to 100 foot-pounds in a crossing or star pattern
- Tighten the hub nut to 103 foot-pounds
- Reattach the center cap
-
step 12 :Testing the Brakes
- Pump your brakes repeatedly until they feel firm
- Test your brakes at 5 miles per hour and then 10 miles per hour
- Road test the vehicle
Tools needed
-
A Piece of Pipe (for leverage)
15mm Wrench
Torque Wrench
Hammer
15mm Socket
Pry Bar
18mm Wrench
17mm Socket
Jack Stands
19mm Socket
Flat Blade Screwdriver
8mm Socket
White Grease
Wire Ties
10mm Socket
Ratchet
Floor Jack
Swivel
Wire Cutters
Brought to you by 1AAuto.com, your source for quality replacement parts and the best service on the Internet.
Hi, I'm Mike from 1A Auto. I hope this how-to video helps you out, and next time you need parts for your vehicle, think of 1AAuto.com. Thanks.
In this video, we're going to show you how to replace the axle disconnect housing on this 2003 GMC Envoy XL. The items that you'll need for this are a new front axle disconnect housing from 1AAuto.com; 8mm, 10mm, 15mm, 17mm, 18mm, and 19mm socket and ratchet with a swivel; piece of pipe for leverage; 15mm and 18mm wrenches; flat blade screwdriver; torque wrench; hammer; jack and jack stands; and a pry bar.
Start off by prying off your hub cap and then just loosen up this 35mm nut. If you don't have the benefit of air tools, it's best to remove the hub nut the entire way at this point. Now, loosen the lug nuts in a crossing pattern and we'll just fast forward as Mike does this. Once you've loosened them, just jack the vehicle up and then remove the lug nuts the rest of the way. Now, the wheel will pull off.
Now you can just take your brakes apart. Two 17mm bolts hold the calipers on. Use an 18mm wrench to hold the slide bolts. Remove those and then use a screwdriver to pry your caliper up and off. Be sure to secure your caliper with wire ties or something, out of the way and then remove your brake pads.
There are two 18mm bolts that hold that caliper bracket. Now, you may need to use a pipe for some extra leverage. Do this slowly and smoothly so you avoid any bloody knuckles or anything like that. Then, remove the bolts the rest of the way and slide the caliper bracket off. Your rotors, hopefully, will just come off with some tap with a hammer. Ours are pretty well rusted. You want to avoid hitting the rotors too hard because you can damage them. If you have to, use two M12 bolts and put them into the threaded holes in the rotor and as you tighten the bolts up, tighten them uniformly and press the rotor off.
Remove that center hub nut if you have not already. To get your axle out, you need to use a pry bar or some other long item. You want to put it up in and put it on the back of the axle, right where it connects to the transmission . or the axle, I should say. Make sure you're hitting the metal and it comes right out.
We're using a 15mm socket and ratchet and a 15mm wrench to just remove this bolt. We'll fast forward as Mike does that. Now, using a hammer, we'll just hit the upper control arm off the ball joint. Now, just pry open this clip and pull the harness free and you want to secure your caliper just somewhere out of the way, so we'll just wire tie it right here on to the backing plate. Then you want to remove these two 10mm bolts. We'll fast forward as Mike does that. Now, just lift up on the upper control arm and pull this back and make sure that the axle's loosened. Once you have the axle free of the differential housing, you have to pull it out and be careful with the seal. Pull it out into the side and then kind of force it up into the right hand upper corner and while you're doing that, push the axle out of the hub and then pull it out. Be careful of all your ABS wires and hoses and stuff, and it will eventually comes off.
Pry out this clip and the harness using a flat blade screwdriver. Pry out on the tab and then pry down on the harness and pull it free. They can be a little difficult because sand will get inside there. You'll see a series of bolts on your axle housing but these four, you don't remove. You only have to remove three of them. It's this one right here on the end, this one all the way over here on the end, and then one up on the top corner on this side of these lines. We'll fast forward as Mike removes those and you will need to use a swiveling head on your socket and ratchet for a few of those. For this top one, you will need a pry bar to just pry down those lines. We'll just sort of pry that down, twist it out the rest of the way by hand, and you're all set. Using you hammer, just tap the housing and then just maneuver it down and you will have to lift those lines up a little bit and the housing will pull free.
On the right, is the old housing; on the left, is a new one from 1A Auto. We can see they're identical and will fit exactly the same; you just have to swap over your actuator and to do that, just remove these two 8mm bolts that hold the actuator in place. The new housing comes with two new 8mm bolts. After you remove the actuator, remove those two new 8mm bolts, put the actuator into place and then replace those two bolts and tighten them up. Then you can see here, we're actually putting in new actuator on and you can get a new actuator from 1AAuto.com as well.
Take your new housing, feed it back into place, tucking it up and under those lines and make sure it's lined up and push them all the way. Then we'll fast forward again as Mike replaces those bolts first by hand and then tightens them up with a socket and ratchet using a swivel for the two on the left. It does help that as you're tightening that top one up to have someone else to hold the pry bar. You can do it on your own but it's a lot more difficult and it takes a lot more time. Just make sure that you torque each of those to 40 foot-pounds. Reconnect your harness and replace that clip.
Again, be careful with all your wires. I just fed it right into the hub. Hold it and move the steering up around a little bit and get it all the way into your hub. Then, pull on it and feed it into the axle. Be careful with the seal. You want to put the steering knuckle back up into place as you go, so you don't over-extend the CV. Just put that in place and push your axle right in, and make sure it's locked.
Now, replace your brake line bracket and the two 10mm bolts that hold it into place and you want to just use the upper control arm to hold the wheel knuckle in place while you're doing this. Re-clip this harness. Now, hammer your upper control line back down on to the ball joint. Replace the bolt and the nut and tighten them up.
We want to make sure that these holes line up in between the two holes that are on the hub and then we'll just slide your rotor back into place and replace the lug nut to hold it into place. You want to check these slides on your caliper bracket and make sure they're greased up. If they're not, just apply some brake grease to them and then fit the bracket into place, and then just start twisting in your bolts by hand and then tighten them up. Now, torque these two bolts to 110 foot-pounds. Torque each of these to 110 foot-pounds. and then just replace your brake pads. If there's no grease on the ends, just apply some brake grease.
Now, push your caliper back down into place and replace those two 17mm bolts and we'll fast forward as Mike does that and tightens those up. Now, torque each of those to 40 foot-pounds.
Replace the hub nut. Remove the lug nut that you put in there to hold the rotor in place and then put your wheel in place and then replace each of the lug nuts and tighten them preliminary. Now, torque each of these to 100 foot-pounds in a crossing pattern and then torque the hub nut to 103 foot-pounds and then replace your hub cap.
After you've done any work on the brakes, you want to just pump the brake pedal until it firms out and then you want to do a stopping test from five miles per hour, and then 10 miles per hour.
We hope this video helps you out. Brought to you by www.1AAuto.com, your source for quality replacement parts and the best service on the Internet. Please feel free to call us toll-free, 888-844-3393. We're the company that's here for you on the Internet and in person.
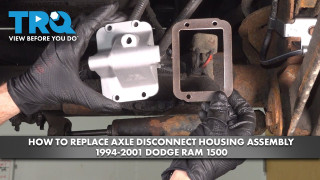
How to Replace Axle Disconnect Housing Assembly 1994-2001 Dodge Ram 1500
This video shows you how to install a new axle locker actuator from TRQ on your 1994-2001 Dodge Ram 1500.
