
How to Replace Airbag Clock Spring 2007-12 Chevy Silverado 1500
Created on: 2019-02-15
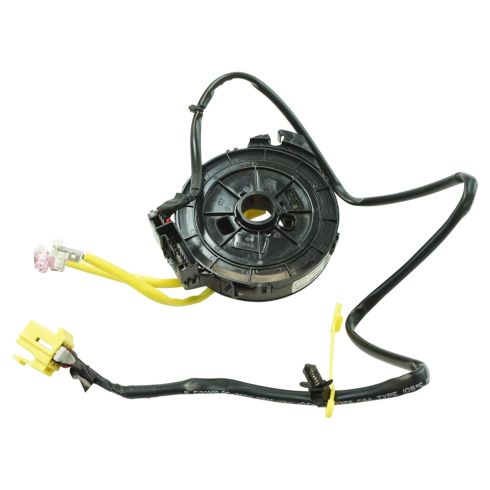
How to replace a malfunctioning airbag clock spring on 07, 08, 09, 10, 11, 12 Chevy Silverado 1500
Tools needed
-
Socket Extensions
Torque Wrench
10mm Wrench
Trim Tool Set
Pick
21mm Socket
Electrical Tape
Side Cutters
Phillips Head Screwdriver
Snap Ring Pliers
Wire Ties
10mm Socket
Ratchet
Hi. I'm Mike from 1A Auto. We've been selling auto parts for over 30 years.
What's up, guys? I'm Andy from 1A Auto. In this video, I'm gonna be removing and reinstalling a clock spring in this 2008 Chevy Silverado work truck. If you need this part, or other parts, for your vehicle, click the link in the description and head over to 1aauto.com.
All right. I'm gonna disconnect the battery. This vehicle, there is a bracket missing here. Normally there would be a bracket here with two, well four, 13mm bolts. You would take those out to access the negative battery cable. I'm just gonna use a 10mm wrench, loosen up the cable. You can probably do it without taking that bracket up, but it just make it easier to take the bracket off. Loosen this up and wiggle it back and forth. And, set it aside.
To remove the airbag, there's these little holes on the side of the steering wheel. We're gonna use a little Allen. This is a 2.5mm Allen. Just gonna slide it into the hole. And, you're gonna have to feel around a little bit. There's a little bar you have to push. And, if you feel ... Push on the airbag a little bit while you're pushing in the hole. You might be able to feel it move around. And then, we're gonna release the airbag. Push that. And then, you're gonna grab the airbag and pull it out just a little bit. See how it's up a little? Then we're gonna do the same with the other side.
All right. Then, pull the airbag out. You can see in here where the Allen goes in and then pushes on this little clip spring. And, that releases that little retainer on the airbag. On the back side of the airbag, you're gonna need a little pick or a small screwdriver. There's a little lock right here. You're gonna pull this lock up just like that. And then, there's little tabs right here. And then, one on the other side. Sometimes it's not too easy. I'm gonna just pull that connector out. Same with this side. Pull this little lock up just like that. And then, slide the connector out. Then, grab the airbag.
When you put the airbag down, you wanna place the airbag like this on a bench or somewhere. You never wanna place the airbag like this. 'cause, if it were to ever explode, it's gonna go flying up.
All right. Next, I'm gonna disconnect this connector right here. I'm just gonna use a small pick tool. The little clip right on top, and then just slide the connector out. The clip was right on there.
I'm gonna take a 21mm socket extension in a ratchet. I'm gonna take this bolt, loosen it up. You can also use a 13/16ths. Break that free. Now, before I take the nut all the way off, I am gonna grab the steering wheel and just rock it back and forth, loosen it up. And, when you pull it up, the nut will prevent it from hitting you in the face. You could also use a steering wheel puller. But, we didn't need to. I just rocked it back and forth. Pull this nut off. You can slide the steering wheel right out.
All right. Next, we're gonna remove this side cover right here. Just grab underneath, pull it off. There's some clips that hold it on.
Next, I'm gonna just grab this panel, pull it straight forward. There's some clips that hold it on.
Next, we'll pull this steering wheel column adjuster off. Just grab it with two hands. Slide it out towards the outside of the vehicle. Then, I'm gonna grab this steering wheel column cover. Sometimes there is some bolts that screw into the bottom of it. This one doesn't have any bolts, so I'm just gonna grab it and pull it straight down. Sometimes grab it from the back side. Slide it right down.
Next, we're gonna take the top cover off. Just grab it, pull it up. Just like that.
All right. There's a lot of dust on this, so I'm just gonna wipe this off with a rag. Next, I wanna prevent this from spinning. This is the clock spring, the airbag clock spring. And, I just wanna put a piece of tape right here. Tape across. Tape across here. That way, it won't spin when I take it off. Just move this down a little bit.
Next, I'm gonna use some snap ring pliers. I'm gonna take this snap ring out right here. Squeeze. Those snap ring pliers are in there, and then you squeeze to take the snap ring out. Slide the snap ring out.
Gonna take this clock spring, slide it up a little bit. Then, I'm gonna disconnect the electrical connectors on the bottom. Just take a little pick. There's a little tab right there. Take that connector off.
So, underneath the dash there's an electrical connector right here. Just gonna disconnect. There's a little lock right there. Pull that off. Then there's a little button here. Disconnect that.
I'm gonna use a trim tool. We actually sell this trim tool at 1aauto.com. Just slide in here to remove the retainer that holds the wire. Just go back and forth. Slide that out. Just fish the wire up here.
Now, there is gonna be some wire ties holding it on. So, we're gonna have to cut those off. I'm just using some small cutters. We'll just put new wire ties on after. Be careful not to cut the wires. There's a little retainer right here. Just slide that out of there. And then, right here. Slide that off. Then, you can pull the whole clock spring off.
Now, we'll take the clock spring, get this lined up over here. Before I push it down any further, I'm just gonna connect the connector underneath, lock that in place. Make sure this goes on properly. Slide that up. Then I'm gonna run this wire. This is gonna go the way it came out. Just go down here. So, the wire's gonna go through here ... We'll just slide this through here for now.
And then, underneath here it's gonna go behind this wire. Then we have this retainer that goes in this spot right there. Push that through just like that. And then, connect this connector. Push that through. Then we'll take this lock. Send the lock through the backside of the connector ... just like that.
I'm gonna take a cable tie, just slide it through here. Make sure the wires aren't rubbing up against anything. And, secure this in this location here, just like that. There's another cable tie that goes down in here ... And, secure it right there. I'm just gonna take some cutters. Cut the excess like that. And, right like that.
Next, we'll take this snap ring. Slide this down into position using snap ring pliers. You just wanna push it so it locks in place. And, that looks good.
All right. Next, we're gonna take the covers, this upper column cover. Just line up the shifter boot. There we got. And then, lock it down. Take the lower column cover, line that up. And then, push it together with the upper cover. Looks good.
Before I put these covers on, I actually already took the tape off of the clock spring. 'cause, the clock spring is safe now. It's not gonna turn. It's keyed to the shaft. So, it's okay to take that tape off at that point.
All right. Now, we're gonna install this cover. Just line it up, lock it in place.
And next, we're gonna install this screw with this Phillips head screwdriver. And, if your vehicle had another one, you're gonna install it over here as well. But, this vehicle doesn't have it. Snug that up.
Next, we'll install this parking brake cable release. Just slide that over there. And then, take the 10mm bolt. Get this started right here.
Now, we'll install the side cover. Just line those clips up, lock it in place.
Take this steering column adjuster handle and just push it on. And, take the steering wheel. We're gonna feed these wires through here. Pull these through. Line the steering wheel up. There is an arrow on the steering wheel with a little mark on the column.
Then, we'll take the connector. Connect the steering wheel connector. That's just for the horn. And then, take this nut, get this started. Take my 21mm socket extension ratchet, tighten this down.
Now, I'm gonna use a torque wrench, and I'm gonna torque this nut to 30 foot pounds. Make sure you hold the steering wheel while you do this. That's good.
Now, we're gonna connect the airbag. Let's just connect these connectors. Connect the pink one right here in the pink. And then, push the lock down. Then, do the same with the white one. Connect it, push the lock down. Then, we can take the airbag ... Make sure the wires are out of the way. Line it up, and just push it down.
Now, I'm gonna grab the negative battery cable. Slide this over the terminal on the battery, and then take a 10mm wrench and just snug this up. Not too tight. You don't wanna break it. Just make sure you grab the terminal, grab the cable, and make sure it doesn't twist. That's good. And then, if you had that bracket here, you're gonna wanna reinstall that bracket.
Thanks for watching. Visit us at 1aauto.com for quality auto parts, fast and free shipping, and the best customer service in the industry.
Shop Products

How to Remove Steering Wheel Airbag 2010-14 Subaru Outback
Check out this video to learn how to remove the steering wheel airbag on your 10-14 Subaru Outback. 1A Auto shows you how, step by step!

