How to Replace Air Pump Electric Motor 2000-02 Chevy Impala
Created on: 2011-07-01
Our experts in this video will show you how to check the fuse and replace the air pump yourself if it needs to be replaced
-
step 1 :Checking the AIR Pump Fuse
- Remove the cover from the relay box
- Remove the AIR pump fuse
- Check the fuse
- Replace the fuse if necessary
-
step 2 :Removing the Wheel
- Pry off the center cap with a flat blade screwdriver
- Loosen the lug nuts with the vehicle on the ground
- Raise the vehicle with a floor jack
- Secure the vehicle on jack stands
- Remove the lug nuts
- Pull off the wheel
-
step 3 :Opening the Wheel Well
- Remove two 7mm bolts from the wheel well
- Remove three 7mm bolts from below the bumper
- Remove the two 7mm from the inner fender
- Pull out on the bumper cover and pull the inner fender out of the way
- Remove two 10mm bolts from the AIR pump
-
step 4 :Removing the Headlight
- Pry the clip out of the hood trim
- Pull the plastic clips off of the headlight
- Pull the headlight out
- Disconnect the headlight wiring harness
-
step 5 :Removing the AIR Pump
- Remove the 10mm bolt from the headlight
- Disconnect the AIR pimp wiring harness
- Disconnect the intake hose from the pump
- Disconnect the exhaust hose from the pump
-
step 6 :Preparing the New AIR Pump
- Pull the old pump out of its mounting bracket
- Remove the rubber grommets from the old pump
- Install the rubber grommets on to the new pump
- Apply penetrating oil to the T25 Torx bolts on the old pump
- Remove the four T25 Torx bolts from the old pump
- If the screws strip, drill them out
- Remove the housing from the old pump
- Remove the gasket from the housing
- Install the new gasket into the housing
- Place the pump on the housing
- Start the four T25 Torx bolts by hand
- Tighten the four T25 Torx bolts
- Connect the new pump to the mounting bracket
-
step 7 :Installing the New AIR Pump
- Check the hoses for any debris
- Clear the hoses if necessary
- Put the new pump into place
- Start the 10mm bolt under the headlight area
- Connect the hoses to the pump
- Tighten the hose clamps
- Tighten the 10mm bolt at the front of the pump
- Connect the pump wiring harness
- Clip the harness on to the mounting bracket
-
step 8 :Installing the Headlight
- Connect the headlight wiring harness
- Insert the plastic headlight clips
- Put the hood trim into place
- Insert the hood trim clip
-
step 9 :Closing the Wheel Well
- Insert the two 10mm bolts into the side of the pump bracket
- Push the inner fender into place
- Insert the 7mm bolts into the inner fender
-
step 10 :Reattaching the Wheel
- Slide the wheel into place
- Start the lug nuts by hand
- Tighten the lug nuts preliminarily
- Lower the vehicle to the ground
- Tighten the lug nuts to between 100 foot-pounds in a crossing or star pattern
- Reattach the center cap
-
step 11 :Checking the AIR Pump Fuse
- Remove the cover from the relay box
- Remove the AIR pump fuse
- Check the fuse
- Replace the fuse if necessary
Tools needed
-
Flat Blade Screwdriver
Rust Penetrant
7mm Wrench
7mm Socket
10mm Wrench
Drill
10mm Socket
Slip-Joint Pliers
Ratchet
T25 Torx Driver
Brought to you by 1AAuto.com, your source for quality replacement parts and the best service on the Internet.
Hi, I'm Mike Green. I'm one of the owners of 1A Auto. I want to help you save time and money repairing or maintaining your vehicle. I'm going to use my 20-plus years experience restoring and repairing cars and trucks like this to show you the correct way to install parts from 1AAuto.com. The right parts installed correctly: that's going to save you time and money. Thank you and enjoy the video.
In this video, we're going to show you how to replace the air injection reaction pump or AIR pump on this 2002 Chevy Impala, same as any '00 to '05. This is an electronic pump. The tools you will need are a flat blade screwdriver, 7 and 10mm wrenches or sockets and ratchet, a T25 Torx bit with a ratchet, pliers and you may need a drill and drill bit if you can't get one of those T25 screws out and you happen to strip the head as I did in this.
If your engine light comes on and it doesn't appear that anything is wrong with your engine, what you want to do is come in here, to the passenger side of your engine compartment, there's a relay box here, release it on that side, press and release, and there's a 30 AMP fuse right here, pull it out and you can probably see that fuse is broken. Maybe not. See if you can focus on that. You can see that fuse is broken so what you want to do is replace the fuse, see if the light goes out if you replace it and it breaks again then you need to replace your AIR pump.
Start by lifting the car and secure it with the a jack stand and then remove your driver's front wheel.
There's five 7mm bolts, two here on the wheel well and then three underneath. Remove those. We'll fast forward here as we remove those. You can use either a 7mm wrench or a socket and ratchet. Remove one more, up higher here on the fender. There's another one up underneath here. You can just pull out on your bumper cover and then pull this whole inner fender up and out of the way. Now you can see right back in here is your AIR pump, you want to remove these two 10mm bolts. We'll fast forward here as we just remove those two 10mm bolts. You can either use a wrench or again a socket and ratchet.
Okay, now you're going to take your headlight assembly out, which may sound difficult but it's actually pretty easy. There's a little pin right over here. You pry the middle of the pin out and that allows the whole clip to come out and you lift up this panel and there's a little white tab under here. You may need to pry it up with a screwdriver or some pliers, just pull that tab up and off and there's a tab right here, up and off. Then your headlight comes right out. Then it disconnects, just pull back on a little tab right here and it disconnects there.
Now, there's a 10mm bolt right here. Remove that. As you remove that, you can see your pump drop down. Right here there's a connector, there's a little safety latch you've got to pull out of there and then push down on this tab and disconnect. Now there's a couple of hoses that hook into it. This one here is the intake, you should just be able to pull it right off. That one leaves this one here, which I believe you can just pull up and to the side on this clip here. Just pull that clip off and now disconnect that and then pull the pump and bracket out right through the other side.
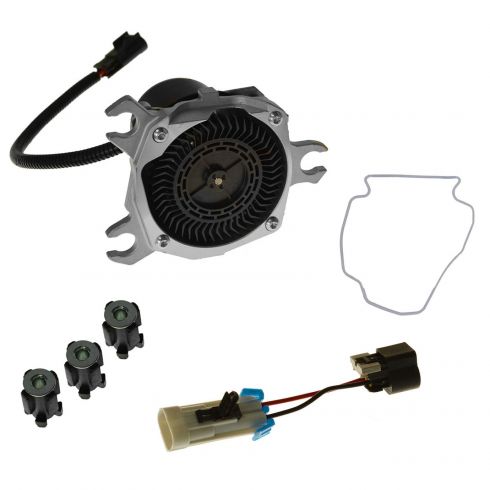
Here's our original pump and a new pump from 1A Auto. It's obvious, we have to switch some stuff over, here. What we're going to do is push sideways there first and push those out. Now we can take these, you want to hold this the same way here and take these rubber grommets out, put them into our new one. You can see we have the same connector. These are T20 Torx screws. I've got a T20 Torx bit with an extension and a ratchet. Okay, first I'm going to spray these with a little bit of penetrating oil. Okay, now turn the pump over and there's four T20 Torx screws. I'm sorry they're T25 Torx screws and most of the time, as you'll see you just break them off and the new pump comes with new screws. Here one of my screws stripped so I'm just hooking up a drill bit to my high speed drill and I'll drill the head right off. I start doing it here then I just transfer it over into a vise and finish the job just to make it easier. Now just use a flat blade screwdriver and gently pry the plastic housing away from the pump. I'm just realizing what the problem is, there's a piece of something, acorn or something wedged into the old motor and it made it all frozen up. I'm just prying it out and just going to throw that motor away. Now, we need to remove the old gasket from the housing and then replace it with the new one. Now we'll take the new motor and join it with the housing, hold it together and start in the four new screws and then I'll speed it up as we put in those screws and tighten them up nice and snug. Now we'll rejoin the motor and housing assembly with the mounting bracket.
Reinstallation is a reverse of the procedure. I'm going to go a little quicker through it, just to keep this a little on the short side. I do check the hoses, make sure there's no other acorns or anything else in there that could get plugged into the new housing then put it up in. Start the front bolt that you can see right from the headlight opening and then connect the large hose, which is the intake. It has no clip on it. Then for the smaller hose, which goes to the exhaust manifolds, connect it and pinch the clip and tighten it up. Now, here I'm reaching in on the other side and just starting one of the bolts on one of the other bracket bolts that just gets the bracket in the right spot and then I can tighten up that front bolt and now reconnect my lead and clip it back onto the mounting bracket.
With the bracket tightened up, the hoses reconnected and the electrical lead reconnected, I can then reconnect my headlight and put it into place and make sure that I put that plastic down and put it back in.
Now, underneath, start in the other mounting bolts and then tighten those up. Now, put the inner fender back into place, it goes inside of the bumper cover and now just work all the bolts in. I'll start with that inner one first and then I'll start all the other 7mm bolts and then tighten them up and you don't want to be extremely tight with these. You just to get them so they're holding everything in place and nothing is rattling or shaking.
Put the wheel back in place and start all of your lug nuts by hand, you want to do this avoid cross threading the lug nuts. Then here I preliminarily tighten the lug nuts with my impact wrench. Now here with the vehicle on the ground, you want to tighten those lug nuts up to about 100 foot pounds, use a crossing star pattern as you're tightening and then replace your cap .Last but not least, you want to make sure that you have a good fuse in your AIR relay slot and then if this is what your problem is, your engine light should go out after about a dozen to 20 cycles of the key.
We hope this video helps you out. Brought to you by www.1AAuto.com, your source for quality replacement parts and the best service on the Internet. Please feel free to call us toll-free, 888-844-3393. We're the company that's here for you on the Internet and in person.

How To Replace Air Injection Check Valve 2002-2009 Chevrolet Trailblazer
This video shows you how To Replace Air Injection Check Valve 2002-2009 Chevrolet Trailblazer.
