How To Replace 4WD Actuator 2007-17 Ford Expedition
Created on: 2020-12-10
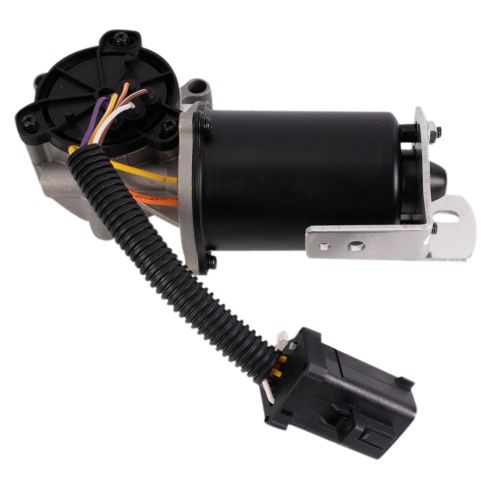
This video shows you how to install a new transfer case shift motor on your 2007-2017 Ford Expedition.
Tools needed
-
Razor Blade / Gasket Scraper
Torque Wrench
Socket Extensions
Jack Stands
Pick
Flat Blade Screwdriver
Socket Driver
Paper Towels
Wheel Chocks
10mm Socket
RTV
Ratchet
Floor Jack
Needle nose pliers
All right friends, the first thing we need to do is get underneath the center of the truck, find the transfer case, and then we're gonna find the motor. After you've done that, take a nice flat pick, and we're gonna disconnect the wiring from where it's connected onto. Once you have that, go ahead and push this little tab right here. That's gonna make it so you can separate these two pieces. Just be careful. There should be a piece inside there. Sometimes this falls out. We'll set this aside.
Inside here, we're gonna have to pull out this red piece. We'll set that aside as well. Now, at this point, we're gonna have this little blue wire right here. We need to be able to get this out of here. So to do that, we need to come from the backside. Come right up along this corner right here with our pick, and then just try to pry this off. Do all four corners and move this back cover out of the way. That's good enough.
All right. That exposes the blue wire for us. Now, looking inside here, you can see this pin right here. That's where the blue wire's gonna have to go onto the new connector. So just keep a mental note of where this is. Along that connector pin, though, you're gonna see that there's a little tab. If you were to get in between there with your pick, you can kind of spread that away from the pin. And then once it's away, we should be able to kind of tug on this wire and draw it up and out of here. There we are. Set this aside.
Now, we're gonna have to remove our mounting bolts. You're gonna find a 10-millimeter here and then 3 more holding the motor on over there. Let's remove them all. Now, let's just take something that we can pry with. Come up in between the transfer case and the motor and separate the two. Now, we need to clean up this area right here to make sure it's nice and flush. Let's just make sure this is nice and flat and level right here.
Next, what we need to do is take a tiny bit of gasket maker, and we're just gonna come along this seal area right along here. Make a nice coating, and that way there, when we put the motor up on there, there's no way moisture can make its way inside. Now, it's gonna be time to get our brand new motor assembly up on here. Let's go ahead and line it up with the shaft that's coming out of the transfer case. There we are. I'm just gonna turn it so it latches in here. And then of course, we'll start in all of our bolts before we snug any of them up. Get that small guy in there.
All right. Now, let's torque these to 89 inch pounds.
Now that we have this all bolted up and torqued down, let's continue on by removing this back cover on our new wiring harness. Okay. Slide this up. That looks good. Now, we're gonna take our blue wire and we're gonna go through the bottom hole. You'll notice that there's two open slots. We want the one that's closest to the edge here. I'm just gonna come right through there, in through here, push it all the way in till I hear a nice click. That means that it's locked in right there. Just double check to make sure all your pins are lined up. This looks great. I'm gonna give it a nice tug.
We wanna make sure that it is completely secured. Now we'll take this cover, latch it down. I heard all four corners click. This looks amazing. Let's continue. Now, let's go ahead and get our red piece in here. We wanna make it so we're holding onto the flat blades and then this end is going up and in. Go ahead and line it up, push it in. We should hear it click. Give everything a nice tug. This looks perfect. Let's just use a little bit of dielectric grease to make sure we help keep moisture out of the connection points here.
Now, let's connect it in. Listen for a click, give it a nice tug. It needs to be 100% secure. Before we go ahead and put this back up into its mounting area, we wanna make sure we close up that existing hole. Just use a little bit of your RTV that you were using earlier and just get right around that wire, and especially inside the open hole. That's gonna help keep moisture out of there. And now we can continue. All right, let's grab this little white tab. You can start it right in here. And we'll grab our connector. We're gonna latch it right in. There we are. Give it a nice wiggle, make sure it's secure.
Shop Products
How to Replace Transfer Case Shift Motor 1997-2002 Ford Expedition
Watch this video and learn how to replace the transfer case shift motor on your 97-01 Ford Explorer or Lincoln Navigator. The 1A Auto experts will show you
