How to Remove Serpentine Belt 2009-19 Ram 1500
Created on: 2019-05-21
Check out this video from 1A Auto to learn how to change the serpentine belt in your 09-19 Dodge Ram.
-
step 1 :Removing the Serpentine Belt
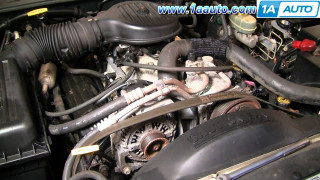
- Before removing the serpentine belt, draw or photograph the belt routing.
- Loosen the serpentine belt tensioner with the serpentine belt removal tool
- Remove the serpentine belt from the alternator pulley
- Release pressure on the belt tensioner
- Remove the serpentine belt from the rest of the pulleys, and feed it around the fan to remove it completely
-
step 2 :Installing the Serpentine Belt
- Pass the serpentine belt over the fan
- Replace the serpentine belt over the fan pulley, over the tensioner, and then over the crank pulley
- Pull the belt slack over the alternator pulley
- Use the serpentine belt tool to relieve pressure on the tensioner
- Slide the passenger side of the belt between the alternator and fan pulley over the idle pulley, and release the serpentine belt tool slowly
Hey friends, it's Len down at 1A Auto. Today we're going to be doing a simple job replacing a serpentine belt on a 2016 Ram 1500. It's going to be a fairly simple job. I want to be the guy that shows you how to do it, so if you need any parts, you can always come down to 1A Auto and check us out. Thanks.
So, next we're going to take the serpentine belt off. It's this right here. Little rubber. You want to pay attention to the way that it's in here. If you have a cell phone, you can snap a picture of it, or you can draw it if you're an artist. That's fine too. Or even just look at this video a couple of times. I'm sure it'll show you how to do it.
So, here we go. I'm going to try to put this little tool right here, which is basically just the same as a 3/8-ratchet. You can either use this tool, or you can use a 3/8-ratchet. Since I paid money for the tool, I'm going to go ahead and try that.
There's a little spot down inside the tensioner that this slides right into. Let me get this geared up. Now, I can relieve pressure from the tensioner and grab this serpentine belt. I'm going to just pull it down off the alternator pulley. Now, I'm going to carefully relieve pressure of the tool so it doesn't come slapping up and slam my hands into anything. You want to be careful not to get into a pinch point. I'm going to try to remove the tool. Notice my little piece is stuck in there. That's okay. Just got to get mad about it and see if I can break it free. I can even try to bonk it with my tool. It'll just fall and hit the ground, I'm sure, which is okay. I got to hit it. Let me get that out of the way. I don't want to lose it. Nice.
All right, so now we're going take the serpentine belt off. I'm going to come around this way. Basically, I'm just removing it from all the pulleys as much as I can see from this angle. And then, I'm going to go ahead, and I'm going to move my stool so I can get to the rest of it.
Okay. Let's see. Alright, so now what's holding us on is the fan clutch. This might be a little bit difficult for some people to deal with, but all I'm going to do is I'm going to take this serpentine belt. I'm going to push it in up behind the fan that's up inside here, being very careful. It's just plastic, so it shouldn't cut me, but there could be sharp edges. Yours might be metal. If you have any sharp edges, just please be very careful. Safety first.
I'm just going to take it. I'm going to try to put it up and over the fan just like this. While my hands are in there, I'm going to carefully spin the fan, which will walk the belt down and around. I'm going to see if I can pull it. Let's see if this worked. I'm going to pull gently of course.
Now we've removed our serpentine belt.
We've got our serpentine belt, new or old, whatever you're using. We're going to go back over the fan first. Remember, we had to take it off over the fan. Now, we're going to go back over the fan first before we start running it on any pulleys. Okay? So, I'm just going to take it and see what I can do about getting it over all the way around. There we are. So now we're into the pulley area. Okay? The whole belt is out of the fan shroud. We don't have to worry about getting caught. We were very careful not to get our fingers caught in there.
So now, we need to try to think back to the way that we took this off. If you didn't draw a picture, take a picture, whatever, just watch this video. I'm going to show you how to do it. Okay? So, I'm going to go over the fan pulley first because we know that it goes over that. I'm going to take this and bring it over the tensioner and then back and over the crank. It's going to be hard to reach. Very hard to reach because I'm short. I'm going to climb up. Okay. Get my hand down in here, being very careful not to cut myself. Safety first. And bring it up and over this pulley. Fell off that. That's okay. It's going to happen. It's going to keep falling off. You're just going to keep putting it back on. Okay? Keep your patience.
Okay. We have it approximately where we know it needs to go. I'm just going double check where it's riding on the pulleys. You want to make sure it's sitting inside all the groves on all of your pulleys. Like I said, it's going to keep falling off. That's okay. You don't mind. It's just part of it. It's part of the fun, right? Put this upon here. Put this up on here.
Now, I'm going to grab my tool, and then we're going to make pressure with it or relieve pressure, I guess, on the tensioner, and then we're going to get our belt over the last pulley.
All right, so we got our belt kind of laying over all our pulleys here. We got it, for the most part, inside all the grooves. We're going to recheck it, but right now what we're going to do is we're going to take our left hand. We're going to take this part of the belt and try to put it around this side of the smooth pulley. It's going to be difficult. We're going to need to push down on our serpentine belt tool or ratchet, whenever you're using, to relieve pressure from the tensioner. Then we're going try to work the belt from along the outside of this and then over that. Okay? So, the back side of the belt, it's going to go on the smooth side of this pulley. Here we go. Good luck to you. Good luck to me. Let's do it.
Push down. Grab this belt. Okay. I'm just going to take a peak while I have the tension released. Looks pretty good. I'm going to come up nice and slow. You don't want to let that tensioner slap back. Okay? I'm going to try and get my tool off of there completely. There it is.
Thanks for watching. Visit 1Aauto.com, your place for DIY auto repairs for great parts, great service, and more content.
How to Replace Serpentine Belt 1998-2003 Dodge Durango
How to repair, install, fix, change or replace a broken, cracked, snapped or cut serpentine belton 98 to 03 Dodge Durango, the 92, 93, 94, 95, 96, 97, 98, 99, 00, 01, 02, and 03 Dakota, 92 to 93 Dodge Truck, and 97 to 02 Dodge Ram models.
