How to Remove Reinstall Hood 2005-10 Chrysler 300
Created on: 2017-02-08
How to install, replace, remove the hood on an 05, 06, 07, 08, 09, 10 Chrysler 300
-
step 1 :Removing the Hood
- Pop the hood
- Reach underneath the hood insulator near the washer bottle
- Remove the washer hose from the T-fitting
- Release the hose from the clips along the hood
- Have a helper hold the hood
- Remove the two 13mm bolts from one side of the hood
- Have a helper hold the loose side
- Remove the two 13mm bolts from the other side
- Remove the hood
- Pry out the clip on the hood hinge
- Lay the hinge and strut out of the way
-
step 2 :Installing the Hood
- Clip in the hood hinge
- Line your hood back up on the hinges
- Have a helper hold the hood
- Tighten the 13mm bolts to the hood
- Reconnect the washer line to the T-fitting
- Reattach the washer line to the fittings
- Slowly lower the hood and check that it aligns into place
Tools needed
-
13mm Socket
Ratchet
Assistant
Hi, I'm Mike from 1AAuto. We've been selling auto parts for over 30 years! We're dedicated to delivering quality auto parts, expert customer service, and fast and free shipping, all backed by our 100% satisfaction guarantee. So visit us at 1AAuto.com, your trusted source for quality auto parts.
Open the hood latch on your vehicle. Open it fully. Reach up under the hood insulator, right where the washer nozzle is. Disconnect the hose from that T-fitting. Release the retainer clip. You have the one on the bottom of the hood. It pops out of this clip here on the hinge. You have another one at the bottom. Just pop open. Just lay that out of the way for now.
Since we're going to be reinstalling our hood, we're going to go ahead and mark the top edge and this edge over here, just to help us align the hood once we bring it back. You could even go a little bit farther and just follow this whole top edge to help align that hinge when it goes back on. We'll do the same thing on the other side.
When removing the hood, it'll be a good thing to have a helper ready to hold the hood here while I remove these two 13 millimeter bolts. We'll do this using the socket and ratchet. While you have your helper supporting the other side, you can remove your side and just keep one hand on the bottom of the hood to keep it in place. These aren't very heavy. As long as you keep the bottom off the windshield, your helper should be able to support the rest of it. Once the bolts are out, you can go ahead and remove your hood.
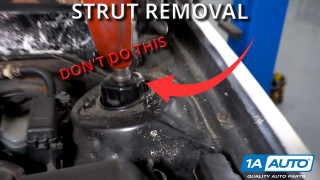
Be sure when setting it down that you put some folded cardboard or some thick rags underneath the edges and lay it on this end so we don't bend the ears at the back of the hood. Now, these hood hinges will stay up on their own. These struts are designed to hold the hinge with all the weight of the hood on it. These could be pushing too hard and bending our hinges, or you could just have the edge up here, which is a way you might hurt yourself when you're working. Go ahead and use a small flat blade screwdriver to pry out the clip. Lay your hood hinge and strut down flat and out of the way. Be sure to do this on both sides of the vehicle.
Once you have your hood and your helper, line it back up over the hinges. Start both of your bolts. Now, you'll notice there are marks where the washer was on the hinge. You'll want to be sure that that washer lands in the same place, as well as around the Sharpie mark that we left on the hood before removing it. Once you've got your bolts down, hand tight, and aligned where you want them, you don't need your helper anymore. Tighten the bolts down with the 13 millimeter socket and ratchet.
Reconnect your washer line. Reattach it to your washer nozzle. Route it back through and hook it into its retainers. Carefully close your hood to ensure that everything is aligned, like the body lines, the latch, and the edges on the fender. Ours looks pretty good. We'll make sure the latch still opens. We're good to go.
Thanks for watching. Visit us at 1AAuto.com for quality auto parts, fast and free shipping, and the best customer service in the industry.
Most Common Strut Installation Mistakes
Len shows you the most common mistakes, and what can happen if you aren't paying attention!
