How To Install Seat Heater In Your Vehicle
Created on: 2013-11-08
This is a general video that will show how to install and wire seat heaters from 1aauto.com on most vehicles to convert your seats to heated seats
-
step 1 :Removing the Seat
- Roll the seat all the way back
- Remove the two 15mm bolts from the bottom of the track
- Roll the seat all the way forward
- Remove the two 15mm bolts from the bottom of the track
- Roll the seat all the way back
- Tilt the seat up
- Disconnect the wiring harness if you have power seats
- Remove the seat
-
step 2 :Removing the Seat Panel
- Remove the two Phillips screws from the plastic panel on the seat
- Flip the chair over
- On the bottom, remove the Phillips screws from the top and bottom of the seat
- Remove the wiring harness from the plastic panel if you have power seats
- Remove the handle with a T25 Torx Bit
-
step 3 :Removing the Seat Cover
- Pull up the seat cover from around the edge with a flat blade screwdriver
- Unclip the lower seat cover from the upper seat cover
- Place the seat upright
- Pull the clip from the seat cover out towards the front of the seat
- Tip the seat onto its back
- Separate the foam from the seat cover
-
step 4 :Installing the Foam Pads
- Fit the heat pad inside the seat
- Peel the adhesive strip from the heat pad
- Push the heat pad into the foam
- Tilt the seat upright
- Pull up the lower seat cover
- Separate the foam from the seat cover
- Push the harness from the heat pad out through the back of the seat
- Place the heat pad underneath the seat cover
- Peel the adhesive strip from the heat pad
- Push the heat pad into the foam
- Pull the seat cover down over the foam
- Flip the chair upside down
- Re-clip the upper seat cover to the lower seat cover
- Re-clip the lower seat cover
-
step 5 :Removing the Lower Dash Panel
- Pull off the fuse box door from the dash panel
- Remove the 7mm bolt from the side of the dash panel
- Remove the two 8mm bolts from the bottom of the dash panel
- Pry out the mirror control panel
- Remove the two Phillips screws behind the mirror control panel
- Pull down the lower dash panel
- Disconnect the trunk wiring harness from the panel
- Remove the lower dash panel
-
step 6 :Installing the Seat Heater Wiring
- Pull up on the center console panel
- Thread the wires from the heating switch harness underneath the center console panel
- Thread the heating switch harness wires up into the lower dash panel area
- Run the ground and fuse wires up through the fuse panel area
- Bolt the ground wire to something metal - we remove a 10mm bolt from the body, place the ground on the clip, and replace the bolt
- Pull out the largest fuse with pliers
- Clip the fuse wire onto the tooth of the fuse
- Push the fuse into place
- Bundle up the fuse wires
- Wire-tie the fuse wires together
- Clip the excess from the wire-tie with wire cutters
-
step 7 :Placing the Seat Heater Switch into a Panel
- Disconnect the mirror switch wiring harness
- Disconnect the seat heater wiring harness
- Mark where you want the switch on the panel with marker
- Drill a hole with a 25/32 drill bit
- Clip the switch into the hole on the panel
-
step 8 :Installing the Lower Dash Panel
- Connect the mirror switch wiring harness
- Connect the seat heater wiring harness
- Connect the trunk wiring harness to the lower panel
- Align the lower panel
- Insert the Phillips Head screws to the lower panel
- Push the mirror/seat heater panel into place
- Insert and tighten the 8mm screw
- Insert and tighten the 7mm screws
- Replace the fuse box door
-
step 9 :Installing the Seat Panel
- Connect the wiring harness if you have power seats
- Press the panel into the side of the seat
- Insert the four Phillips screws into the seat panel
- Flip the seat over
- On the bottom, insert the Phillips screws on the bottom of the panel below the seat
- Tuck the seat heating wire into the panel
- Insert the Phillips screw on the top of the panel below the seat
- Wire-tie the heat pad harnesses to the bottom of the seat
- Flip the seat upright
- Insert and tighten the T25 Torx bolt into the side handle
-
step 10 :Installing the Seat
- Place the seat upright in the vehicle
- Connect the heat pad wiring harness
- Connect the power wiring harness if you have power seats
- Thread the 15mm bolts on the track behind the seat by hand
- Tighten the 15mm bolts preliminarily
- Thread the 15mm bolts on the track in front of the seat by hand
- Tighten the 15mm bolts preliminarily
- Tighten all four bolts the rest of the way
-
step 11 :Testing the Heated Seats
- Start the vehicle
- Turn the heated seats on High
- Test the seat for thirty seconds to a minute
Tools needed
-
15mm Socket
Hog Rings
Hog Ring Pliers
25/32 Drill Bit
Flat Blade Screwdriver
Phillips Head Screwdriver
8mm Socket
7mm Socket
Drill
Wire Ties
Ratchet
Needle nose pliers
Wire Cutters
T25 Torx Driver
Marker / Writing Utensil
Brought to you by 1AAuto.com, your source for quality replacement parts and the best service on the Internet.
Hi, I'm Mike from 1A Auto. I hope this how-to video helps you out, and next time you need parts for your vehicle, think of 1AAuto.com. Thanks.
In this video, we're going to show you how to turn your seats into heated seats. This can be done to any vehicle. However, the process will vary based on the style and designs of seats. We show you this process on this 2004 Chrysler Sebring. The items you'll need for this include a heated seat kit from 1AAuto.com, a 7mm, 8mm and 15mm socket and ratchet, Phillips screwdriver, flat blade screwdriver, T25 Torx bit, zip ties, 25/32 drill bit, and pliers.
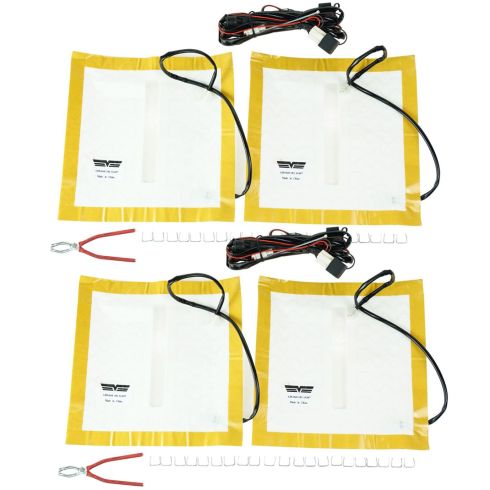
Here's the kit from 1A Auto, you can see it comes with a heat pad, one for the back, one for the seat, and then there's a wire harness here with a switch that you can mount to your dash. You can see the connections; it's got an inline fuse that we're going to connect to our fuse box, along with a relay and a ground wire, and then these hog-rings and hog-ring pliers. It may look intimidating, but we're going to show you how to do all of it. You'll be doing this process on the driver's seat.
You just want to roll your seat back all the way, and then we have two 15mm bolts here. You want to go ahead and remove those. We're just going to fast-forward as Don does this. Once those are out, slide your seat forward, and remove the two 15mm bolts on the back here. Again, we'll fast-forward as Don does this. Now, again, roll your seat all the way back and tilt it up.
Now underneath your seat, if you have power seats, you're going to have a harness here. You just want to go ahead and disconnect that. You can just pull your seat right out. On the seat, you're going to want to remove this plastic panel. To start off, just remove these two Phillips screws right here. Again, we'll fast-forward as Don does this. Now, you just want to flip the seat downwards and underneath. On this plastic panel you'll see there are two more Phillips screws: one up here and another one right down here. It just pulls off. If you have power seats, you're going to want to remove this harness right here.
Now, using a T25 Torx bit, you want to remove this handle. Now, you just want to go around and pull up your seat cover from around the edge. On this particular vehicle it's clipped on, so you just want to pull up and unclip it. We'll fast-forward here as Don finishes doing this. For some parts of this, it may be easier to use a flat blade screwdriver to help you pry up that seat cover. Now, you want to just unclip the lower seat cover from the upper seat cover, and just separate this rubber clip here.
Now, you want to flip the seat back upright. Pull that rubber clip part of your seat cover back out towards the front. Tip the seat onto its back. In this particular vehicle, the seat cover is actually glued to the foam inside, so you're going to have to carefully just separate the foam from the seat cover. You're going to want to do this until you have enough room to fit that entire heat pad inside the seat. We'll just fast-forward as Don does this. Once you've separated enough, you want fit your heat pad up inside the seat. Now, you want to peel away this strip here and push the adhesive down onto the foam. You're going to want to be careful doing this because it is very sticky and will stay stuck to whatever you stick it to. If it's easier, just do it little pieces at a time. You're going to want to do this around the entire heating pad. Tilt the seat upright and again, you just want to pull up your seat cover. You can see it's glued here, too. Again, just carefully separate that.
You're actually going to have to put the harness through the seat, so you just want to push a hole back out through this end so you can get the harness down out through there, and then you just want to feed the heat pad into the seat and push that harness through first. Make sure you pull it out the back of the seat. There it is. Make sure you have the heat pad lined up and flat. You want to just peel off the adhesive and, again, press it down into place. Go around the entire heat pad and do this. Then we're going to fast-forward here as Don pulls the seat cover back down over the foam. You want to do this all the way around.
Re-clip the seat cover back together. Then you can see we actually have a little spot on ours that was already there, and that's where we're going to put our harness. If you don't have one, just don't clip a spot where your harness is, and try to clip around it. We're just going to fast-forward as Don re-clips the seat cover. Now, we just need to remove the panel so we can install the wires and the button.
You want to start off removing this 7mm bolt here and these two 8mm bolts down here. Now, you just want to pry out this panel right here, and you'll see behind it there are two Phillips screws right here. You want to go ahead and remove those. Once those are removed, you can just pull down this panel. Briefly touched on earlier, here's your harness with the switch on it. We're just going to show you where to clip your relay, as well as where to run these wires for your heat pads, where to clip the wires to your fuse box, and where to clip them to a ground wire.
I'm going to start off by just disconnecting this panel right here, so you can put that aside. Now we're going to run the wires underneath your center console, so you just want to pull out on the panel and tuck the wires up in there. You'll see we do this all the way up and underneath the dash. Now, you want to take your ground and your fuse wires and run them up through here, through where your fuse panel was on the side here, and then you're going to want to bolt the ground to something metal. There's a 10mm bolt right here in the body of the car, so we're just going to remove that, put the ground onto the clip, and just replace that bolt.
Now, using a pair of pliers, you want to just pull out the largest fuse you can. You can see we pull out one that says 30"� on it. You just want to clip that fuse wire onto the tooth on the fuse and push that right back into place. You can see there it is right there, and here's an inline fuse which we're just going to sit up onto of the fuse panel. Now bundle up your wires, try to keep them nice and neat (you can see we just rolled ours up), and then you want to zip-tie them up into place here. You can tuck your relay back behind there. Now you want to just disconnect this little panel here, and you want to disconnect your switch and take that with you.
Here we're going to show you how to put the switch into a panel. You just mark where you want to put it, take a drill with a 25/32 seconds drill bit and drill the hole. Then you just want to feed that wire through and your switch will just clip right into place. There you have it.
Now, you want to reconnect your switch and this panel here and just put that up into place along with the lower panel. We'll just fast-forward here as Don replaces those two Phillips screws, pushes that panel into place, and then replaces the 8mm and two 7mm screws. Now, in the seat, you want to reconnect this plastic panel and replace the four Phillips screws that hold it into place. When you're doing this screw, make sure that you tuck the harness underneath that plastic panel before you put the screw in.
Now, you want to just zip-tie your heat pad harnesses up and out of the way under the seat. Now you can flip your seat over, replace that handle, and that T25 bolt. Put your seat back into your car. Now, underneath the seat, you just want to connect all your harnesses, your heat pads, and your power seat if you have it. Now, you want to just replace those four 15mm bolts in the seat. Don starts with the rear ones, just puts them in by hand, tightens them up a little bit, does the front ones by hand, tightens them up, and then you want to go around and tighten up all of them the rest of the way.
Now, you want to start your car. We're just going to test these heated seats out, turn them on, and put them on high. We've got our infrared thermometer here, and, in a matter of 30 seconds, you can see the seat's warming up. We're just fast-forwarding through these 30 seconds, but you can see it. You can see after a little over a minute they get nice and warm.
We hope this video helps you out. Brought to you by www.1AAuto.com, your source for quality replacement parts and the best service on the Internet. Please feel free to call us toll-free, 888-844-3393. We're the company that's here for you on the Internet and in person.
Shop Products


How to Replace Seat Bottom Heating Element 2000-2006 Chevrolet Tahoe
This video shows you how to install a new seat bottom heating element on your 2000-2006 Chevrolet Tahoe.
