How To Install Replace Front Stabilizer Links 2001-10 Ford Explorer Sport Trac
Created on: 2015-05-04
Learn how to replace the front stabilizer links with the steps in this how-to video
-
step 1 :Removing the Stabilizer Link
- Turn the wheel by hand
- Hold the stabilizer link nut with a 16mm socket and ratchet
- Remove the 18mm upper nut from the stabilizer link
- Remove the 16mm lower nut from the stabilizer link
- Pull off the stabilizer link
- If the stabilizer link won't budge, remove the link with a reciprocating saw
-
step 2 :Reinstalling the Stabilizer Link
- Remove the top two bushings and washers, the shaft, and one bushing and washer from the link
- Push the stabilizer link into place
- Insert the lower bushing and washer into place
- Insert the shaft into place
- Insert the washer, bushing onto the shaft and insert the link into place
- Insert the bushing and washer into place
- Hold the lower stabilizer link stud with a 16mm socket and ratchet
- Fasten the 17mm upper nut onto the stabilizer link
Tools needed
-
Reciprocating Saw
Rust Penetrant
16mm Socket
Jack Stands
18mm Socket
Ratchet
Floor Jack
Brought to you by 1AAuto.com, your source for quality replacement parts and the best service on the Internet.
Hi, I'm Mike from 1A Auto. I hope this how-to video helps you out, and next time you need parts for your vehicle, think of 1AAuto.com. Thanks
In this video, we're going to show you how to replace the stabilizer bar links on this Ford Explorer Sport Trac. It's the same process for many of the Explorer Sport Tracs, as well as the regular Explorer Mountaineer, Ranger, etc. We show you on the right side, but the driver side is the same procedure. Items that you'll need for this repair are new stabilizer links from 1AAuto.com, a jack, 16mm and 18mm sockets with two ratchets or wrenches, and you'll need a reciprocating saw if your link is as rusty as ours is, and then some penetrating oil.
Our truck was making some rattling noises, and we can feel a little bit of clunking in the steering wheel. Coming under here, this is your stabilizer bar, and it's linked to the control arm with these links. When you grab hold and shake them, they should be nice and firm. This isn't the best shot, but as you can see, as we grab hold and shake it, it'll move around some. That's causing some of our clunking and rattling.
This repair, actually you can keep the wheel on. I just have it off to make it a lot easier to film. What I've got here is you can see that the lift is underneath the frame so it's supporting it, and I just have the jack under here to put the weight back on so that you can see I can grab hold of the link and move it back and forth. That's how it would be if it was just sitting on its tire as well, but this makes it a lot easier to video.
We use some penetrating oil and spray the top of the shaft. You'll see that was kind of a [mute 00:01:51] point. 16mm socket on the bottom and then an 18mm socket and ratchet on top. You're going to see it just breaks apart, which is actually a good thing.
I can see the condition is really bad, but I'm still going to make a half-hearted attempt. Spray the stud down with some penetrating oil. Then I take a few whacks at it with a hammer, but it makes no movement at all. I'm going to bring in the big guns. Lock onto that top stud with some locking pliers to hold it from spinning. Then, a reciprocating saw, and I'll fast-forward here as we cut through down at the other bushing. There you go. Your old one is out.
Take your new link. Just remove the nut, remove the top two bushings and washers, the shaft, and one of the bottom bushings and washers. You just now have the shaft and one washer and bushing at the bottom. Put it up through, put one bushing and washer with the washer up on, and then put the sleeve on. Jacking up the side you're working on and letting the wheel hang down some will help you get extra space. Now put the washer close to the sleeve and put the bushing on. The little step should go into the sway bar, then push the link up through. Put the top bushing on, then the washer, and the nut. I just jacked the suspension up a little bit more. If you're not taking the wheel off, you would let it down a little bit just so you can get things together and thread the nut on.
You want to replace the other side. You can see I've replaced it. I did it with the wheel on, and I've also tightened it up. Now you want to tighten them up. The new links may be a slightly different size. I think it's a 16mm link and a 17mm nut. When you tighten them up, you basically want to tighten them, make sure that the vehicle is in the correct ride position. Again, if you're just doing it with the wheels on, it's a little simpler, because with the wheels on it's in the correct ride position. You're basically tightening it up until the bushings push out enough so that they're the same kind of size or diameter as the metal washers. If you do end up taking your wheel off, make sure you reinstall it and torque the lug nuts to 100 foot-pounds each.
Thanks for tuning in. We hope this video helped you out. Next time you need parts for your car, please visit 1AAuto.com. Also check out our other helpful how-to and diagnosis videos.
Shop Products


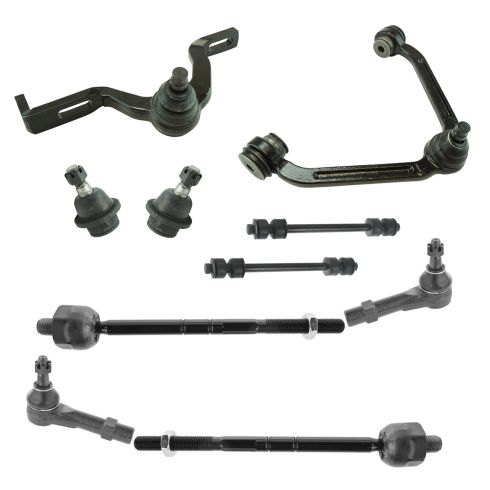
Ford Front 10 Piece Steering & Suspension Kit TRQ PSA85416
Part Details:
- (2) Front Sway Bar Links
- (2) Front Lower Ball Joints
- (2) Front Upper Control Arms with Ball Joints
- 10 Piece
- (2) Front Outer Tie Rods
- (2) Front Inner Tie Rods
How to Replace Front Sway Bar Bushings 2002-09 Audi A4
How to remove, replace, and install a sway bar bushings on 02, 03, 04, 05, 06, 07, 08, 09 Audi A4
