
How to Install Replace Front Lower Ball Joint with Stuck Rusty Cotter Pin 2001-07 Toyota Highlande
Created on: 2018-02-16
How to repair, install, fix, change or replace loose, worn, or creaking ball joints on 01, 02, 03, 04, 05, 06, 07 Toyota Highlander.
-
step 1 :Removing the Wheel
- Loosen the lug nut covers with a 21mm socket
- Pry off the center cap with a flat blade screwdriver
- Loosen the lug nuts with the vehicle on the ground
- Raise the vehicle with a floor jack
- Secure the vehicle on jack stands
- Remove the lug nuts
- Pull off the wheel
-
step 2 :Removing the Castle Nut
- Pull the hub and rotor out
- Spray rust penetrant on the ball joint nut
- Straighten out the cotter pin
- If the cotter pin breaks, loosen the nut with a 19mm wrench and dead blow mallet
- Punch the cotter pin out with a hammer and punch
- If the nut remains jammed, move to the next step
-
step 3 :Loosening the Axle Nut
- Place the wheel on the vehicle
- Hand tighten the lug nuts
- Lower the vehicle to the ground
- Tighten the lug nuts
- Pop the center cap off
- Insert a flat blade screwdriver or punch into the nut to loosen it
- Loosen the nut to the end of the axle
- Loosen the lug nuts
- Raise and support the vehicle
- Remove the remaining lug nuts
- Remove the wheel
-
step 4 :Removing the Axle and Ball Joint
- Spray rust penetrant behind the nut
- Test the axle nut for play
- Tap the axle nut with a dead blow hammer
- Test the axle for play
- Remove the three nuts from the control arm with a 17mm socket
- Pop the ball joint out of the control arm with a pry bar
- Remove the axle nut
- Pull the axle out of the rotor
- Pry the control arm down into the ball joint and capture the nuts
- Tap a 19mm socket onto the castle nut
- Loosen the castle nut with a breaker bar
- Remove the control arm from the ball joint
- Remove the ball joint
-
step 5 :Installing the Ball Joint
- Insert the ball joint up into place
- Tighten the castle nut by hand
- Tighten the castle nut a few turns with a 21mm wrench
- Insert the axle into place
- Loosely tighten the axle nut
- Tighten the 19mm nuts to the ball joint
- Torque the nuts to 76 foot-pounds
- Lift up on the ball joint with a floor jack
- Tighten the castle nut
- Insert the cotter pin
- Bend the ends on the pin
- Remove the floor jack
- Tighten the axle nut by hand
- Tighten the axle nut with a 30mm socket and ratchet
-
step 6 :Reattaching the Wheel
- Slide the wheel into place
- Start the lug nuts by hand
- Tighten the lug nuts preliminarily
- Lower the vehicle to the ground
- Tighten the lug nuts to 76 foot-pounds in a crossing or star pattern
- Tighten the hub nut to 217 foot-pounds
- Tap the axle nut with a hammer and punch into the groove
- Reinstall the center cap
Tools needed
-
Socket Extensions
Torque Wrench
Hammer
Rust Penetrant
Pry Bar
Jack Stands
Complete Metric Wrench Set
Utility Knife
Flat Blade Screwdriver
Center Punch
Bungee Cord
Ratchet
Floor Jack
30mm 12-Point Socket
Needle nose pliers
Complete Metric Socket Set
You'll loosen the lug nuts with the vehicle on the ground so the wheel doesn't spin. Use a long breaker bar that has 21-millimeter deep socket. Now, raise and support the vehicle. With the lug nuts loose, we use the socket to finish removing them. On this car with the steel wheel, the center cap can actually stay here while you remove the lug nuts. All right, now we can remove the wheel.
It may seize to the hub. Take a couple lug nuts and just thread them on a few turns by hand. You don't want the wheel to fall off because I'm going to use a dead blow mallet to break it free. I'm going to hit right on the tire. There it goes. It might take one hit. It could take a couple good hits, but it should break free. Take this off. Put it out of the way.
Twist the hub and rotor out. Spray some rust penetrant on the ball joint nut, and then work on removing the cotter pin. Use some needle nose pliers. Bend the cotter pin up. Try to get them straight. That one is pretty far into the castle nut on this side. A little tricky to get it out. Grab it and try to push it out of the other side. So I'm going to try to break it off. The cotter pin is basically broken off. It's flush with the nut, and it's flush on the other side inside the little castle opening, so what I'm going to do is take the 19 millimeter box wrench, and I'm just going to try to break the cotter pin as I loosen the nut.
Let's see if I can… sometimes you can't get that in there, so I got to use the open end. I'm going to use a dead blow mallet to try to break it free. Got a punch a ball-peen hammer. I'm going to try to punch the cotter pin out. To remove this lower ball joint and get this nut off, I tried to remove the cotter pin. It was too rusted and rotted, and it was stuck too deep inside of the castle nut, so I couldn't pull it out. I tried to punch it out. That didn't work.
I tried to put the open end of a box wrench on there to try to just break it because the cotter pin was so rusty, and that doesn't work. I can't get enough leverage on it. I also can't get a good grip by using the closed end. It doesn't quite fit. This axle's in the way. We're going to replace the axle anyways, so if the bolt or if the nut is stuck like this in your vehicle, you can remove the axle, and you'll get better access to get a wrench in there.
What I'm actually going to do is put a socket and a breaker bar and give me more leverage to break the cotter pin that's still stuck in there and remove this nut from the ball joint, but first, I have to loosen the axle, and then pull it out of the way. I put the wheel back on the vehicle. I lowered it back down to the ground. Now I'm going to pop the center cap off. On this one, with the steel wheel, the center cap pops out from the center. From the front, just take a small flat bladed screwdriver, pop it off. It will come right off.
If you've got an alloy wheel, you may need to take the wheel off first, pop the cap out, and then put the wheel back on. I like to have the wheel on the car and the car on the ground to remove this axle nut. It's a lot easier because these axle nuts have a lot of torque to them, than trying to do it with the vehicle on the jack stand, and also you'd have to have someone hold the brake for you to prevent it from spinning. This way it's all on the ground. It's not going to move or rock back and forth. The axle nut is staked. It doesn't have a cotter pin, so you'll take a flat bladed screwdriver or the appropriate-sized punch.
This one's a little bit too big. I'm going to need a smaller one. I'm using a worn out, old, flat bladed screwdriver. Just kind of work it in here. You don't have to get it fully bent back out. Just enough that you can get on there and then turn it. So I'm going to use a little ball-peen hammer. A screwdriver might not be enough to do this. It's not really meant for it, but if you don't have a small chisel or a punch to get in there, spray it with some rust penetrant to help it spin. Use a 30-millimeter, 12-point socket on the end of the breaker bar. This might take some force. There we go.
I'm just going to loosen it up. I'm just going to get it just so the end is beyond the axle, and this should be so that when I've got it up in the air it will be easier to spin it off. I won't be fighting trying to spin the thing off the whole axle. Put this aside. Take some rust penetrant. I'm going to spray it in here. There are splines in here for the axle. I want to make sure it's free. I'm going to tap it with my dead blow, because I want to make sure the axle's going to move free before I loosen the lower ball joint, and this is all moving around on me. Easier to free it up this way. Perfect. That's going to slide right out.
I'm just going to turn this out of the way so you can see what we're doing. I need to remove these two nuts here, and the single bolt that's holding the bottom of the ball joint. Spray some rust penetrant on here and the top of that bolt. Use a 17-millimeter socket and a breaker bar. Got one started. Get the other one, and the bolt. There's the bolt. I'm going to use a pry bar to pop this ball joint out of the lower control arm. That way I'll have enough swing to slide this axle out of the back of the knuckle.
I'm going to finish removing the axle nut. It's still a little stuck. I'm going to use the ratchet. Spin that right off. I'm going to pull the axle out. Actually, I pull the whole knuckle this way, and then pull the axle out. Let's see. Just like that.
To give myself some extra space, bungee up this axle out of the way. There we go. Take a large pry bar and pry the control arm down. Get this ball joint up here get started. Just like that. I'm just going to capture these nuts at the bottom. All I want to do is hold this steady while I break this ball joint nut free. Just going to snug them up. Not going to overtighten them, just seat them down there.
Now I can put my 19-millimeter socket in here. The axle's out of the way. It is a 19-millimeter. It doesn't quite go on all the way because of the cotter pin is sticking out a little bit, so I'm just going to tap it down. Put the breaker bar on. I've got the steering wheel locked, so the steering doesn't move. I'll push against this. Here it is. Just a matter of getting more leverage on it.
Normally, if the cotter pin comes out without a problem, it will just slide out. Then you can put your open ended wrench in here and start to turn this off because the CV axle will be in the way. Since it wouldn't turn with this wrench, I didn't have enough leverage. I had to take the CV axle out, and the cotter pin was stuck in there. I used the breaker bar and the 19 millimeter socket to break it free, but normally you should only need a wrench. I'm going to switch to a ratchet just to make it quicker. Loosen these back up. Take them off.
Use a pry bar to separate this. You could try to hit this with a heavy sledge while it's still attached to the control arm to try to get the ball joint out. Right now it's stuck on the taper that it has. The best way to remove them though is with a ball joint press. I'm just going to slide it in like this. The boot on this ball joint is really thick. It's not allowing me to get the puller on there. Since we're already replacing the ball joint, I'm just going to use a box cutter and just cut the boot away. Pry this out of the way. That's better.
So with the boot out of the way, I should be able to slide the fingers of this tool in just like that and open it up a bit. That's perfect. That's where I want it. I'm going to start tightening it up. Use the appropriately-sized socket. You can see this has a taper to it. It matches the taper on the inside of the knuckle. That's what helps it sit on there nice and tight, and that's why they're so hard to get out because it's not a straight up and down. It's got a taper to it to help hold it in place.
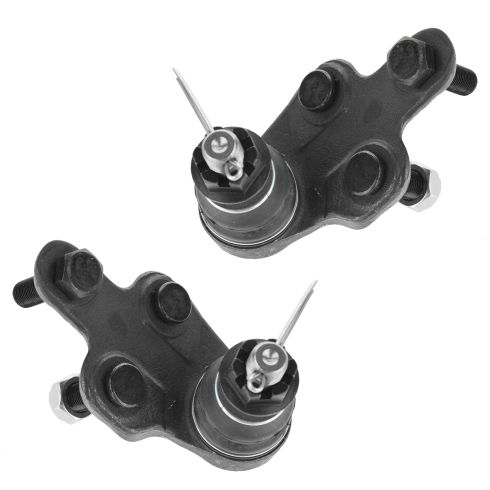
Here's our original ball joint. Here's our brand new one from 1AAuto.com. Same exact style, same mounting studs, and mounting hole for the bolt. This has that nice taper. Opening for the cotter pin. Comes with a new castle nut and also will come with a cotter pin. Also comes with two new nuts for these. That'll work great and fit great in our vehicle. I'm going to put this up under the knuckle. You can bend these. It slid in just like that. Get the nut started.
So the new nut is 21-millimeter. I'm just going to give it a couple turns with the wrench and snug it up. I'll completely tighten it when it's all back together and the vehicle weight is on it. That's good just like that for now.
Remove your bungee cord. Put the axle back into the hub. I'm going to push the hub out, grab the axle, and turn it. See, I have to force it out, and you might have to turn this a little bit as you feed it in to catch the splines, just like that. I put the axle nut on here just loosely so that as I move this around it doesn't pull all the way out. Using a large pry bar, pry the control arm down. This vehicle does have a new ball joint on it. It's pretty stiff. I've got it pushed up and kind of flip it over. There it is. Get the new self-locking nuts started. Just going to tighten these down. I'll come back and torque them afterwards.
Install the bolt. These new nuts are 19-millimeter. Same with the bolt. I'm going to torque them to 76 foot-pounds. Just bring them down evenly. When it clicks, it's torqued. Use the floor jack to lift up on the ball joint. Put some vehicle weight onto it while we tighten it. 21-millimeter box wrench. The closed end of the wrench doesn't fit. Going to use the open end of the wrench. Going to get it as tight as possible, and then make sure that the opening in the castle nut lines up so that the cotter pin can come through.
Insert the cotter pin. I'm doing it from the back so that you can see what we're doing. Bend the ends over. You can use a flat bladed screwdriver. I'm using a pry bar, or a hammer if you need to. You can usually start it with your fingers. Once you're done with that, remove the floor jack. I've lowered the vehicle back down so I could work on it. I unlocked the steering wheel, and now I can turn the knuckle so it's straight. I'm going to tighten up the axle nut. I'm not going to torque it yet, but I am just going to tighten it down. You can just do this by hand at first. I'm actually going to use the axle nut socket to snug this down.
Reinstall the wheel. Our steel wheel has the center cap off. If you've got an aluminum wheel, you want to make sure the center cap, which is the part that's right here, is removed before you install it. Usually they need to pop out from behind because what we're going to do is tighten up the lug nuts, lower the vehicle down, and then torque this with the vehicle on the ground. The center cap can be installed afterwards. Start the lug nuts by hand and get them tight. We'll torque them with the vehicle on the ground. Torque the lug nuts in a cross pattern to 76 foot-pounds. Torque the axle nut to 217 foot-pounds. Since this doesn't have a cotter pin, we're going to stake it using a punch to bend the axle nut flange into this opening in the axle. Reinstall the center cap. It just snaps into place. It'll be the same for an aluminum wheel. It might just be this big. You just pop it right in.
Thanks for watching. Visit us at 1AAuto.com for quality auto parts, fast and free shipping, and the best customer service in the industry.
Shop Products
Toyota Lexus Front Driver & Passenger Side Lower 2 Piece Ball Joint Set TRQ PSA63042
- 2 Piece
- (1) Front Passenger Side Lower Ball Joint
- (1) Front Driver Side Lower Ball Joint

How to Replace Front Lower Ball Joint 2002-14 Volvo XC90
This video shows you how to replace the front lower ball joint on your 02-14 Volvo XC90. 1A Auto shows you how you can do it yourself, step by step!

