How to Install Front Passenger CV Axle 2003-08 Mazda 6
Created on: 2018-09-26
How to repair, install, fix, change or replace broken, worn, or vibrating CV axles on 03, 04, 05, 06, 07, 08 Mazda 6
Tools needed
-
Socket Extensions
Torque Wrench
14mm Socket
Hammer
17mm Wrench
Rust Penetrant
Pry Bar
Jack Stands
19mm Socket
Pipe Wrench
Pickle Fork
32mm Socket
Rubber Mallet
Bungee Cord
Chisel
10mm Socket
Ratchet
Floor Jack
1/2 Inch Breaker Bar
Hi, I'm Mike from 1A Auto. We've been selling auto parts for over 30 years.
Hi, everyone. Sue at 1Aauto.com, and today I'm installing a passenger side CV shaft axle assembly on our 2007 Mazda 6. We ordered this on our 1Aauto.com site. It's a TRQ model design. It comes with a nice brand new locknut, ABS ring. It's the same shaft length as the factory and it has a nice dust shield that goes over the transmission side, covers the rubber seal, keep it from dirt. One of the things I love about this TRQ shafts is I've been testing them every time I get them and they don't fail me at all. I can physically grab and turn this with no binding. I have seen brand new ones come from other brands where I have to put an effort into it and really move them. You don't really want that because it causes a shake going down the road. It will eventually break in, but who wants eventually? So if you want a part like this or any other parts for your car, clink on the link below and head on over to 1Aauto.com.
So we're going to start by removing the wheel. I have it partially on the ground so I can break the lug nut free. It's a 21 millimeter socket. I've got my half inch breaker bar. All right, so now that those are broken free and I can turn it by hand, I'm going to raise my vehicle. I have a two post lift. If you have a floor jack and jack stands, you'd do the same thing.
So now with the car up in the air, we're going to remove the lugnuts and set them aside. Perfect, that's frozen on there. And this happens quite often when you have an aluminum rim with a steel front end. Obviously the steel and the aluminum, they oxidize together. So I'm going to show you how to take this wheel off safely. A lot of people don't think about this. I know I didn't the first couple of times I did it. Take a lug nut and just put it back on by hand. Not all the way, halfway. And now when you take your rubber mallet or your pry bar and you hit it from the other side, it doesn't fly off. I take a rubber mallet and I hit the rubber part of the tire on the backside. That came off nice and easy. Sometimes they don't want to come off that easy and you've just got to keep giving it an effort back and forth. Now we can remove that lugnut and dismount the tire.
So to break the axle nut free, I apply a pry bar in there because I don't have someone to sit on the brake pedal for me. Thirty two millimeter socket, and I'm going to be going counter clockwise. And with this 202 foot pounds, it's really on there. So I'm going to use a breaker bar and an old fence post. So now with that broken free, obviously it goes without saying to be careful. This can slip out. Do it at your own discretion. If you have an air gun, that's the way to go. Now that we have the axle nut out, we can remove the pry bar and raise our vehicle backup.
I'm going to be removing the axle and I'm going to just undo the top control arm nut and the ABS sensor and the flex hose mounting bolt, and that is how I'm going to get my maximum swing of the knuckle and the rotor so that I can get the axle out that way without undoing the two lower ball joints because those are pressed in. This is just a 10 millimeter socket to remove that ABS sensor mounting bracket. And I'm doing this now before I take the upper nut off because I don't want any pressure to swing out on the control on the sorry, on the pressure on the flex hose for the brakes or this wire. The front flex hose mounting bracket bolt is a 12 millimeter socket. Break it free. Get that out of the way. I want to get that clear.
So we're removing the upper ball joint nut, lock nut. It's a 17 millimeter socket or a wrench. Now that I broke it free with the wrench, I'm going to give it a little spray and move over to a socket and ratchet. So now to break the upper ball joint from the knuckle, I'm going to hit it right here where that point is with a hammer. If you have a pickle fork at home, you can try that, but you don't want to tear the boot if you're reusing the ball joint.
So hitting it a couple of times with a hammer, sometimes it will jolt that stud free out of the knuckle. In this case it didn't, so I am going to be using my pickle fork. I'm going to guide it and hope that I don't pinch that boot. I really don't want to tear it. Nice and easy, so we're in good shape. So now with the upper control arm clear and the ball joint out of the knuckle, we have to hit the CV shaft axle center nut or stud. Got to push it through the hub. Now they give you a nice little punch hole here so you can use an air chisel with a punch on it and hit right there. I have presoaked this because it gets stuck in the splines.
If you have a stubborn one, I recommend presoaking it and seeing if you can use a chisel or a punch because you don't want around that axle if you're reusing it. And I'm going to reach my hands in here and pull it out. The reason I disconnected these, as you'll see right now, I can get a good throw. I can turn that all the way without any strain on the flex hose.
So now that I've raised my vehicle, I'm going to take the passenger side CV shaft axle out. There is a extension shaft here that goes into the transfer case of the transmission and it has a carrier bearing on it. Some models, you have to press that off. On this particular model, you don't. The CV shaft actually separates from this long steel or spline. So I'm going to use a hammer. I like to use a hammer that has an actual hammer peak on it, like a, like a blacksmith's peak. That way I can get it at the right angle and hit that. So I'm going to clear and make sure this has got some movement down here so I can pick up the distance and I'm going to hit it out. There we go.
I cannot remove the axle and I've tried. So I wanted to show you at home, you might say, oh look, I can clear this and I was thinking the same thing, but you can't. It's just that little bit that you can't. So with the top of the knuckle disconnected, I'm going to disconnect the caliber, easy access. I've already dismounted my flex hose so there's no strain on that. So with a 17 millimeter socket, I'm going to just undo the caliper bracket bolts. I don't need to undo the sliders because we're just going to lift this whole bracket up. Instead of the side. If you don't have a bungee cord and your piece of rope, even like a metal hook, you're going to want to hang this caliper out of your way.
I'll pry the caliper off the rotor. I like to use a Bungee cord, so I'm going to use the coil spring, and get this up out of the way and move it to the back. Now we can see clearer so you have the clearance. It will not fit through the inner CV joint. Circumference is bigger than the wishbone. So all we have to do now is undo the wishbone and then we can slide the shaft right through between the level control arm. The reason you don't want to undo this lower controller is there are pressed in bushings in the front and in the rear ball joint. Those have to repress back in and out, way too much work for this. So do it the easiest way. Take the wishbone out, bolt out and slide it through.
So now I'm going to dismount this lower strut tower, which is a, they call it a wishbone onto the lower controller. This is a 15 millimeter socket. The nut has a lock clip on it, so it's, you can't put a wrench or anything on that side. Just loosen that nut. I'll show you what I mean about the nut, how it has a lock on it. So that's spot welded. So you can't, holding this means nothing because it stops itself, it hits the metal on the wishbone. At this point there's no threads left, I'm just trying to get it out from the pressure of the wishbone and the control arm. You might when you're at home, if you're doing this on the ground with jack stands, you're going to need the jack to put on this lower control arm when you put it together. You can actually use it right now too to get the pressure off. But I have the luxury of a lift, so I'm just going to let it drop a little. There we go. Now I'm just going to swing the lower part of the strut, the wishbone over to the right. And now I can hopefully guide my CV shaft out. And there we have it.
So this is a TRQ axle from 1Aauto.com. It comes with a new lock nut at the end where it goes to the hub. It's got the ABS ring. It has boot clamps, nice and sealed unmarked. It has a dust cover for the inside. Identical to the factory, the same length. The diameter of the shaft is the same, so if you need this part or any other part for your car, click on the link below come on over to 1Aauto.com.
As I was getting ready to install my new TRQ axle, I noted that there's a double spline here like a keyway. So I checked my factory one. The same keyway is there. So I went to the vehicle and I checked the exterior splines to see if there was a two way keyway and there is not. So that means that this axle's probably multi-fit. So please check your vehicle and if it has that key ay, make sure you line it up so you're not causing any damage or getting frustrated. So this will go on any way because there is no key way I can line those splines up in any way I want.
So now I've got my new axle. I'm going to just guide it up in, and if you can see there's a lock clip that hangs down. It's a spring lock. I like to put the open part of it on the bottom so there's less fighting for me. I'm going to blind that. Excellent. Just give it a good push. See if I can get some of the dirt off. See it will make a smoother transition on. So you just bring it up and bend it so that it lines up with the hub. See the support, it's coming through. You'll feel them line up. It'll come right through. At this point, I'm just going to put the axle nut on by hand. That just assures me it's not going to back out while I, because we're going to now line up the wishbone with the lower ball joint.
Now at home you can, this is where you're going to use a floor jack. If you have a two post lift and you have a stand jack, that's what I'm going to be using. I'm going to keep the wishbone part in my hand and I'm going to spin my bottle jack up, little bit more. Now I've seen it's gone all the way through, I can take this down and get that out of my way.
So on this nut because it's got this safety lock that locks it into place so you can't use it, I'm going to thread it on and I wanted to go this way on this side of the wishbone. I don't want it to go on this side because when we tighten up the bolt, it's going to be turning it that way. So I want it to bottom out on that wishbone right there. I don't want it to be down here in the control arm.
Before I torque this down, I'm going to put the upper control arm ball joint for the knuckle first. I like to get everything lined up before I torque it all down. So I'm going to get my caliper back to the front of this situation over here. I'm just going to slide it right on the rotor. Now I can put a bolt on. Now I know that everything's where it's supposed to be. Make sure that lines up. Make sure my ABS cable's not twine turned around. It's not. So I can now grab my upper control arm and guide the ball joint through.
So now that I have the lock nut snug down to my ball joint in the knuckle, I'm going to torque it to 39 foot pounds. There we go. So 17 millimeter socket or wrench, and I'm going to tighten up my caliper bracket bolts. So the caliper mounting bolt is 79 foot pounds. So I'm going to take my half inch drive torque wrench and my 17 millimeter socket and I'm gonna torque this bolt to the knuckle. There's top one, let's do the bottom one.
So now I'm just going to remount my ABS cable to the frame. That's that little six millimeter bolt with my 10 millimeter socket and I'm going to put the bolt back on for the front flex hose to the strut tower and that is an eight millimeter bolt with a 12 millimeter socket head to it. Just a second, I'm tightening up the flex hose to the strut tower with my 12 millimeter socket. I'm just tightening that. Then I'm going to get my 10 millimeter socket and tighten ABS cable. They just have to be snug.
Now I'm torquing my wishbone lower strut mount to the control arm, 85 foot pounds, 15 millimeter socket. So I hand tightened the nut down as far as I could, and I've got my 32 millimeter socket and I'm going to torque this puppy to 202 foot pounds. There you have it. And this is the way they want you to lock this castle nut is you take a punch or a flat chisel and you pein it over into that groove. Just give it a good hit, one more time.
So now just going to remind my tire. Put it up against the hub. Put my lug nuts on hand tight. I'm just going to hand tighten them with my socket. Then I'm going to lower it down on the ground. Then I'm going to torque these to 83 foot pounds. It's not going to torque my wheels at 83 foot pounds in a star pattern. That just helps make sure that the seat of the rim is seated correctly against the hub. I'll double check it real quick. There you go.
Thanks for watching. Visit us at 1Aauto.com for quality auto parts, fast and free shipping, and the best customer service in the industry.
Shop Products


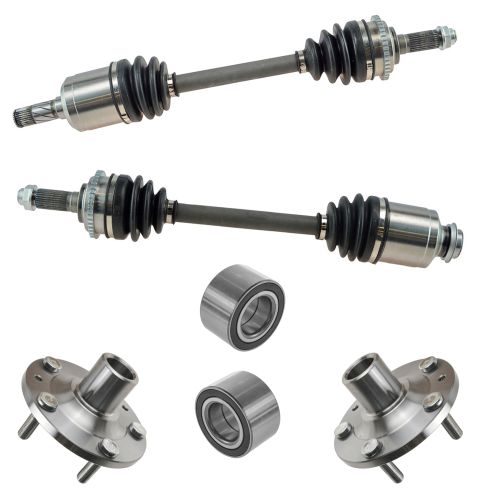
2006-09 Ford Fusion Mercury Milan Front 6 Piece Drivetrain Kit TRQ CSA80109
Part Details:
- Heat Treated
- Precision Machined
- 100% New Components
- 6 Piece
- (2) Front CV Axle Assemblies
- (2) Front Wheel Hubs
- (2) Front Wheel Bearings
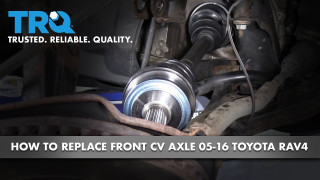
How to Replace Front Driver Side CV Axle 2005-16 Toyota RAV4
How to replace a bent, broken, rusted, or worn front driver side CV axle on your 05-16 Toyota Rav4.
