
How To Replace Front Power Window Regulator 2003-08 Audi A4
Created on: 2015-11-18
This video shows you how to replace the window regulator on your 03-08 Audi A4, S4, or RS4.
-
step 1 :Removing the Door Panel
- Lift the hood
- Pull back the weatherstrip and disconnect the battery
- Disconnect the negative battery terminal
- Pop off the trim button below the door pull
- Pry off the silver trim piece with a flat blade screwdriver
- Remove the two screws on the bottom of the door panel
- Remove the four screws from the top of the door panel
- Pry out the door panel with a door panel removal tool
- Pull the door panel up and off
- Disconnect the door latch cable
- Disconnect the speaker wiring harness
- Pry the orange safety clip on the switch panel wiring harness
- Remove the three T25 Torx screws from the window motor
- Disconnect the three wiring harnesses from the window motor
- Remove the T25 screws from the sensor
- Carefully peel off the water shield
- Remove the three T35 black screws from the speaker
- Disconnect the other speaker wiring harness
- Pull the speaker out, up, and off
- Pry out the two trim panels at the corner of the door with a flat blade screwdriver
- Pry off the weatherstrip with needle nose pliers
-
step 2 :Removing the Window Frame
- Remove the two T25 Torx screws from the bottom of the regulator
- Disconnect the side view mirror wiring harness
- Pull the side mirror wiring from its clips to release it from the door
- Remove the four T45 bolts from the door frame
- Remove the black phosphate coated T45 bolt from the door frame
- Pull the weatherstrip off the side of the door frame
- Pry out the rubber trim button on the side of the door
- Remove the T45 Torx bolt below the rubber trim
- Push the blue regulator motor caps through the door
- Pull the window frame up and out
-
step 3 :Removing the Window Regulator
- Remove the two T25 bolts that hold the window to the regulator
- Disconnect the orange clips from the window
- Slide the window out by hand
- Remove the two T25 bolts from the window track
- Pull the window regulator out
-
step 4 :Installing the Window Regulator
- Make sure the regulator cables are aligned
- Tighten the two T25 bolts that hold the window to the regulator
- Cut the wire ties off the new regulator motor with pliers
- Align the window with the window track
- Slide the window up to secure it in place
- Slide the regulator's rails into the brackets on the window
- Tighten the bottom two T25 Torx bolts
- Slide the window up
-
step 5 :Installing the Window Frame
- Remove the wire clips in the door frame
- Insert the regulator assembly into place
- Push the power mirror harness into the door
- Insert the T45 Torx bolt to the side of the door
- Insert the top T45 bolts to the door frame
- Tighten the two T25 bolts that hold the window to the regulator
- Insert the speaker into place
- Tighten the three T35 black screws to the speaker
- Insert the weatherstrip into place
- Push on the rubber trim on the side of the door
- Push the power mirror harness into place
- Carefully push the watershield into place
- Tighten the sensor with two T25 torx screws
- Push the speaker wire leads into place
- Insert the window motor into place
- Tighten the three T25 screws to the motor
- Insert the three connectors to the motor
- Strap in the mirror wiring harness
-
step 6 :Installing the Door Panel
- Push the orange safety clip forward on the switch panel wiring harness
- Push the orange safety clip in while reconnecting the wiring harness
- Click the speaker wire back in
- Connect the door latch cable
- Lift the door panel up into place
- Push the door panel clips in
- Insert the four screws into the top of the door panel
- Insert the two screws underneath the door pull
- Insert the silver trim panel into place
- Push on the trim button below the door pull
Tools needed
-
Socket Extensions
Flat Blade Screwdriver
Phillips Head Screwdriver
T30 Driver
T45 Socket
10mm Socket
Ratchet
Flashlight
Needle nose pliers
T25 Torx Driver
Brought to you by 1AAuto.com, your source for quality replacement parts and the best service on the Internet.
Hi, I'm Mike from 1A Auto. I hope this how-to video helps you out, and next time you need parts for your vehicle, think of 1AAuto.com. Thanks.
In this video, we're going to be showing you how to replace the front window regulator. We're going to show you the driver's side, but the passenger side is a similar procedure. This is a 2007 Audi A4, and this procedure should be the same for 2003-2008 A4 sedans and wagons for the front.
Items you'll need include a new window regulator from 1AAuto.com, Phillips and flat blade screwdrivers, 10mm T25, T30, T45 Torx drivers, ratchets and extensions, pliers, and a flashlight will help too.
To start out, open the driver's door and release the hood. Pull the lever here back, and that pops the hood, and then you want to disconnect your battery. Now on our vehicle, I believe a couple panels are missing but you just want to pull this weatherstrip back and you can pull the panels up and out. I think there should be one over the battery, but there's not and then you want to use one, once you have uncovered the battery, a 10 millimeter socket and ratchet or a 10 millimeter wrench. Loosen the negative or the black battery cable and pull it up and off and put it off to the side so it doesn't contact the terminal.
Use a flat blade screwdriver and a rag or paper towel to protect the plastic and fabric. There's a little oval panel underneath the door. Pull and you pry out the bottom and it comes out and then you want to pry out this bright strip. You just pry the front out and pull firmly and then pull the back towards the front of the car to remove it.
Six screws hold the door panel on. There's two underneath the door pull and four gold screws at the top. We'll just fast-forward here as I remove those with a Phillips screwdriver. The two that are under the door pull may stay in there. Just make sure you collect them after the door panel is off. Then you can pull from the, starting at the top, pull firmly and you'll release the clips. Our panel comes off a little bit easily, probably because it's been off before, so you may have to pull a little more than what I did there, so just pull around the edge and then once you have the clips released, pull the door panel up and off. I try and gather those screws.
Once you have the panel back, you're going to pull your cable out of the clip and then there's a little hook that you release. Then there's a wire that goes into the speaker. It just has two tabs at the top. Squeeze them together and pull the harness up and out, and then there's a harness here that has an orange safety clip, private safety clip a little bit first. Then pull the connector and the clip down at the same time.
Use a T25 Torx bit and remove the three screws that are holding the window motor in place. Then you can pull the window motor off. It has three connectors on it and they all have a little tab that you push and release. Some of them are a little more difficult than the other ones. Carefully remove the foam insulation and water shield. Even though I'm fast-forwarding it, I am pulling carefully making sure I don't tear or stretch out that shield.
And then you'll need a T25 Torx driver again to remove the sensor. Once that's off then finish, again carefully removing the shield from the door. Pull, and I watch, make sure that the glue doesn't tear the water shield. Connect the other lead from the speaker, again two tabs that you push inside toward each other, and then pull it out. Then the speaker's held in place, again, with three T35 large headed black screws. Then the speaker pulls out and up and off.
Actually, there are two trim panels to remove at the top corner of the door, there's this outer one and there is one to the left of this that I removed and I didn't get to film, but it's a smaller one that's right next to the mirror. Remove them both. They both pull off. Then there's a T30 Torx screw at the bottom of the window frame. Remove that. You want to remove the bottom of the door weatherstrip the bottom of the door, so pull out on the weather strip, and once you pull out you can see the white and yellow clips that are in behind there. Pull out and then pry the clips. I have a little trim tool, but you could also use a pair of needle nose pliers and do the same thing.
You can see I start using the needle nose pliers right there. Try and do this carefully. The better shape that you leave the clips, the better it'll go together afterwards. In behind where you pulled the speaker, there is a T25 Torx screw that holds the bottom of the regulator on. Remove that one, and then there's the other one further back, remove that. Now we're going to free up the harness for the mirror, and there's basically a little strap clip that you pull off. Pull firmly and it'll come off, and then that frees up the end of the harness. Pull the plug from the door and feed the harness through into the door, and then what I didn't shoot very well, and I apologize for this, there are two harness clips inside the door. You have to reach in there, feel the harness where it's attached to the door, and pull firmly to pull the harness clips from the door. Four T45 bolts now hold the frame to the door. One up here in the front. I'll fast-forward there to remove that one.
Then there's another silver one further back. Now there's a black phosphate coated one at the front, and this one is the longest of the four. Pull this weather strip off and then flat blade screwdriver, pry that cap out. Then there's another T45 Torx bolt, and you'll need the T45 Torx bit as well as a socket ratchet and extension, and remove that one. Use a screwdriver or a pair of pliers to push the teeth that are on the regulator transmission and then push them through. Now pull the window frame up and out, being mindful of your power mirror harness as well as your weatherstrip. Two T25 bolts hold the window to the regulator.
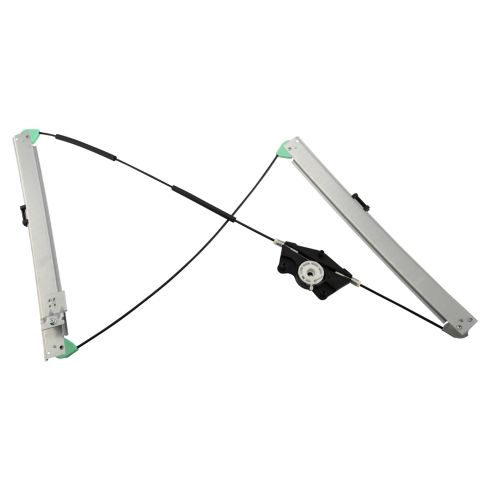
Once you have those off, slide the window down, and then you can push the regulator down to unclip those clips. I force it a little further, and the window comes free on its own. What I should have done prior to that was push down on that orange clip to release it. With the window out of the way, two more T25 bolts hold the window regulator to the window frame and pull the cable out of that little white clip and remove the regulator. The new regulator from 1A Auto is on top and to the left in this picture. You can see it's exactly like the regulator that came out of the car. It's going to go into your car installed exactly like the original and work like the new original worked.
Make sure that you have the cable that the blue transmission is on. It should be underneath the other cable, and you can reference and make sure when you take it apart by noting how that was set up, but on that driver's side it's underneath, so you put in the front T25 bolt and tighten it up, then slide the cable and transmission underneath. You put the cable with that clip in and then install that rear T25 bolt. Then make sure you tighten them both up.
Use a pair of wire cutters, or you could even use a serrated steak knife and cut the wire tie that's holding that. You want to be very careful with that wheel that it doesn't pop up out of that transmission. You'll see more of that later.
Now put the window in place. Make sure it goes correctly into the front and rear tracks, and you can slide it up so it's securely in place. Then you can carefully and slowly move the regulator up to the level where the clips are, and again watch that wheel. Make sure it doesn't pop up out of that blue transmission. Then move the rails into place and set them into the brackets on the window. Then start your bolts. Basically, when you tighten these up you want to hold the track into the center where that orange clip is in the center of the hole and then tighten them up Don't tighten them up too much, you are going into plastic, but make sure they're nice and firm, and then you can push the window all the way up, and again having an assistant here or something that holds that wheel down is probably better. You can see I slide it up a little bit then if the wheel pops out I push it back down in until I get the window mostly up into place.
To prepare your door to reinstall, the assembly goes inside, and remove the wire clips, and then you'll want to attach them back on to your wire harness. Down the door, take note, there is a clip that the regulator cable goes into. Raise up your assembly, make sure the weather strip is inside the door, and then feed the power mirror harness down in and lower it into place. Make sure the window regulator transmission goes down into place and evenly put it down in. As you can see, the front slides into place pretty easily once you get it lined up, and then you should pull up on this rubber piece of weather strip and pull it out of the way, and push the frame down in.
From the inside, check, make sure everything's lined up correctly. Clip the cable in for the regulator, and then pull the transmission for the window regulator down and push it into place. Now get the harness for the power mirror back into place, and replace the clips back into the holes and in the door so the harness stays out of the way of the window. Install that T30 screw that's way up front, and then the two silver T45 screws that are at the top of the door, and then the longest black one goes in the front, and then the one in the rear, and then you want to tighten those up nice and firm. Install the T25 screws that hold the bottom of the window regulator rails to the door and we'll keep the speed up as we tighten those up. Then replace your speaker. There is a tab at the top that you hang it up on, and then three T25 screws hold it in place. Those would be three, they have a larger head and they're the coarse thread bolts.
Then I don't even know how I keep working this fast, but we're going to go and put the clips back in on the weather strip, and they should push back into place, and they'll snap a little bit. Make sure it's nice and secure, and reinsert the rubber cover over the bolt hole. Now reach in through and push that power mirror harness through and get it set into that grommet. A good time also to make sure your speaker is connected. Put your water shield back in place, make sure you get that door handle cable to come through, and then put that sensor back on with the two T25 Torx screws. Install the window motor. What I'm going to do is take the three screws and I'm going to put them in a few turns first and give them a good pull to make sure that those studs are locked into the door. Screw them in a few threads, it also helps to get them going, and then once you do that, put the window motor in place.
If you get it, and it won't go on all the way, move the window down a little bit and keep applying pressure on the motor. The gears will mesh and it'll slide right on, and then put those three T25 screws back in place. Tighten them up nice and firm. You are going into plastic, so don't over tighten them. Reconnect the three connectors that go into that door module. Make sure you press them up in there and they click. They are nice and secure. Then put that strap clip back on the mirror harness.
Reinstallation of the panel is the reverse of the procedure. Take the large clip, make sure that the safety clip is forward. Put it up and in, and then push the clip up and in while you rotate the safety clip back, and make sure it clicks into place and locks. Replug the speaker wire back in and make sure it clicks. Pull your panel up close and clip, or put the hook back into the door handle and clip the cable in. You want to lift the panel up into place. Push the top of the panel towards the window and make sure it goes into the ledge clip. Once you get it down, you basically want to look in behind and feel behind and make sure that the clips find their holes.
You can see I do that here. I hit it once in the back, but it didn't really set so I'm just trying to line it up correctly. You may have to move it back and forth just a little bit or up and down, but once you get them in, you can give them a few hits and they set into place. Four screws at the top, fast-forward as I put those in, and then using a flashlight, put the screw onto your screwdriver and guide it in. It might help to use a little bit of glue on the end of the screwdriver just to hold the screw onto the screwdriver while you start it in and I'll fast-forward as I do the other one.
Put the trim panel back in place. Slide the backend first and then again look in behind, line up the clips, and then it goes right into place once you have it lined up. The lower panel, the larger clip, goes at the bottom, and then you basically kind of put it into place, force it up into the panel, and then push the bottom in.
Reconnect your battery and then tighten up the 10 millimeter nut. You want to get it until its firm. You don't want to overtighten it and then once that's all set, put any of the panels back in place and reset that weatherstrip to hold them down in the front.
Thanks for tuning in. We hope this video helped you out. Next time you need parts for your car, please visit 1AAuto.com. Also check out our other helpful how-to and diagnosis videos.
Shop Products


Audi A4 A4 Quattro RS4 S4 Front Driver Side Window Regulator TRQ WRA51987
- No
- No
- Galvanized Steel
- Electric
- No

How To Replace Manual Window Regulator 1980-96 Ford F150 F250 F350
Check out this video from 1A Auto to learn how you can replace the window regulator on your 80-96 Ford F-series truck.

