Replaces
This part doesn’t fit a . Select from parts that fit.
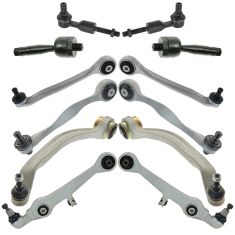
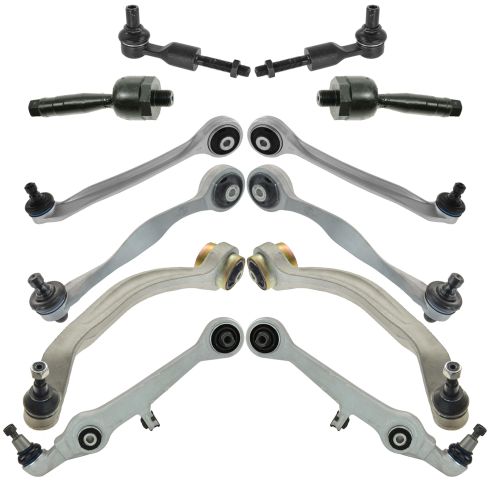
Frequently bought together
Part Details
TRQ suspension kits are manufactured using premium raw materials and coatings for extended service life. Each TRQ suspension component is designed to be a direct, maintenance-free replacement to the stock unit. To extend the life of your steering and suspension components, TRQ recommends replacing components in pairs, sets, or kits. All products are fit and road-tested in our Massachusetts R&D facility to ensure we deliver on our promise of Trusted Reliable Quality.
Product Features
Install Tip: When replacing steering components, have a professional alignment performed afterwards. This ensures proper tracking and even tire wear.
Our steering and suspension components are pre-greased and sealed for long life and do not require the extra maintenance typically required by greaseable versions.
Item Condition:
New
Attention California Customers:
 WARNING: This product can expose you to chemicals including Chromium (Hexavalent Compounds), which is known to the State of California to cause cancer, and birth defects or other reproductive harm. For more information, go to www.P65Warnings.ca.gov
Lifetime Warranty
This item is backed by our limited lifetime warranty. In the event that this item should fail due to manufacturing defects during intended use, we will replace the part free of charge. This warranty covers the cost of the part only.
FREE Shipping is standard on orders shipped to the lower 48 States (Contiguous United States). Standard shipping charges apply to Hawaii and Alaska.
Shipping is not available to a P.O. Box, APO/FPO/DPO addresses, US Territories, or Canada for this item.
Expedited is available on checkout to the United States, excluding Alaska, Hawaii.
Final shipping costs are available at checkout.

Created on:
Tools used
Brought to you by 1AAuto.com, your source for quality replacement parts and the best service on the Internet.
Hi, I'm Mike from 1A Auto. I hope this how-to video helps you out, and next time you need parts for your vehicle, think of 1AAuto.com. Thanks!
In this video, we're going to show you how to remove and replace a tie rod on this 2007 Audi A4. That's the same for '02 to '09 A4 as well as S4, some other Audi models, and VW Passat as well. Items you'll need are a new tie rod from 1AAuto.com, 17mm socket, ratchet with a breaker bar or your tire iron, 22mm and 18mm open end wrenches, 13mm and 16mm sockets and ratchet, jack and jack stands, hammer, and some penetrating oil.
Remove the wheel. Use the special center cap removal tool, available at 1AAuto.com, or you could use a 90 degree pick. Put it into the center of the cap and pull. Loosen your lug nuts. They're 17mm. Loosen them with the vehicle on the ground. Raise and support the vehicle. We'll remove the lug nuts the rest of the way.
Obviously, if you had the benefit of air tools, you didn't need to loosen them up on the ground, but you can loosen them now with either wrench. I'm going to use an impact gun. Now, remove the wheel.
We want to loosen this 22mm nut, and we're going to hold the 18mm nut in behind it. I'm just going to use a little bit of penetrating oil and spray it down first. I've got my 18mm wrench on that back nut and then 22mm on the locking nut. Just pull it and it loosens up actually fairly easily. I'm going to just loosen it up a little bit, about a quarter of a turn. Now, we're going to remove this 13mm bolt on top and this 16mm nut here. You need to drive this bolt out. I'm going to put the nut back on here just so I don't end up ruining the bolt itself.
Hammer, get it going. I've driven it out some. I'm just going to use my upper bolt to drive it out the rest of the way. Then, to get the tie rod to drop down, a couple good hits usually loosens it up a little bit. Just shaking and pulling it down. Put your 18mm back on the end of your steering here and then just turn your tie rod end right out.
The old part that we removed from the vehicle, new part from 1A Auto, you can see they're dimensionally the same length and the important part, which is where it goes in to the steering knuckle is the same as well as where it goes into the end of the rack is the same. This is going to be a functional replacement. It's going to fix your problem if your tie rod end is loose. It may look a little different.
For reinstallation, we're going to take the lock nut, set it to basically the same position as the original. This will give you a good preliminary alignment. You will want to take your vehicle to an alignment shop and have an alignment done after you do this repair just to make sure it's all good. This should be able to make it so it's drivable.
Just set that where it is on the original. Just like before, thread it in to the rack. While you're turning this in, make sure you hold the 18mm nut so it doesn't spin at all. Use a wire brush and just try and clean it out a little bit.
Need to move or twist this shaft so it will go up and this indent will line up so the bolt goes through. Just use a pair of pliers, grab it tightly where the indent is, and twist. The other thing is you'll have to line it up somewhat to go up in there. Once you feel like you have that pretty well lined up, put the tie rod up in to place. You should be able to get it started pretty well with some light hammer taps. It should drive it up in the inside.
This bolt goes in. The flat side should be facing the flat on the other side. Tighten the 13mm bolt first. Then tighten the 16mm nut. Now, hold the 18mm nut on the end of the tie rod and rack and tighten the locking nut.
Reinstall the wheel back up in place. Kind of a pain because no lug studs. Twist it and line up the holes. Tighten the lug nut bolts preliminarily. Lower the vehicle.
Now torque your lug bolts to 90 foot-pounds using a star pattern. Put your center cap back on, just note the largest space here. Find your largest space between the tabs on your cap then peek in behind.
Thanks for tuning in. We hope this video helped you out. Next time you need parts for your car, please visit 1AAuto.com. Also check out our other helpful how-to and diagnosis videos.