Replaces
This part doesn’t fit a . Select from parts that fit.
Install Tip: When replacing steering components, have a professional alignment performed afterwards. This ensures proper tracking and even tire wear.
Our steering and suspension components are pre-greased and sealed for long life and do not require the extra maintenance typically required by greaseable versions.
Item Condition:
New
Attention California Customers:
 WARNING: This product can expose you to chemicals including Lead and Lead Compounds, which are known to the State of California to cause cancer, and birth defects or other reproductive harm. For more information, go to www.P65Warnings.ca.gov.
Lifetime Warranty
This item is backed by our limited lifetime warranty. In the event that this item should fail due to manufacturing defects during intended use, we will replace the part free of charge. This warranty covers the cost of the part only.
FREE Shipping is standard on Orders shipped to the lower 48 States (Contiguous United States). Standard shipping charges apply to Hawaii, Alaska and US Territories. Shipping is not available to Canada.
Expedited is available on checkout to the United States, excluding Alaska, Hawaii and US Territories as well as P.O. Boxes and APO/FPO/DPO addresses. Final shipping costs are available at checkout.


Created on:
Tools used
Hey friends, it's Len here at 1A Auto. Today we're working on our 1996 Dodge Ram 1500, and I want to show you something very basic, replacing a right front tire rod sleeve. It'll be super easy. I can do it and you can do it too. As always, if you need any parts you can check us out at 1AAuto.com. Thanks.
Okay friends, we're underneath the vehicle and we can see we have our right front outer tire rod end comes along here. You have a sleeve right here, that's the adjustments sleeve, and then the right front inner tire rod, which goes to the Pitman arm, which is connected to your steering box. So, what you need to pay attention to is the condition of your threads on each one of these tire rod ends. Generally speaking, if your vehicles as old as this one and it hasn't been serviced in a long time/had any of these parts replaced, they're probably pretty darn rotted at this point. If you look at them, you can see. I'm going to grab a screwdriver here. Just a nice little small pocket screwdriver.
Let's go like this. Just with this pocket screwdriver, I'm literally peeling away the threads on this tire rod, which comes here and then this one right here really doesn't look like it's too much better. This one's semi-decent, so the problem is is inside of this, is this where it is? Feel. Okay, this is turn. So, this somebody put piecing up like that, so moisture and all that crud's going right inside there and it's probably rotted out the threads on the tire rod ends where it goes into the sleeve.
Generally speaking, it's always a great idea to just go ahead and replace the whole thing as one assembly. So, you would get the right front outer tire rod, which is this nice long tire rod. You would get yourself a new sleeve, which you need to do no matter what, whether you're replacing the outer or the inner, and you would replace this as well all at one time. Okay. If for some reason you don't want to, maybe a yours are in good condition, we'll say you're just replacing the outer tire rod, right? The inner tire rod ends still in good condition, which this one isn't. You would basically just unscrew this whole thing. You would unscrew the sleeve from this inner tire rod end right here, take it right out, and then what you would do is you would just count, all right, just to make sure you know how many threads you want to go in on that tire rod end.
So, what we're going to do is we're just going to replace this whole assembly right here, but once it's apart with the new parts, I'll show you how all this would come apart. All right? So, what we're going to do here is we're going to take our measuring tape and we're just going to kind of get like a nice guesstimate of the length from the outside of this tire end all the way across to this one, and it looks like we're looking at about 42 and three quarters. So, we're going to write that down, and when we put together our new tire rods, we want it to be 42 and three quarters inches.
Okay. So, what we're going to do, we have a Cotter pin here and a nut. You would take those off, give this a couple bumps with the hammer and it'll come falling down. This one right here, Cotter pin in and up. We'll come down here. You have where your shock mounts onto the arm. You're going to come right on the backside. There's a Cotter pin back there with a nut, and then right up here, theoretically there'll be a Cotter pin somewhere on this possibly, and also of course the nut. So, let's get started.
Okay. Say it doesn't want to come off. There you go. This one. Get that out of there. This one right here should have a Cotter pin as well. Carpet on this thing's pretty much wasted, so not going to worry about that one, but theoretically should have a Cotter pin and this one should also have a Cotter pin. If they don't, just move along.
Okay. So, we're going to take off this nut right here. It's 18 millimeter. See if we can get it on there. There's our nut. It's a castle nut. We'll set this aside. We'll continue. All right. So, right now this does not come out of our armory here. So, what we're going to do is we're going to take this side nut off, that washer off of there, the shock, and then the other washer that's under there, and then we'll just put like a nice big socket over. It looks like it's about the size of a 22, and then we should be able to break it free from the arm. So, grab our 18. There's that. It's our nut. Little lock in nut. Should be a washer right here. See if it'll want to come off. It's really holding on there. Okay. Our washer. Pull that off of there. That's our other washer.
Okay. So, now we're going to grab a socket and probably just a long ratchet and I'm just going see if I can try to twist this. To get it to break free. Okay, let's get this on here. Oh, yeah. Once you break it free, you should be doing all right. At that point you're just going to take off the nut from the back there. There we go. Put that on there for now. This part right here was right inside there. Okay. Let's move along.
All right. So, we're going to use our 21 millimeter socket right up on here. It's pretty much ready to come off. Let's get our socket off of there real quick. It's our castle nut. I'm just going to put it on a few threads here. We'll come back to that in a minute. We're going to continue on, do this one and that one over there. That one came off nice. Just set that on there. Over here. This one, I think I might grab a swivel. See if I can get a better shot at it. Cool. All right. We're cooking now.
So, what needs to happen now. We've got all the mounting bolts loose or the nuts that hold the studs in, right? So, now we need to start separating things. To do that, if you're replacing this inner tire rod right here, you can go ahead and bonk right up on this as long as you're not worried about damaging it. If you're not replacing this and you're only doing the sleeve and the outer tire rod end, you do not want to bonk this. All right. You're going to have to try to come up along here, give this a few bunks, but then of course you risk damaging your power steering box, so it's really up to you. It's better just to do it as a complete unit anyway.
Of course, there is something like this as well, a pickle fork. You could use this available at 1AAuto.com. Come right in like this. Give it some bonks. You see how it's angled like that? It's going to create a wedge and it's going to separate the two. All right. Could do the same thing all the way down here. The problem with using something like this is it's inevitable. It's going to damage the boot and ultimately, it'll damage the ball and socket as well. So, if you're not replacing the unit, you don't want to use a pickle fork. You're just going to have to keep bonking right about here. Bonk, bonk, bonk, bonk until this finally just kind of seems like it's broken free. So, you do you booboo.
Let's try it with a pickle fork. Right in here. Oh, yeah. That separated nice. Just make sure it drops back in there. We don't want it coming out yet cause we still got a little bit more work to do. This one's in really good condition, so I'm obviously not going to use a pickle fork on this one. Save that one for last. Come right over here. Make sure your nuts on this. Continue with my pickle fork here cause it's working well.
Here we are. There's the reason for having the nut up there. It lets this drop down without actually falling down and potentially hurting anybody. We'll continue onto that last one. All right. So, this one right here is in great condition, so we're going to try to save it. I'm just going to use my nut. Put it on here. I'm going to make it so the threads are flushed with the top of the castle. Okay. As close as possible. It's only so I don't damage the threads on itself and of course I don't damage the nut to the point that I can't reuse it. I was going to give this a loving bonk and see if we can get it to break free. Let's see. Oh, yeah. Very nice.
I'm going to take this out and the arm's going to come swinging down. So, you want to make sure you have everything clear, bring it down and get it out of the way. Put my nut right back on there so I don't lose it or misplace it. Awesome. So, we're cooking right along here. This is pretty much ready to come out. Can use whichever side you want. Take that side out of there. That one out of here and there we are.
Okay friends. So, here we are. We've got it down on the bench for you so we can have a better look. You've got your inner tire rod end right here. You've got your sleeve and you've got your nice long outer tire rod end. If you're doing one at a time, let's say that maybe you're just doing your outer tire rod end right here. That'd be pretty much the outer tire rod end and the sleeve. If you were doing the inner tire rod end, you would do the inner tire rod end and the sleeve. There's never just an inner tire rod end and no sleeve or outer tire rod end and no sleeve, unless of course they're pretty much brand new and they look like this. Okay.
Generally speaking, it's always the best idea to just go ahead and replace the whole assembly. 1A Auto has it all very cost effective and it's really not going to cost you very much to do it right, so I would do it that way, but to continue, if you were just going to do the inner tire rod end, what you would do is you would take this off of the Pitman arm. You would take the bolt out of here that holds your stabilizing shock and you would have it so everything's just hanging pretty much from right here and right here. You would just turn this until it all comes free and vice versa for this side.
If you're just doing this side, you would unattach right here. That's where the left front inner goes to, and then of course you would take this off right here. Okay. Leave all this still attached to the Pitman arm and to the steering thing, and then you'd just take this and take it right off. So, I'll just show you what we're talking about. Let's say this is in the vehicle right now. You would just turn this. What it's doing is it's actually unscrewing both these sides at the same exact time. Okay. When you go to install, it's very important that you time your tire rods properly, which essentially just means that you're going to be putting this on both tire rods at the same exact time. Okay. If it's maybe a thread off or something like that, it's really not that big of a deal. Of course, these things, yeah. Those just come right off. Get this on here real quick. I could probably just take it off, but okay. Just continue getting this thing out of here. Getting very close. There we are.
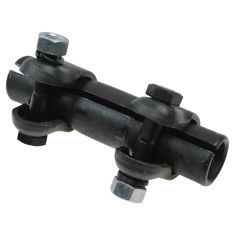
Okay. So, it all came separated the exact same time and that's because of this right here. This is your tire rod adjusting sleeve. It's very important. The inside of this tire rod adjustments sleeve, I'm sure it doesn't look anything like this one where you can see all those threads and they're beautiful and perfect. A lot of times what you'll notice if you did happen to get this off, there will hardly be any threads in there. It'll be rusted and rotted to the point that you don't even know if you're really want to put your tire rods in there. The reason for that is because once you put these on, the threads inside here need to grab onto the threads on here very tightly. If it's smooth surface on either the tire rod or inside the sleeve, even though you tighten this down as good as you can, that could pop right out if you hit a good speed bump or a pothole or whatever you might have in your area. Maybe you're going off-roading. Whatever the case may be. You could pull your tire rod end right out of the sleeve.
So, to avoid that you just replace it. If it doesn't look like it's going to be a saveable type of item like these right here where you can't even see the threads on them, just replace it. Okay. So, let's jump ahead now and we'll do a product comparison.
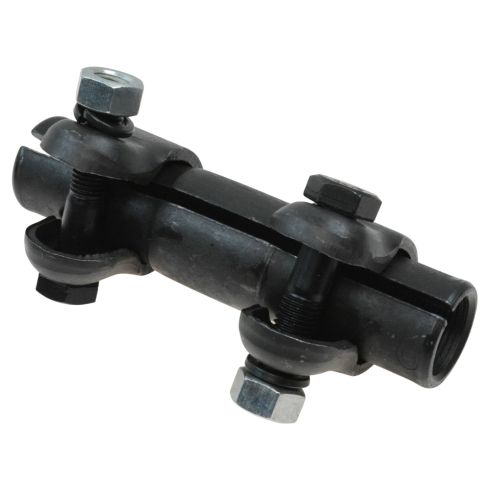
So, here we are, friends. A quick product comparison for you. Over here we have our sleeve, and this is the exact same sleeve as the one that's inside of our 1996 Dodge Ram 1500. It's the same length, which is very important. Okay. You've got a clamp here and a clamp there with brand new locking nuts. Great eight bolts, super important. The one thing that I would like to mention to you about these is that with the old type, they didn't have what we put in ours right here. See that groove right there? There's one right here and that makes it so these bolts can only sit right there. This can't spin around. Dodge did it like this. They put another clamp here with this little rod that comes across, and what that's supposed to do is it's supposed to make sure that you have these two clamps aligned. Okay.
Ours come pre-aligned. You can't mess it up. It's foolproof. So, it's pretty awesome and it kind of does away with a little extra weight there. So, I'll just put that back together, slide it in there, show you it right next to it. Okay. So, there you are. Just like that. With that said, I don't see any reason why this wouldn't be a quality part to install into the vehicle, so I'm going to go ahead and do it. As always, if you need this or any other part, you can check us out at 1AAuto.com. Thanks.
All right. Something that's good to do is you can either use a little bit of copper anti-seize inside the sleeve or right on the bar itself. All right. Let's give a little spritz. Just like that. It's going to help keep moisture out of there and keep it flowing. It's also going to help the alignment person down the road when it comes time to do your alignment.
So, now we're going to start this on. It's important to do this. You just go on a teeny bit on one side, give it two turns just like that so it's on. We're going to do the same thing on the other side, except this one I want to spin the tire on. There we go. Oops. Close. Come on. There it is. Okay.
So, you make sure that you didn't go too far on either side. They're both about the same. Now, what you do is you actually just turn the sleeve. Let's see if I can get it to do it. We're just going to turn the sleeve until it comes all the way up and we'll get it as close to measurement of the original one as we can. Of course, if you had this in the vehicle, maybe you still have your tire rod still attached to the vehicle or the other tire rod, you would just be doing this in the vehicle. Since we're doing it all as one assembly, I can do it right on the bench. It's much easier.
So, now we're just going to measure this real quick. We're looking for 42 and three quarters from one end to the other. So, it looks like we're just over 43 so we'll just take it in a little bit more here. Try it one more time. On the end here, bring it down. Looks like we're getting really close now. One more time. This is just a guesstimate really, like a rough estimate because the alignment person is really going to be the person that's going to get this right in where it's supposed to go. Us personally, we're just trying to get it so it can go down the road to the alignment shop. Go a little bit more. Yeah. So, it can get down the road to the alignment shop without burning the tires off of it on its way.
Sometimes people do stuff like this and they don't measure it. They just kind of eyeball, and by the time they get down to the alignment shop, tires making noises all the way down the road. They're all chopped up, and the alignment guy's going to say, what did you do? Well, sorry, but anyway. We've got this set to 42 and three quarters inches length, so let's go ahead and get it into the vehicle.
All right. So, it's time to get this up in here. I'm going to go right up into the Pitman arm right here. Put our nut on there that way we know we're safe. Bar can't go anywhere. Bring this one over here. Should want to slide right in. There we go. Okay. So, that's started, that's started. We can get our piece in here for our shock. Take that right after we get this in. To get this lined up, you can just try to turn the wheels a little bit. That ones started in. Okay. I'm going to grab our piece.
It's probably a good idea for us to clean this down. I'm just going to clean it real quick, and we'll come right back. Okay. So, we've got our piece. That's going to go right in here just like that. Take our nut. It'll go right on the backside. Cool. I'm going to hold this. I'll tighten this up.
All right. Let's get this tight. It's nice and tight. We're going to take our washer right on like that. Just going to use a little bit of grease right along this shaft right here. A lot of times that'll help get the rubber on there. Just try to get this lined up. There it is. This up on there. Another one here. Snug this side up. Okay. That's pretty snug. Give it a teeny bit more. That's it. Awesome.
Let's tighten this up. We'll tighten this and that. We'll continue here. Okay. So, we're just going to start at one end, work our way down and all we're going to do right now is just bottom these out, and then we'll torque them down to manufacturer's specifications. Here we are.
So, we're going to go ahead and torque this down to 65 foot pounds. Just check it one more time. Cool. Take a peek. Looks as though we might be able to get our Cotter pin right through there. That's where the slot on the slotted nut is and where the hole is through the stud of the tire rod. We'll grab a Cotter pin.
All right. So, we grabbed ourselves a Cotter pin. It's going to go straight through here like this. You can just take your cutters, grab onto it, just try to peen it over. Perfect. We're going to do the same for the others. Torque them all down, 65 foot pounds. That one looks like it's lined up pretty well. That one looks like it's good too. Awesome.
A lot of times they won't line up perfectly and if for some reason your slot isn't lined up with the hole inside your tire rod, you have to continue tightening even past where you torqued it to. You cannot loosen it to the next little slot. You have to continue on to the next one by tightening.
That's pretty snug. Peen this up. Right there. That's definitely tight. Tight. We know that it's tight and this is tight. Perfect. We'll tighten these up real quick.
So, let's snug these up. When you go to turn this, of course the back side of the bolts going to turn. So, we'll grab our pliers. You can use pliers or a wrench or whatever you want to use really. Now, when you go to tighten this down, you don't want to overtighten it. The torque spec for this is only 40 foot pounds, which isn't really very much. Okay. Grab my torque. We're looking for 40 foot pounds here. There we are. This one. There we are. Just going to hit one more time. Make sure its pretty set and finally tight. This one. Okay. Tight, tight, tight, tight, tight. Booya.
Thanks for watching. Visit 1Aauto.com, your place for DIY auto repairs for great parts, great service, and more content.
Tools used
Tools used
Hi, I'm Mike from 1A Auto. We've been selling auto parts for over 30 years. We're dedicated to delivering quality auto parts, expert customer service, fast and free shipping, all backed by our 100% satisfaction guarantee. Visit us at 1AAuto.com, your trusted source for quality auto parts.
So in order to start this project you want to go ahead and loosen the wheel and the lug nuts here. We're going to use a breaker bar with a 19 millimeter socket. So next we're going to go ahead and raise and support your vehicle. You can use a jack and jack stands. In this case here we're using a lift to make it a little bit easier. Just go ahead and remove the lug nuts here just by using that socket because we've already loosened those. With the lug nuts removed we can now go ahead and remove the wheel and tire.
So this right here is your outer tie rod end. We have the nut here to anchor this on. This is the castle nut. Normally you would have a cotter pin through here, but this did not have it in there. So it must have rotted or fallen out. So we're going to go ahead and remove this nut off of the outer tie rod end, and we're going to use a 13/16” wrench for this here.
So in order to remove this outer tie rod end, this actually fits into a tapered hole. What we can usually do in our driveway at home is, if you use a hammer and you strike the front here, it normally causes this to pop out. So now that we have this out, you can see that this is a tapered base, and this fits tightly into the front of the steering knuckle. So when you tighten up the castle nut, it sucks it down inside and keeps it nice and tight.
We're going to go ahead and replace the adjuster sleeve right here. We want to start by removing your outer tie rod end. Ideally, you want to count the amount of threads that this comes out on, so you have full rotation of this ball joint on your tie rod end.
Okay. We're going to use a 24 millimeter and we want to go ahead and basically unthread this off of the inner tie rod end. There we go. Now, because we're just replacing the adjuster sleeve, you can leave this jam nut right here, and when you take the new adjuster sleeve, just thread it right on up to that jam nut. There we go.
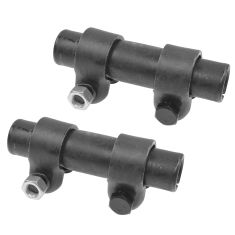
This here is the old part. This here is the new part from 1A Auto. If you notice, on the old part, we have the spot right here that has a flat section so you could put your wrench on there. Our part also has that. On the installation it is important to know that each side is a different diameter. The larger is the inner tie rod end port, and the smaller one is for the outer tie rod, so you can only put it on one way. Obviously if you have the smaller port, it just won't fit.
We're just going to go ahead and thread this on. When this threads on, you're going to notice that the wrench side is closer to the tie rod on the outer tie rod, but this here was closer to the inner. It doesn't matter. It's going to work the same exact way, it's just to give you an anchoring point for your wrench. Okay, you want to just crank that right up by hand up to that jam nut.
Now that we have the adjuster sleeve installed, because we don't actually have to replace this outer tie rod end, we can go ahead and get this installed now. In this component, we did count 31 full rotations. That means for the ball joint section facing down, a full rotation, that is one. We counted 31 of those there. In case you were installing a new outer tie rod end, you would have that count. I believe that was a 31. We'll just tighten up that jam nut by hand a little bit.
Then you're ready for your installation. Install your castle nut. You would tighten this up. Line up the castle nut with the hole in the outer tie rod end there. Use your cotter pin, feed it through, and then you're going to want to bend that over using a pair of pliers. Your adjuster sleeve may come with jam nuts. If your factory equipment is just fine, there's no need to replace them. Okay, so we're going to go ahead and tighten up these jam nuts.
All right, I'm going to go ahead and reinstall the tire. I'm going to go ahead and reinstall the lug nuts here. You want to get a few threads caught on all of these here. These lug nuts are 19 millimeters. So we're just going to snug these, bottom it out. Bottom the wheel out to the rotor. We're going to lower the vehicle down onto its own weight, and then do a final torque. With the vehicle on the ground, we're going to do a final torque of the wheel which is between 83 and 112 foot pounds. We're going to do it in a star pattern. All right, just double check the first one. She's all set.
Thanks for watching. Visit us at 1AAuto.com for quality auto parts, fast and free shipping, and the best customer service in the industry.
Tools used