
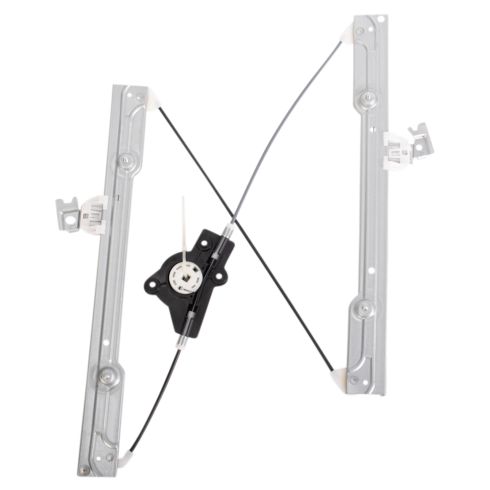
How to Replace Window Regulator 2004-08 Nissan Maxima
Created on: 2012-03-26
Check out this video to learn how to replace the power window regulator or motor in a 04-08 Nissan Maxima.
-
step 1 :Remove the door panel
- Use your flat blade screwdriver and pry up the screw cover behind the door latch.
- Pry up the switch panel in the door pull and disconnect the wiring harness.
- Once again with your flat blade screwdriver, pry up the panel on the door pull.
- Unbolt the 3 exposed 10 mm bolts using your socket and ratchet.
- From the edges of the door panel, start prying it off with your hands.
- Unclip the door latch and lock rods and unplug the wiring harness from the speaker and courtesy light.
-
step 2 :Remove the window regulator and motor
- Unplug the wiring harness to the window motor, using a flat blade screwdriver to unplug it.
- Unclip the wiring harness from the inside of the door.
- Remove the 10 mm bolts anchoring the stamped metal inner inside door panel.
- Unbolt the four bolts securing the regulator rails and the three bolts securing the motor.
- Pull the stamped panel away from the door and unbolt the window from the regulator.
- Make sure you hold onto the window so it doesn’t fall, then you can tape it up with painters tape.
- Remove the window regulator and motor.
- Carefully separate the motor from the regulator and either install the good motor to the new regulator or the new motor motor to the good regulator.
- Use a 7 mm socket and ratchet to unbolt the motor.
-
step 3 :Install the regulator and motor
- Bolt the motor and regulator to the stamped panel.
- Thread the wiring harness through the stamped panel.
- Bolt the stamped panel back into the door.
- Clip the wiring harness back to the stamped panel.
- Plug the switch panel back in and roll the window regulator clips to line up to the access ports.
- Untape your window and lower it down to the window regulator clips and bolt it in with your socket and ratchet.
- Test that your window rolls up and down ok.
- Unplug the switch panel.
-
step 4 :Install the door panel
- Plug in your wiring harnesses and clip in your door latch and lock cables.
- Clip your door panel back on, making sure to thread through your switch panel wiring.
- Bolt in the 10 mm bolts to secure the door panel.
- Plug in the switch panel and clip it in.
- Clip down the door pull panel and little plug in the door latch.
Tools needed
-
Socket Extensions
Flat Blade Screwdriver
7mm Socket
Painter's Tape
10mm Socket
Ratchet
Brought to you by 1AAuto.com, your source for quality replacement parts and the best service on the internet. Hi, I'm Mike from 1AAuto. I hope this how-to video helps you out and next time you need parts for your vehicle, think of 1AAuto.com. Thanks. In this video we're going to show you how to remove and replace the window regulator as well, as it is the same procedure for the power window motor, and we'll do this for the driver side front on this 2005 Nissan Maxima. It applies to any '04 to '08 Maxima, and it's basically the same procedure for the passenger side front as well. The tools you'll need are a flat blade screwdriver, seven and ten millimeter sockets with ratchet extension, and some painter's tape.
OK, take a small screwdriver. There's a little, kind of, trap door right behind your handle here. Pry that right out. OK, carefully go up under the back of your power switch plate here and pry up, and then this comes up and out, and you'll disconnect the harness here by pressing on a button. The button's in the back. Press and pull, and then this one, same thing. It's a little button. Press and pull. OK, take your screwdriver again and kind of pry in behind this panel here. OK, and this trim, just carefully, firmly pull it out. Trim pulls out. Now there are three 10-mm bolts to remove. One right back in there. One right back in there, and then one right behind your door panel. Just speed up here as we just remove those three 10-mm bolts. Again, one from behind the handle and then two from behind the pull. OK, once you've removed those then you just kind of grab the side of your panel here, pull firmly. OK, and then go up and just pull out these cables. Pull firmly away from the door and then the cable comes up. Same one with here. Firmly away from the door, and you just have to probably hold your lock button. Pull the cable up and out. Then down further there are just two connections. Same thing as the other ones. The little button. OK, you just want to disconnect this connection.
Then with your small screwdriver, and there's little tabs that you just kind of push on each side that allow you to pull these clips out. Fast forward here as I just remove all the wire clips so the wire harness comes away from that inner panel. Then disconnect, this is your window harness. Press this button to disconnect that, and now we're going to remove these 10-mm bolts around the perimeter. And crank up the speed again as we just remove those 10-mm bolts that hold the panel to the door. Now we're going to remove the four nuts that hold the regulator rails and the three bolts that hold the window motor. OK, you push this plug through and pull this panel off. That reveals our window. There are two bolts right down here. I'm going to remove those. And speed up as I remove those two bolts, and you'll notice I kind of hold the window up just to make sure it doesn't fall down. And after we remove those we'll lift our window right up. So we put some painter's tape on there just to hold the window up. Then pull your non-functioning regulator out. Then now on the bench here, you'd remove your window motor by undoing three 8-mm bolts. Speed up here as I remove those three bolts. OK, now if your regulator is still in good shape and you're changing you power window motor, then you'll want to be very careful when you pull this out to hold the gear in, OK? Then if you're changing your window regulator and your motor's still good, when you get your new regulator it'll have a wire tie on it, you'll want to snip that wire tie to hold that gear in there.
Put it down on the motor. You may have to turn it a little bit until the gear decides it wants to mesh. Let's see. OK, and then put your 8-mm bolts back in. And speed up here again. So I put each bolt in by hand first. Then use the socket and ratchet to tighten them up. When you tighten them up be careful not to over tighten them. You want to tighten them nice and firm, but you don't have to make them too tight. OK, now you want to take the motor, turn it over, and then you want to put your panel on top here. The regulator comes through. OK, and then position the motor so that you can see the holes. And we'll start in these bolts for the motor. Basically what you want to do here is you're bolting the motor back on, and I'm just kind of speeding through this. Put all three bolts into the window motor by hand first. Then tighten them up nice and firm, and then you want to put the nuts that hold the window regulator rails to the panel. You want to put those on just by hand, and then put the harness through and lock that plug in place. OK, then I'll take your panel and put it up in. Make sure the top, the rails go inside the door. Lift it up. Make sure our harness isn't getting tangled up here. I'm going to have to reach back a little bit, make sure that the regulator goes in there correctly. Now I'm going to obviously speed up as we put those bolts back into the perimeter of the door panel. Tighten them up and then also tighten up the nuts that hold the window regulator rails onto the panel, as well as just do a quick check on the motor to make sure those are tight.
Now you can put all these back. OK, remove or pull back these two little covers, and we're going to reconnect our switch plate here. Now we're going to turn our key and we're going to run our window up. OK, until I totally can see the hole that we're putting the bolt in right through here. Shut the key off. OK, now I'll just remove the tape from my window. I carefully let my window down. Make sure you kind of keep the back pressed into the track and then the window should make contact with the regulator. Push it down into the regulator and then take your bolt with your extension. To get my back started I'm just going to start a bolt in there. For my front I just have to pull out on the regulator a little bit and now it's settled right down in, so put this bolt in. Tighten it up. Then this bolt. Nice and firm. Push those covers back down. Turn our key on and do a test. The window is working well. Now remove your switch again. OK, reinstall the door panel. Get it kind of close and plug in our harness connections down here, and make sure they're clipped in. OK, now up here the one with kind of the L-shaped goes on top. That's your lock. It just goes into a little hole. Down in the hole then swing it around. OK. This one goes in the hole. Swing it around pretty easily. Make sure these harnesses go up into that well there. OK. Press the panel against the window. Slide it down into place. OK, make sure we have our harnesses. Line up the pins. Right around. We'll speed up here as we reinstall those two 10-mm bolts behind the door pull. Connect our switch panel. Front down in first and then lock the back in place. Make sure it all goes down. Put this panel in place. Put the bolt back in here. OK, and put our old trim door on there.
We hope this helps you out. Brought to you by www.1AAuto.com, your source for quality replacement parts and the best service on the internet. Please feel free to call us toll free 888-844-3393. We're the company that's here for you on the internet and in person.
Shop Products


2004-08 Nissan Maxima Front Passenger Side Window Regulator TRQ WRA51897
- No
- No
- Galvanized Steel
- Electric
- No

How to Replace Front Window Regulator 1999-2007 Chevy Silverado
This video shows you how to install a new window regulator on your 1999-07 Chevy Silverado.

