
How to Replace VTEC Solenoid 2002-09 Honda CRV
Created on: 2018-09-13
How to remove and replace a VTEC solenoid to the 02, 03, 04, 05, 06, 07, 08, 09 Honda CR-V
-
step 1 :Removing the VTEC Solenoid
- Locate the solenoid on the backside of the engine, facing the firewall
- Have a drain pan ready
- Remove the 10mm bolts from the solenoid
- Disconnect the solenoid connector
- Pull the solenoid out
- Press the clips and remove them from the solenoid
- Disconnect the wiring harness with needle nose pliers
-
step 2 :Installing the VTEC Solenoid
- Clean and wipe down the mating surface with a paper towel
- Place a tab of clean oil on the gasket
- Insert a bolt into the solenoid
- Insert the solenoid into place
- Tighten the three 10mm bolts by hand
- Tighten the bolts with a 10mm socket and ratchet
- Torque the solenoid bolts to 8.7 foot-pounds
- Connect the wiring harnesses
- Clip the harness into the solenoid
Tools needed
-
Socket Extensions
Torque Wrench
10mm Socket
Ratchet
Needle nose pliers
Hi, I’m Mike from 1A Auto. We’ve been selling auto parts for over 30 years!
Hi, everyone. My name's Sue from 1aauto.com. Today we're going to be installing this VTEC Solenoid in our '09 Honda CRV. If you need this part or any other part for your car, click the link on the description and head on over to 1aauto.com.
Now we're going to replace the VTEC Solenoid valve on our '09 Honda CRV. It's in a difficult spot. It's on the back side of the engine facing the firewall. We set up a mirror. There's three mounting bolts on this VTEC solenoid, and there is a 10 millimeter socket, and I'm going to bring my ratchet right down there. You can see there's one. I'm going to break it free.
Because of the difficulty, I'm going to pull these bolts right out once I'm on it. Now I'm going to go for the second one. I think right now I'm going to disconnect the solenoid sensors on top. There's two connections. Just push on the tab and pull. I'm going to have to wait on that one. Can't see it. Let's get the last mounting bolt. Once this bolt is out, I can hopefully hold the solenoid and then disconnect that other sensor a lot easier, and squeeze the harness clips off of the shield and get all a little bit easier with the dismounting.
Be careful if you're working on a garage full. You might want to put a catch basin underneath as some oil will come out. Disconnect this connector on this harness hopefully. This one. Now I can squeeze this other solenoid and release it. See, it gets moving. Here we go. You never want to pull on the harness. As tempting as it is, you don't want to do that. Now, as you can see, the solenoid valve is out and there is no gasket there. So always double-check your surface before you remount any part that requires a gasket.
Now, with my valve out, I can see with my little truly mirror I installed that the gasket is still stuck to the block. So I'm going to reach down there and pull that out. Nice.
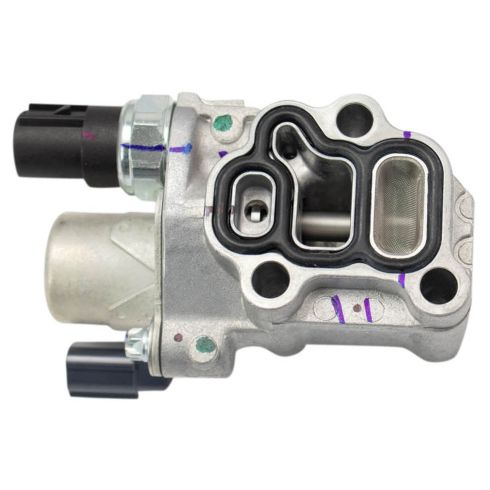
Here we have a VTEC solenoid out of a Honda, and we have the factory one that we removed. It comes with the oil pressure switch and the variable time solenoid. And here is the one from 1aauto.com. Nice. Lined up. It shows you that they took account of everything they put in, and that they've lined it and set it to specs, because with the new gasket with screen you can also get the screen and gasket separately at 1aauto.com or put the whole assembly in.
Before I install my new VTEC valve solenoid, I installed a new harness clip here because I broke the old one. But it's important that you reattach the harness the way it was, because you get the drive belt down there and you sure don't want to cut that harness. It goes to the crank position sensor so that would be a no start.
Before I install the new VTEC valve solenoid from 1A Auto, I'm going to clean and wipe down the surface, just to make sure there's no debris in the way. It wouldn't hurt to put some little clean oil on this gasket. It just makes it a nice seal so it won't be leaking—it won't encourage it to leak.
I'm going to take a quick look here, and all my mounting bolts are the same length, so it doesn't matter the sequence I go in. I'm going to install one and bring it down there with this little valve. I'm going to end up snugging these down by hand and then torquing it.
The torque on this, torque is really important because of the rubber gasket. If you overtighten something, the gasket actually will not seal. So you don't want to go through all this trouble doing this and not tighten it in the specifications the manufacturer suggest. The manufacturer's specs on this is 8.7 foot-pounds. You can always rent tools if you don't own them. Now I've pre-set my torque wrench to 8.7 foot-pounds, and I'm going to put my 10 millimeter socket on this and then tighten it up. There we go. That one's set.
Move on to this one. That one's set. Let go back down with the first. Now that the solenoids all torqued down, I'm going to reconnect my OP switch connector and my variable timing valve connector. They're color-coded and they're also different design. One's a rectangle style and the other one is a round circle so you cannot mix those up. Nice, heard the click. Move on to the OP switch one. It's oil pressure. There we go. Now I can reconnect my loom clips. Make sure I connect it in. I'm going to wrap the wires on the new wire loom clip that I installed. Perfect.
Thanks for watching. Visit us at 1AAuto.com for quality auto parts, fast and free shipping, and the best customer service in the industry.
Shop Products


How to Replace VVT Solenoid 1997-2005 Lexus GS300 3-0L 2JZ-GE
Learn how to replace a VVT solenoid on a 97-05 Lexus GS300. It's a major cause of the P1346 check engine code. 1A Auto experts will show you every step.

