
How to Replace Transfer Case Shift Motor 1997-2002 Ford Expedition
Created on: 2011-02-22
Watch this video and learn how to replace the transfer case shift motor on your 97-01 Ford Explorer or Lincoln Navigator. The 1A Auto experts will show you
-
step 1 :Remove the transfer shift case motor
- Unplug the old transfer shift case motor.
- Use pliers to pull out the plastic anchor plate from the inside of the wiring harness clip.
- Use a small pointy tool to push out the wires that are coming from elsewhere and are routed through the transfer shift case motor harness.
- Remove the four 10 mm bolts in the transmission and bracket.
-
step 2 :Install the new transfer shift case motor
- Mount the transfer shift case motor, bolting in the four 10 mm bolts.
- Transfer over the wires into the new transfer case motor plug.
- Connect the wiring harness.
Tools needed
-
Socket Extensions
10mm Socket
Ratchet
Needle nose pliers
Brought to you by 1AAuto.com. Your source for quality replacement parts and the best service on the internet.
Hi, I'm Mike Green. I'm one of the owners of 1AAuto. I want to help you save time and money repairing and maintaining your vehicle. I'm going to use my 20+ years' experience restoring and repairing cars and trucks like this, to show you the correct way to install parts from 1AAuto.com. The right parts installed correctly. That's going to save you time and money. Thank you and enjoy the video.
In this video, we're going to show you how to replace the four-wheel drive shift motor on this '97 Expedition. It's the same for both the Expedition and the Navigator with the auto four-wheel drive. Tools you'll need are 10 mm socket with a ratchet and extension, and a small pointy tool like a ballpoint pen or an electrical tester.
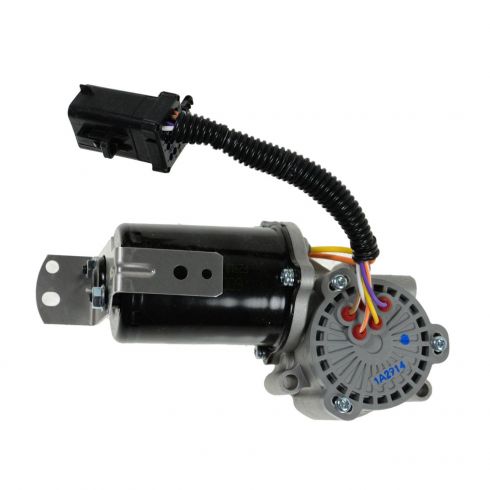
Coming in from the driver's side, up underneath, here is your transfer case shift motor. Here's my new transfer case shift motor, and you can see it's pretty easy. There are three 10 mm bolts over here on the transmission side. Then just one bolt here, and you can see them all right here. Here's the bracket bolt and here's the two of your transmission bolts and there's one up top. Unbolting it and bolting it isn't that difficult. The kind of confusing or difficult part is here's your connector for your new one, and it's got seven wires going into it.
If you look at this connector for your old one, there's a whole bunch more wires. There are other harnesses that come in, so what you need to do first is unplug your old motor. You do that by there's a little tab right here. You push down on that tab and then you pull really hard. You push down on this tab really hard and pull that out. Probably, what you're going to want to do is pull that off of there. You can see in that connector and here's my new connector. It's pretty obvious there's a lot more pins in the old one.
What you're going to want to do is get a good picture of the back here. You got a brown, a gray with a red stripe and a black with a green stripe. Then we have a solid green, and a light blue. There's another solid green. Then another gray with red stripe in there. Those are all the wires that are going to come out. To get those wires out, take a pair of needle-nose pliers and there's a red locking clip. Just pull that right out.
Now inside, I'm actually using a ballpoint pen, and there are little tabs above these pins. You just kind of push your ballpoint pen in there. Push the tab up, and then push or pull the wire. I probably chose the hardest one. Pull the wire back through. You do that, as I'm looking at it, you want to remove these bottom ones and then these four here. This is the side that you press the clip on. This is the side that clips to the bracket on the motor, so you want to remove the three bottom ones and then these four right here.
One note. There are two green ones that go in there, okay, so as you're looking at the connector, the left-hand one is the one that goes with this three-wire harness here. Although, the ballpoint pen works, what actually works a little better is something with a sharper point. I'm using this electrical tester because it has a sharper point. Makes it a little easy to get in there accurately and press those pins. Now, your harness is free of those other wires.
Okay. I'm going to fast forward. I'm using a 10 mm socket with an extension and a ratchet and I'm going to remove the four bolts that are holding the shift motor on to the transfer case. Due to some corrosion, the motor doesn't come right off, so I just use a screwdriver. A little prying action, and the motor comes right off and down. Mounting the new one up in there is pretty self-explanatory. Just make sure you don't pinch any of those wires, and make sure that three-wire harness is coming down below and don't pinch any of those wires in as you install the bolts. I'll fast forward through putting the bolts on.
Here is just a shot of that upper bolt. It does go through a little clip that holds the harness in place. Now, here again I'm just using my wrench and tightening up all those bolts. Tightening up by hand first. They don't have to be extremely tight especially this is aluminum transfer case that you're bolting into, so you can strip it fairly easy. Just make them snug, firm. Remember from before, you had these wires, these three here. This green one goes into the bottom corner of those four upper ones. Then, the black goes to the corner and gray goes right next to it. Make sure you push them all the way in. Push them all the way in. You'll hear them click usually. Then, you check the other side. Then, from this harness up here you have the gray. The gray goes right above that green one you put in first. Push it all the way in. The green goes next to the green. Then we have this light blue one. It goes right here. Then they wrapped this brown one around and put it in this bottom corner here. Pliers to grab onto it, force it in all the way.
Now, we're going to take our tab that locked it, and push that right in there. Connect it, and then put it on the bracket, and we're all set. We hope this helps you out.
Brought to you by www.1AAuto.com. Your source for quality replacement parts and the best service on the internet. Please feel free to call us toll free 888-844-3393 for the company that's here for you on the internet and in person.
Shop Products

How to Replace Front Differential Shift Cable 1991-2004 GMC Sonoma
Check out this video to learn how to replace a broken, disengaged, defective or frayed front differential shift cable in a 91-04 GMC Sonoma.

