
How to Replace Transfer Case Shift Motor 2006-10 Dodge Ram
Created on: 2016-05-04
Check out this video to learn how to replace the transfer case shift motor on your 06-10 Dodge Ram.
-
step 1 :Removing the Driveshaft
- Have an assistant hold the driveshaft in place or brace it with a pry bar
- Remove the 15mm bolts at the front of the driveshaft
- Cut the dust boot clamp at the rear of the drive shaft with pliers
- Index the drive shaft with a marker for reinstallation
- Index the boot on the rear of the drive shaft with a marker
- Separate the front of the driveshaft from the transmission and let it hang
- Separate the rear of the driveshaft from the splines
- Pull the driveshaft down and out starting from the rear
-
step 2 :Removing the Transfer Case Shift Motor
- Pry the red tab on the wiring harness and disconnect the wiring harness
- Remove the three 10mm bolts from the transfer case shift motor
- Pry and wiggle the transfer case motor off its splines
-
step 3 :Installing the Transfer Case Shift Motor
- Make sure the shaft is in the correct position
- Mount it with a pair of pliers if necessary
- Make sure the truck is in 2WD, the drive shaft will be still and the splines will rotate freely
- Insert the transfer case shift motor into place
- Tighten the 10mm bolts to the transfer case shift motor
- Torque the bolts to 17 foot-pounds
- Reconnect the wiring harness
- Slide the red safety tab into place
-
step 4 :Installing the Driveshaft
- Lift the new driveshaft into place starting with the rear
- Align the index on the rear
- Replace the dust boot clamp
- Align the index on the front
- Tighten the 15mm bolts to the front of the driveshaft
- Hold the drive shaft with a pry bar
- Torque the bolts to 85 foot-pounds in a crossing pattern
Tools needed
-
Socket Extensions
Flat Blade Screwdriver
1 Inch Hose Clamps
Torque Wrench
15mm Socket
Jack Stands
10mm Socket
Ratchet
Floor Jack
Needle nose pliers
1/2 Inch Breaker Bar
Marker / Writing Utensil
Brought to you by 1AAuto.com, your source for quality replacement parts and the best service on the Internet.
Hi, I'm Mike from 1A Auto. I hope this how-to video helps you out, and next time you need parts for your vehicle, think of 1AAuto.com. Thanks.
In this video, we're going to show you how to replace the transfer case shift motor in this 2008 Dodge Ram. The part is the same for 2006-2010 Ram, but this procedure is the same for a wide range of years of the Ram 1500.
The items you'll need include a new transfer case shift motor from 1AAuto.com, 10-15mm sockets with ratchet and extensions, pry bar, pliers, marker, flat blade screwdriver, crimp clamp or hose clamp, torque wrench, and you may want to use a jack and jack stands, but you can usually do this without lifting the vehicle.
Remove the four 15mm bolts securing the front drive shaft to the front differential. This can be accessed with the vehicle on the ground or you can raise and support your vehicle for more room. If your vehicle is locked in four-wheel drive, the front drive shaft won't turn. Otherwise, you'll need a pry bar to keep it from turning when you loosen the bolts. You can remove the bolts by hand, but if you have access to air tools that's the fastest way to do it. Also an impact gun may mean you don't need to support the drive turn from turning.
At the rear of the drive shaft, cut the dust boot clamp closest to the transfer case. You may have to pry out the clamp and twist in order to separate it. Drive shafts are balanced, so before removing you want to index it with a paint pen or Wite-Out to make sure it goes back on in the same place you took it off. You'll also have to index the rear of the drive shaft.
Remove the front of the drive shaft from the differential flange and let it hang to clear the front crossmember. Work the boot on the rear of the drive shaft so you can pull it off the splines. Send your drive shaft back over the front crossmember and exhaust. Be sure your indexing marks are aligned.
Remove the front of the drive shaft from the differential flange and let it hang to clear the front cross member. Work the boot on the rear of the drive shaft until you can pull it off the splines.
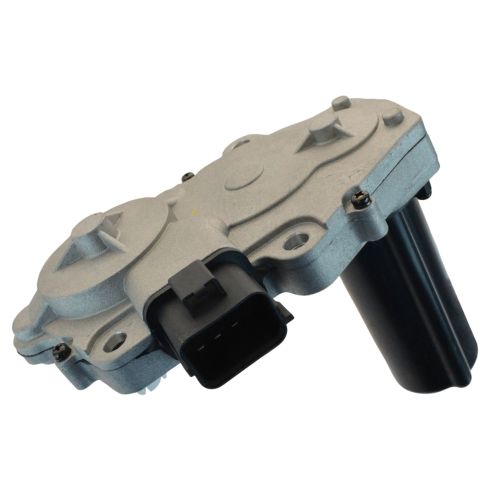
Here's your transfer case motor. Pry up on the red safety tab on your connector. Press down to release and remove these three 10mm bolts. Once the bolts are released, wiggle your transfer case motor off the splines.
Old part from the vehicle, new part from 1A Auto, you can see they're exactly the same.
The seven pin connector is the same, and then how it mounts is all the same. If your old transfer case shift motor was bad, this may have ended up in a different clock position.
You can see that there's a little indicator tab right there. It's exactly the same on the new one here from 1A Auto, so you wouldn't have to do anything. If your vehicle, if your transfer case shift motor failed in 4-wheel drive and this was maybe up over here, what you would want to do is go underneath the vehicle, grab ahold of the shaft with pliers, turn it to the right position so that you can mount your new one easily. You'll know your transfer case is in 2-wheel drive when your front splines rotate freely and your rear drive shaft won't move with the transmission in park.
Make sure your splines are both in the 2-wheel drive position before installing your transfer case motor onto the shaft. 10mm bolt holes align right up. Now you can tighten the 10mm bolts. These bolts should be torqued to 17 foot-pounds.
Re-connect the harness and slide the red safety back over the tab. Center your drive shafts back over the front cross member and exhaust.
Be sure your indexing marks are aligned. Your dust boot crimp clamp goes around the boot. Push it on so the teeth grab, crimp it down nice and tight. Just give your boot a little wiggle to make sure it's not coming off. If you don't have this style crimp clamp available, you can always use a screw-style radiator hose clamp.
Line up the index on your front drive flange, start your flange bolts. Tighten them down by hand or with power tools when available. Stop your drive shaft from moving with a pry bar. Torque to 85 foot pounds in a cross pattern.
Thanks for tuning in. We hope this video helped you out. Next time you need parts for your car, please visit 1AAuto.com. Also check out our other helpful how-to and diagnosis videos.
Shop Products

How To Replace Transfer Case Shift Motor Encoder Ring 2000-06 Chevy Tahoe
This video shows you how to install a new transfer case shift motor encoder ring in your 2000-2006 Chevy Tahoe.

