How to Replace Timing Chain 1996-99 GMC K1500 5-7l
Created on: 2017-03-30
Watch this video to learn how change a worn or damaged timing chain. 1A Auto's mechanics will show you how to replace the timing chain on your 96-99 Chevy or GMC C-Series or K-Series pickup truck.
-
step 1 :Removing the Fan Shroud
- Unclip the wiring retainer from the fan shroud with a flat blade screwdriver
- Pull the wiring off the fan shroud and set it aside
- Remove the seven 10mm bolts from the fan shroud
- Lift the fan shroud up and out
-
step 2 :Draining the Coolant
- Twist off the radiator cap
- Have a drain pan ready
- Twist off the radiator drain plug
- Allow the coolant to drain
- Twist on the radiator drain plug
-
step 3 :Removing the Fan Clutch
- Attach an adjustable nut to the fan clutch nut
- Tap the wrench with a hammer to loosen the nut
- Attach a 3/8 inch drive ratchet to the serpentine belt tensioner
- Turn the tensioner as far clockwise as possible
- Tap the adjustable wrench with the hammer again
- Remove the ratchet and the adjustable wrench
- Spin off the fan clutch
-
step 4 :Removing the Serpentine Belt
- Familiarize yourself with the route of the serpentine belt
- Insert the 3/8 inch drive ratchet into the tensioner
- Turn the tensioner clockwise to loosen the belt
- Pull the belt off the alternator
- Release the tensioner
- Pull the belt off by hand
-
step 5 :Removing the Water Pump
- Press the clamp on the upper hose
- Twist the hose free
- Remove the hose
- Have a drain pan ready
- Loosen the clamp on the lower hose
- Wiggle the hose free
- Remove the four 14mm bolts from the water pump
- Pull the pump off
- Remove the last hose
- Remove the four 10mm bolts from the water pump pulley
- Remove the pulley
-
step 6 :Removing the Crankshaft Pulley
- Remove the three 14mm crank pulley bolts
- Remove the 16mm center bolt
- Remove the pulley
-
step 7 :Removing the Harmonic Balancer
- Reinstall the 16mm center bolt without the washer
- Insert the hardware from the puller kit into the bolt holes
- Run in the center bolt supplied from the puller kit
- Tighten the center bolt
- Slide the harmonic balancer off
- Remove the center bolt
-
step 8 :Removing the Timing Cover
- Disconnect the crank position sensor
- Remove the 8mm bolt from the sensor
- Remove the sensor
- Remove the eight 10mm bolts around the timing cover
- Remove the timing cover
-
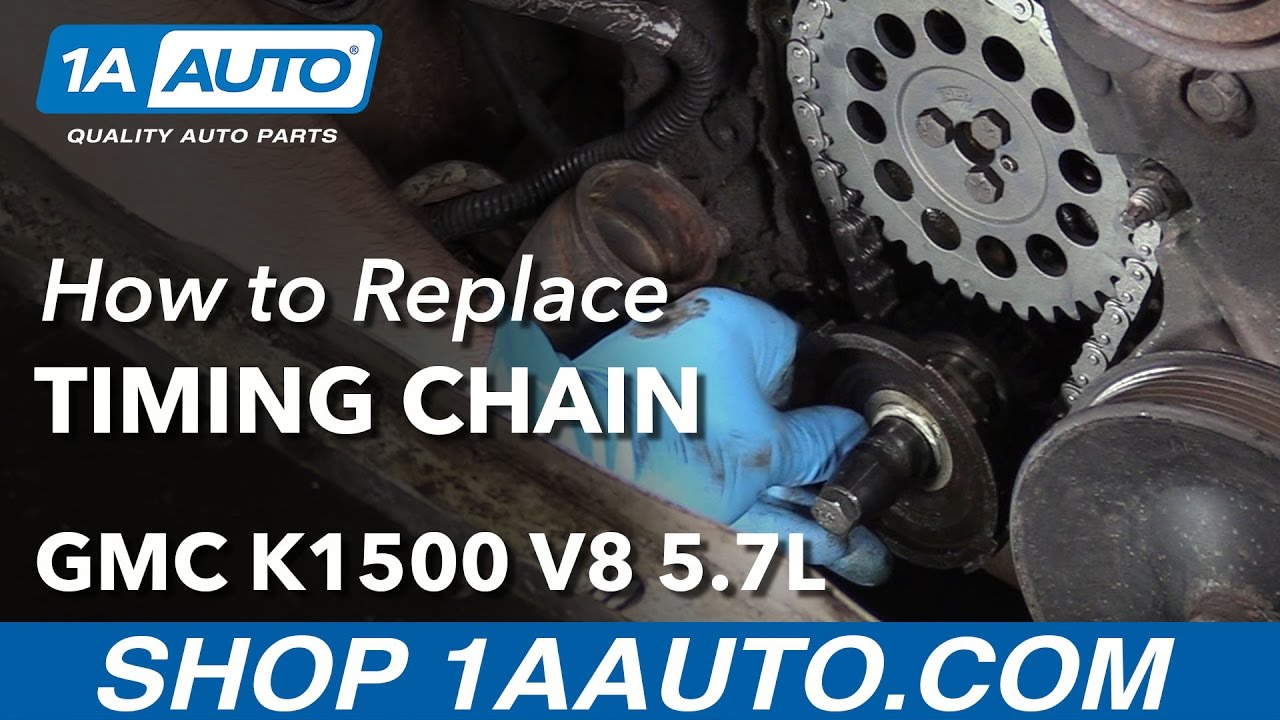
step 9 :Removing the Timing Chain
- Remove the oil slinger
- Insert a socket as a spacer into the crank
- Rotate the crank until the timing marks on the gears line up so that both dots on the gears' teeth are lined up close to each other
- Hold the crank shaft with a 16mm socket and ratchet
- Remove the three 13mm cam sprocket bolts
- Remove the camshaft sprocket and timing chain
- Install the two or three jaw puller to the crank gear until the gear comes off
-
step 10 :Installing the Timing Chain
- Install the crank shaft gear with the dot facing you
- Tighten the bolt with an impact gun
- Insert a large socket or install tool and tap it to adjust the pulley into place
- Insert the 16mm crank bolt
- Insert the camshaft pulley and chain into place and around the crankshaft pulley
- Push the cam gear in
- Reinstall the three 13mm cam sprocket bolts
- Torque the cam sprocket bolts to 26 foot-pounds
- Reinstall the oil slinger with the high side facing in toward the crank gear
- Remove the crank bolt
-
step 11 :Installing the Timing Cover
- Wipe off any grease off of the timing cover and around the chain
- Scrape off any built-up gasket material with a razor
- Wipe off any dirt and debris with brake cleaner
- Apply oil safe gasket sealer to the bottom of the timing cover
- Press the bolts into the cover
- Press the cover into place
- Tighten the 10mm bolts
- Let the adhesive dry
- Torque the bolts to 18 foot-pounds
- Install the crank position sensor
- Tighten the 8mm screw to the sensor
- Connect the connector to the sensor
-
step 12 :Installing the Harmonic Balancer
- Install the installer tool into the crank shaft tightly
- Insert the harmonic balancer onto the crank
- Tap the balancer with a hammer
- Install the sleeve of the install tool
- Install the bearing
- Install the bolt and tighten the nut down until the balancer is bottomed out
- Remove the tool
-
step 13 :Installing the Crankshaft Pulley
- Insert the pulley into the engine
- Tighten the 14mm bolts to the pulley
- Tighten the 16mm center bolt and washer by hand
-
step 14 :Installing the Water Pump
- Tighten the four 10mm bolts to the pulley
- Clean the gasket surfaces with a razor blade
- Set the bolts into the pump
- Place the gasket on the pump
- Connect the inlet hose to the pump
- Insert the pump into place
- Tighten the hose clamp
- Tighten the 14mm bolts to the water pump
- Torque the bolts to 30 foot-pounds
- Reinstall the remaining hoses to the water pump
-
step 15 :Installing the Serpentine Belt
- Loop the belt around the crank pulley
- Bring it around the water pump
- Bring it under the power steering pulley
- Bring it around the A/C Pulley
- Bring it around the belt tensioner
- Bring it under the idler pulley
- Pull the tensioner clockwise with the 3/8 inch ratchet
- Pull the belt over the alternator
- Release the tensioner
- Torque the center crankshaft pulley bolt to 74 foot-pounds
-
step 16 :Installing the Fan Clutch
- Start the fan clutch nut onto the pulley by hand
- Attach an adjustable nut to the fan clutch nut
- Tap the wrench with a hammer to tighten the nut
-
step 17 :Installing the Fan Shroud
- Line up the fan shroud
- Fasten the seven 10mm bolts into the fan shroud
- Place the wiring on top of the fan shroud
- Clip the wiring to the fan shroud
-
step 18 :Filling the Coolant
- Add coolant to the coolant bottle using a funnel
- Twist on the coolant bottle cap
- Run the engine briefly
- Add coolant as necessary
Tools needed
-
Razor Blade / Gasket Scraper
Adjustable Wrench
Funnel
Torque Wrench
Hammer
Channel-Lock Pliers
3/8 Inch Drive Ratchet
Anti-Freeze
Brake Parts Cleaner
2 Jaw Gear Puller
Flat Blade Screwdriver
Harmonic Balancer Puller
Harmonic Balancer Holding Tool
Paper Towels
Gasket Adhesive
Drain Pan
3 Jaw Gear Puller
3/8 Inch Impact Gun
Complete Metric Socket Set
Hi, I'm Mike from 1AAuto. We've been selling auto parts for over 30 years! We're dedicated to delivering quality auto parts, expert customer service, and fast and free shipping, all backed by our 100% satisfaction guarantee. So visit us at 1AAuto.com, your trusted source for quality auto parts.
In this video, we're going to be working with our 1996 GMC Sierra, K1500, 5.7 liter V-8. We're going to show you how to remove and replace your vehicle's timing chains.
If you like this video, please click "Subscribe." We have a ton more information on this and many other vehicles, and if you need these parts for your truck, you can follow the link down in the description or 1AAuto.com.
Here are the items you'll need for this repair: full metric socket set, 3/8 ratchet, socket extensions, small flat blade screwdriver, adjustable wrench, hammer, torque wrench, impact gun, drain bucket, brake cleaner, paper towels, razor, coolant, funnel, harmonic balancer puller, oil gasket sealer, pliers, 2 or 3 gear jaw puller
Using a small flat blade screwdriver, pop open the wire retainer on the top of your fan shroud, lift the wire off, and it's long enough that you can just lay it back in the engine bay. You can remove it from the battery, and take it out completely, if you'd like to, but this should give you plenty of room to work.
Remove the seven 10 millimeter bolts along the fan shroud. There should be two on the bottom on each side. Ours is missing two bolts, and then three along the top, and the same two bolt locations on this side. We'll remove these with a 10 millimeter socket ratchet and extension. Once the hardware is removed, lift up, and remove the upper fan shroud from the vehicle.
Remove your radiator cap by pushing down and turning it counterclockwise. At the bottom of the driver's side of the radiator, you'll see a little thumb screw for your radiator drain. Make sure you have a drain bucket underneath there, then reach down and loosen it by hand. Allow your cooling system to drain and then close the drain on the radiator.
We're going to use an adjustable wrench, because we don't have the right size open-end wrench, but that would work as well. As well as, some pipe wrenches. We're going to place that over the clutch fan nut, and then strike it quickly with a hammer.
Using the drive of a three-eighths ratchet – you could also use a three-eighths breaker bar –, go into the slot on the serpentine belt tensioner, and rotate it as far as we can clockwise, to put some extra tension on the serpentine belt. Then, try hitting the wrench again because this should keep the pulley from turning. Once it's loose, you can remove your ratchet, spin the clutch fan off.
Now use a 3/8 drive ratchet to turn the tensioner counter clockwise and remove our serpentine belt. Make sure you have a belt path for this, either under the hood somewhere, take a picture, or draw one yourself.
Using a pair of locking jaw or other pliers, compress the clamp, move it off the end of the fitting for the water pump hose and then clamp on there. Twist it a little bit to free it up. Remove that from the water pump. Now, the other one is pretty tricky to get at, so we'll do the bottom hose on our water pump the same way. Remove the bolts and pull it out a little bit before, removing the other hose. Once again, we'll grab the hose with a pair of pliers. Just try to wiggle it, free it up a little bit. Once it's freed up, we'll remove the hose. Make sure there's a drain bucket underneath there.
Remove the four 14 millimeter bolts around the water pump with your 14 millimeter socket, ratchet, and extension. Now, normally the old gaskets tend to bake these on pretty good, so when you remove the bolts it should stay in place as long as you don't bump it. You can then wiggle the pump, pull it out far enough that we can access the last clip here. Remove that hose the same way we did with the first one using our pair of locking jaw pliers. Once everything's off you can remove your water pump from the vehicle.
Remove the three 14 millimeter crank pulley bolts. Now these tend to be pretty stuck on there, so you may need to use a strap wrench or something to hold the crank in place, but I found that if you crack them all loose before you remove any of them fully, and you kind of give them a little shock with the ratchet by just giving them a quick little jerk, sometimes you can free them up without needing to remove anything. Once you've cracked all the bolts loose, you can remove them fully.
Now use the 16 millimeter socket, ratchet, and extension to try to break loose the center bolt on the balancer. However, this is really torqued on there, so you may need to use an impact gun or some type of holder to get it off. Now you may be able to use a strap wrench, some kind of holder. If you have a manual transmission, you may be able to just lock it in place, but for us, the easiest method is going to be to break it loose with an impact gun. You can then remove the bolt and pulley from the harmonic balancer.
So now we'll reinstall the center bolt without the washer as far as we can by hand. We'll now use our harmonic balancer tool from 1A Auto, some of the supplied hardware fits the balancer bolt holes, so we'll set those in. You want to make sure these are all in equal lengths, so that it pulls straight and flat. Run in the center bolt, also supplied in our puller kit from 1A Auto.
We'll now use a 19mm socket and ratchet to tighten down the center bolt. Once we've tightened down the center bolt far enough, we can slide our harmonic balancer off by hand. Be sure to remove the center crank bolt.
Disconnect the crank position sensor and undo the eight millimeter bolt on the bottom with an eight millimeter socket and ratchet. You can then work the crank position sensor out of the bottom of the timing cover and remove it. You can now remove the eight 10 millimeter bolts around the perimeter of the timing cover. We'll do this using the 10 millimeter socket, ratchet and extension. You can now remove the timing cover from the front of the engine. You may need a screwdriver another small pry tool to help free the cover from the front of the motor.
Remove the oil slinger, just slides off. So we're going to use the original crank bolt and a 13 millimeter half-inch drive impact socket, because it just happens to fit on there nicely as a spacer. You may find a different socket works better. Going to install this into the crank, and then use my 16 millimeter socket and ratchet to rotate the crank until the timing marks on the gears line up.
So here we can see both timing marks. There's a dot here on the crank shaft, and a dot here at the 12:00 position on the cam shaft. The reason that these are both at roughly the 12:00 position right now is because your crank shaft rotates twice for every one rotation of the cam shaft, meaning that while the crank is at top dead center in that position, the cam is not positioning the intake valves. To make it a compression stroke is actually 180 degrees out on its exhaust stroke. So we're going to bring that around, and this time, when our dot comes up to the top, the dot on the cam shaft will be at the bottom, and they will line up with each other. Prevent the crank shaft from turning with a 16 millimeter socket and ratchet or wrench and use a 13 millimeter socket ratchet and extension to remove the three cam sprocket bolts.
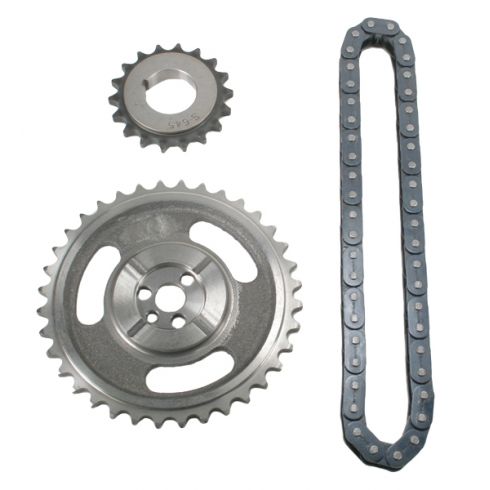
You can now remove the cam shaft sprocket and timing chain. Install your two jaw puller or three jaw puller if you have one large enough onto the crank gear. You can now tighten down the puller, so the gear comes off the crank. You can then remove the gear from the crank.
Here we have our old timing components that we removed from our vehicle and our new parts from 1AAuto.com. As you can see, these parts are exactly the same, with the exception of some minor aesthetic differences here. The gears and chains are the same length, as well as diameter and thickness, making this a direct fit part, which is very important when it comes to your engine's timing, as your cam shaft must rotate at exactly 50% of the rate of your crank shaft. This means the crank will rotate twice for every one revolution of the cam to make sure that the pistons and values are synchronized properly.
Now if your chain becomes stretched, this can create a variance in timing, especially under heavy acceleration or heavy load on the engine, as it will pull some of that slack and mis-align the gears slightly. And while on this particular vehicle, that's not the end of the world, because the valves won't touch the pistons, meaning this is a non-interference motor, it could create significant power loss and even rough running conditions, where a nice, new set of chains and gears will keep your engine timed correctly and running right. Plus, these part will go in, direct fit, just like our original equipment, and fix you up right.
Install the crank shaft gear with the dot facing out toward you. Get it on as far as it will go. Now your best bet to not move the crank shaft while loosening the 16 millimeter bolt is with an impact gun. Just a few quick taps should do it. At this point, you should be able to use a large socket installer tool or a thick piece of pipe. In our case, it looks like a 35 millimeter socket's a little bit work. Should just be able to tap it home. You'll hear the change in pitch when the gear bottoms out.
You can now reinstall your socket and 16 millimeter crank bolt. You should only need to do this by hand for now, just in case we have to move that a little to get it to line up. Now our cam shaft should not have moved in this process, so go ahead and hook the chain around the crank shaft. Push the cam gear in. When you do that, our two dots should be aligned perfectly. We can reinstall our cam gear bolts. There are three of them. You can then torque the cam sprocket bolts to 26 foot pounds. Reinstall your oil slinger with the high side facing in toward the crank gear. This will only fit on one way. You may need to use that socket, just to give that a little nudge. This part is not press fit. It will sit right onto that same key way as your crank sprocket. Now that your timing is set, you can remove your crank bolt.
We'll take a second to wipe off some of the heavy grease that's built up around our timing cover with a paper towel or rag. This is not to clean the gasket surface just yet, but it is because there's just so much debris around here from other leaking gaskets that it'll be hard to get a good clean on there anyway. Using a razor blade, scrape down any built up gasket material that may be on the main surface here. Our old cover did not have any sealant on it, so there's really not much to scrape off. It doesn't hurt to take a second and do this step anyway. This will also let you feel if there are any burrs on that surface. Ours is nice and clean. Now we'll make another pass with a clean paper towel and some brake cleaner to wipe off any dirt and debris that's still on that surface. If you're getting a lot of black coming up on the paper towel don't be afraid to do this a few times. The cleaner that surface is the better it's going to seal.
Here we have our old timing cover that we removed from our truck and our new part from 1AAuto.com. As you can see these parts are the same. The same face, same timing mark. You have a nice new front crank seal and crank position sensor location as well as all the same bolt locations. It even comes with some nice new hardware. This also comes with a crank position sensor block off plate as this is going to fit a lot of the older small block Chevys, which may have a non-computer controlled ignition system, meaning there would be no need for a crank position sensor, allowing you to just plug that off and bolt it on.
Back side also comes with some new gasket on it. We'll need to use some gasket sealer down here to seal it up against the oil pan. Other than that this part is one time use only so if you've removed your old one to do a timing chain or to get at anything else inside the motor, you'll need to replace it with this new part from 1A Auto, which is going to go in direct fit just like your original equipment and fix you up right.
There's no actual gasket in the bottom part here which sits into your oil pan, so we're going to go ahead and load that up with some oil safe gasket sealer. Don't worry too much about using too much here because we're going to go ahead and dump our oil and do an oil change after this process anyway. Make sure you get all the way over to the corners here so it'll seal off. This is time sensitive so make sure all of your bolts are pushed back or out if they're not going to fit and lay this into the engine. Set the bottom edge in and over the oil pan first. The rest will fall into place. We had our 10 millimeter socket and extension ready to go so we could start some bolts in. Most gasket sealers require a few minutes to set up so be sure to check the label on your particular gasket sealer before torquing the bolts to 18 foot pounds. Now there's no specific sequence for these but you should try to cross it up a little bit to make sure that you don't pinch one side down while leaving the other side loose. Install your crank position sensor and start the eight millimeter screw into the bottom of the timing cover by hand. We'll then tighten this down with an eight millimeter socket and ratchet. Once the bolt's tight, reconnect the electrical connector.
Install the appropriate installer tool into your crank shaft. Ours is 7/16 by 20 thread. You may need to use a pair of pliers to get that in nice and tight. Install your harmonic balancer onto the crank and give it a couple of taps with a hammer, just to get it started on there. You then install the sleeve of the installer tool, bearing, and the nut. You can then install the bolt. Now every tool is different, so use the appropriate size wrench to tighten the nut down until your harmonic balancer is bottomed out, and if necessary there's two flats on the tool here, so you can hold that with the wrench and prevent it from rotating. Once the harmonic balancer is bottomed out, you can back it off, remove the tool.
Reinstall the crank shaft pulley with the three 14 millimeter bolts. Tighten those down with the 14 millimeter socket, ratchet, and extension. Reinstall your 16 millimeter crank bolt and washer. For now, we'll just tighten down the crank bolt as much as we can with the 16 millimeter socket and ratchet. Once we get the belt on, we should have a little more leverage to torque it.
Clean the gasket services for both sides of the engine water pump. It's just these two little two-bolt flanges here. All we're going to do is just get in there with a razor blade. Scrape off any old gasket material, and then wipe it down with a rag or a paper towel and some brake cleaner.
Set your water pump bolts through and place the gaskets onto the bolts. This can get kind of tricky because you want to keep everything in place and get this inlet hose back on. It's much more difficult to do once it's on the vehicle. Slide the clamp back into place. Make sure your gaskets are still in place on the bolts then line up your water pump with a 14 millimeter socket and extension. Get your hardware started. Snug the bolts with a 14 millimeter socket, ratchet, and extension. Torque these bolts to 34 pounds. Reinstall the remaining top hose and clamp as well as the bottom hose and that clamp.
Loop your serpentine belt under the crank pulley. We'll then go under the water pump, around the top, down and under the power steering pump, and over the A/C compressor pulley. On the left, we'll go over the tensioner and over the alternator. We'll then hold down where it will go below the idler pulley.
Using the drive from a 3/8 ratchet, we'll turn the tensioner counter clockwise. Slide the belt under. Take a quick look to make sure everything is aligned. There we go. Put tension back onto our belt. Using your ratchet, put tension on the serpentine belt by rotating the tensioner clockwise. Using your 16 millimeter socket, torque the crank bolt to 74 foot pounds.
Reinstall the clutch fan and just snug it up by tapping it on with a wrench.
Reinstall your upper radiator fan shroud. Reinstall the seven 10 millimeter bolts securing your fan shroud. Tighten them down with a 10 millimeter socket and ratchet. Reinstall the wire along the top of your shroud. Rock it back into place.
Fill your vehicle with a 50-50 mix of Dex-Cool coolant. We're using the special funnel to show you how much air actually comes out of the system when you do this, but any old funnel will do at home.
To finish bleeding your cooling system, simply leave the radiator cap off, start your vehicle, and set your defrosters or vents to the lowest fan speed and the highest temperature setting. This will allow the heater core to bleed as well. Just run the vehicle. Keep an eye on the temperature gauge. Let it get up to temp and monitor the coolant level inside of your radiator and top off as necessary. You'll notice that there will be several surges where it sort of burps and an air bubble comes out. It loses some fluid. You top it off and this process will probably repeat a few times.
Thanks for watching. Visit us at 1AAuto.com for quality auto parts, fast and free shipping, and the best customer service in the industry.
Shop Products


How To Replace Toyota Tundra Timing Belt 2002 V8 Disassemble Front of Engine PART 1 from 1A Auto
Learn how to replace the timing belt in your 00-09 Toyota Tundra. Part 1 of a multi-part video

