How to Replace Thermostat Housing 2001-06 Chrysler Sebring 2-7l
Created on: 2013-10-29
Watch this video to learn how to fix a coolant leak. The experts at 1A Auto show how to replace the coolant bleeder housing on our 01-05 Chrysler Sebring or Dodge Stratus.
-
step 1 :Drain the radiator
- Use a large pair of pliers to open the radiator drain plug.
- Drain the radiator fluid down into a catch pan.
-
step 2 :Remove the three hoses connected to the radiator housing
- Pinch the clamp with a pair of pliers and work the hose off the housing.
- Repeat on the other two hoses.
- Unplug the wiring harness.
-
step 3 :Remove the cover next to the throttle intake
- Use a 10 mm socket and ratchet to remove the bolt.
- Remove the 10 mm bolts securing the upper intake manifold.
- Now you can access the 8 ten millimeter bolts securing the coolant bleeder housing.
- Use an 8 mm socket and ratchet with a flex joint and remove the four bolts.
- Now your bleeder housing is free, pull it up and out.
- Remove the O rings.
-
step 4 :Install the new bleeder housing
- Clean up the area.
- Put the new O rings on the new bleeder housing.
- Mount the housing and bolt it in with an 8 mm socket, ratchet and flex joint.
- Secure the upper intake manifold with your 10 mm socket and ratchet.
-
step 5 :Reconnect the hoses and refill the radiator reservoir
- Connect the three hoses and secure the pinch clamps with a pair of pliers.
- Reconnect the air pressure sensor wiring harness.
- Refill the radiator bottle with a funnel and screen and radiator fluid.
- With the engine running, use an 8 mm wrench to bleed out the air from the coolant system.
Tools needed
-
Funnel
Socket Extensions
Flat Blade Screwdriver
Torque Wrench
Phillips Head Screwdriver
3/8 Inch Wrench
8mm Socket
Drain Pan
10mm Socket
Slip-Joint Pliers
Ratchet
Swivel
Brought to you buy 1AAuto.com, your source for quality replacement parts and the best service on the Internet. Hi, I'm Don from 1A Auto. I hope this how-to video helps you out, and the next time you need a part for your vehicle, think of 1AAuto.com. Thanks.
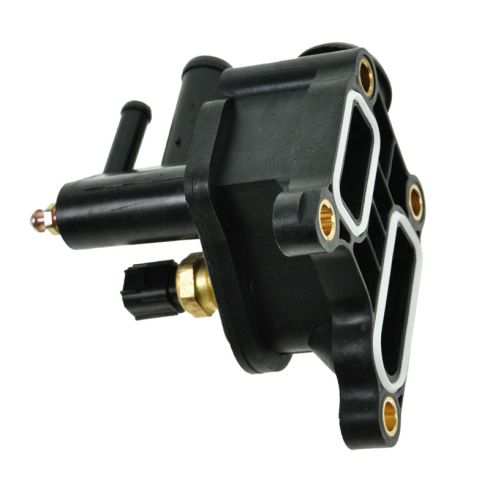
In this video, we're going to show you to replace the coolant bleeder housing on this 2004 Chrysler Sebring with a 2.7 liter V 6. This procedure is the same for most cars with that 2.7 liter V6. These housings can warp and crack and cause a leak in the front of your engine. You'll need a new bleed housing from 1AAuto.com, flat blade screwdriver, 8 and 10 mm sockets with ratchet and extension, a flexible joint for that ratchet and socket, large slip joint pliers, catch pan, funnel, 3/8- wrench and a torque wrench that can measure in inch/pounds.
You need to drain the radiator, and the correct way to do it, which we ended up not using, there's drain plug right down here that you turn out of the radiator. We use a large pair of pliers to grab onto it and start it going. We even use a smaller pair to try and get it further. We even reached up from the top and tried to get our hand down in there. We just couldn't get the drain plug to move far enough, so we actually ended up using an alternate method. That alternate method was just use the pliers. You have to undo this hose, anyways. Use your large set of pliers: squeeze the clamp, pull it off and then twist the hose and then pull it from the radiator. When you do that, it's going to lose enough fluid so that you don't have to worry about the fluid when you take the housing off. You can see it drains right down into our pan, pretty well controlled.
Now there are three hoses connected to the housing. All three of them probably have this pinch-style clamp, but it looks like maybe one of our hoses was replaced before. You can see you pinch the clamp and then pull. You can twist the hose. Use a pair of pliers to grab the hose and twist it on the housing or just pull. Also you could use a screwdriver to put in between the hose and the housing, that can break it free as well. Remove the hose and then we'll do that for the other two. Again, you'll see us use a screwdriver on that large hose. I'm pretty sure that if your engine has not been touched before, it probably will have one of these pinched-out clamps. Now disconnect the electrical connection by pressing and pulling that locking tab up and then press the tab and disconnect. Disconnect your map sensor by pressing on a tab and pulling it off. Then four bolts hold the housing in place and we found to get to the two inside ones, you need to lift up the intake, so we'll get into that next.
Start out using a 10mm socket and ratchet or a wrench and remove the cover that's right next to the throttle intake. Pull that, you'll see a 10mm bolt, and then all seven of the other 10mm bolts that hold the upper intake manifold down. Disconnect your manifold pressure sensor just by pushing on a tab and pulling. Then I'm going to fast-forward here as we remove those 8mm to 10mm bolts. You just basically back them out. The only one that you pull out is the last one that was underneath that cover. You'll just need a little bit of clearance, so once you have those bolts out, lift it up. We put the screwdriver on there just to hold it up.
Now use an 8mm socket and ratchet, and we have the whole flexible joint on there, helps us get the angle. Remove the four bolts that hold in the housing. Now a good tug on the housing. Pull it up and off. Pull the hoses back to pull it up and out. Make sure you remove the O rings. New bleeder housing from 1A Auto's on the left, old one on the right. You can see they're an exact match. We're just going to pull the four bolts out and put them into the new one for re-installation. The mounting surface- check it, make sure it's clean. Ours is in pretty good shape. If there is any debris that you're worried about that's going to affect the seal, use some steel wool or emery cloth, just make sure you don't get any debris down in there. Just wipe it down with a paper towel a little bit. Then put the new housing into place and start the bolts in. We'll tighten those 8mm bolts up, and they're usually in about a hundred inch-pounds, which is six to eight foot-pounds.
You do just want to seat them all first. Get them all seated, and then tighten them up evenly using a crossing pattern. Now you can remove whatever you have holding the manifold up and make sure it seats down into place correctly. Fast forward as we just start the upper intake manifold; put bolts in and just tighten them preliminarily. You do want to torque them. You torque them to 105 inch-pounds. Start with the middle ones first and then alternate as you go out to the outer ones. We'll fast-forward here as we put the hose back in place. The larger one, just push it on and then connect the radiator end. Also put the medium hose on, position the clip in a way that you can easily get to it with the screwdriver. If you have a pinch clamp, use the pliers to tighten that up. Clamp on the hose clamp for that second hose.
Install the small hose and bring the clamp up into place and then clamp the large clamp to the radiator. Reconnect your air-pressure sensor. Put that shield back in place and tighten down the 10mm bolt that holds it. Refill your radiator bottle, and we're using a funnel with a screen in it and we're going to reuse the fluid that came out. The screen just makes sure no big particles get in there. Refill it most of the way to the top, leave a little out. With the engine running, you'll want to take a 3/8 wrench, turn that bleeder a little bit counterclockwise, allow any air to escape until you have good fluid coming out of there. Tighten it back up, run your car and make sure you refill the radiator bottle to the proper level.
We hope this helps you out. Brought to you by www.1AAuto.com, your source for quality replacement parts and the best service on the Internet. Please feel free to call us toll free: 888-844-3393. We're the company that's here for you on the Internet and in person.
Shop Products

How to Replace Thermostat and Housing 2002-11 Toyota Camry
This video shows how to drain and refill the coolant to access and replace the thermostat. Follow our expert steps to do this job yourself

