How to Replace Sway Bar Link 2000-13 Chevy Impala
Created on: 2013-09-08
Learn how to replace the sway bar links and what the correct order is for the grommets and bushings by watching this video
-
step 1 :Removing the Wheel
- Loosen the lug nut covers with a 19mm socket
- Pull off the center cap
- Loosen the lug nuts with the vehicle on the ground
- Raise the vehicle with a floor jack
- Secure the vehicle on jack stands
- Remove the lug nuts
- Pull off the wheel
-
step 2 :Removing the Sway Bar Link
- Turn the wheel by hand
- Hold the nut at the top of the sway bar link with a 13mm wrench
- Loosen the sway bar link bolt with a 13mm socket and ratchet
- Apply penetrating oil to the bolt if necessary
- Make note of the positions of the bushings and washers
- Tap the bolt out with a hammer
-
step 3 :Installing the New Sway Bar Link
- Place a rubber bushing on the control arm
- Put on a washer
- Put on the metal sleeve
- Lift the sway bar with a pry bar
- Put a rubber bushing on top of the metal sleeve
- Put a washer and a rubber bushing onto the bolt
- Slide the bolt into place
- Put a rubber bushing on the bolt, on top of the way bar
- Put on a washer
- Thread on the nut
- Hold the nut at the top of the sway bar link with a 14mm wrench
- Tighten the sway bar link bolt with a 14mm socket and ratchet
-
step 4 :Reattaching the Wheel
- Slide the wheel into place
- Start the lug nuts by hand
- Tighten the lug nuts preliminarily
- Lower the vehicle to the ground
- Tighten the lug nuts to 100 foot-pounds in a crossing or star pattern
- Reattach the center cap, lining up the notch with the valve stem
- Tighten the lug nut covers with a 22mm socket
Tools needed
-
14mm Wrench
13mm Socket
Torque Wrench
14mm Socket
Hammer
Rust Penetrant
Pry Bar
Jack Stands
19mm Socket
Ratchet
Floor Jack
1/2 Inch Breaker Bar
13mm Wrench
Brought to you by 1AAuto.com, your source for quality replacement parts and the best service on the Internet.
Hi, I'm Don from 1A Auto. I hope this how-to video helps you out, and next time you need parts for your vehicle, think of 1AAuto.com. Thanks.
In this video, we're going to show you how to replace a front sway bar link on a 2006 Chevy Impala. It's the same for model years 2000 through 2012, and the procedure is exactly the same on the left side, and on the right side. To perform this repair, you'll need a 13, 14, and 19 millimeter sockets and socket wrench; 13 and 14 millimeter wrenches; some penetrating oil; a hammer; flat blade screwdriver; and a jack and jack stands.
Start by loosening the five plastic lug nut covers that hold the wheel cover to the wheel. For taking off the wheel, you'll be using that same 19 millimeter socket, but if you don't have the benefit of a lift or air tools, start with it on the ground. Loosen up your five lug nuts slightly. Get it safely on some jack stands and then proceed to remove the five lug nuts with your socket, socket wrench and breaker bar. Then take off your tire. I
'm going to turn the steering knuckle there a little bit so you can get a good look at the sway bar link, which is between the control arm and the sway bar. I'm using a 13 millimeter socket and socket wrench, on the bottom, and then I'm counter holding it with a 13 millimeter wrench up top, and I'm going to go ahead and fast forward as I loosen those up. The bolt that goes through the center there is quite corroded and sticking to the rubber bushing, so I'm going to use some penetrating oil. I'm going to try and separate the bushings and those washers, as well as the bolt that goes through the control arm, all the bushings, and the sway bar, using a flat, long screwdriver to try and get some room, and start to pull that away. Once I do, I can just use a hammer on the top and tap it out. As you pull everything out, you'll just want to remember the position of everything, how the bushings and the washers go in.
Here you'll see the old part, rusted and corroded, and the new part from 1A Auto. That, there, is how it will go back into the car. I'm going to start with a rubber bushing against the control arm and then a washer. On top of the washer I'm going to place the metal sleeve. I'm going to use the pry bar to lift up so that I can get, then, another rubber bushing, place it on top of the sleeve with a washer underneath it. As I lift it up then I can let it down and it'll fall right into place. I've got the bolt going from the bottom with a rubber bushing. It's got the bolt, then a washer and then the rubber bushing that's going to be sitting next to or against the control arm. You can see there. You might have to twist or pull some of the stuff to get it to line up so it goes through. Again, here, I'm using a hammer. I'm going to use the pry bar again to pry up on that sway bar to give me a little bit more room. Then once I get that pushed through, I'm going to put another rubber bushing and a washer, and then the nut. Then, to summarize, from the bottom up, you've got the bolt, washer, rubber bushing, control arm, rubber bushing, washer, sleeve, washer, rubber bushing, then the top of the sway bar, then a rubber bushing, a washer, and then the nut. I'll go ahead and fast forward as I use a 14mm wrench and a 14 millimeter socket and socket wrench to tighten up the sway bar link.
I'm reinstalling the wheel and I'm going to tighten by hand the five lug nuts. Then, once I do that, I'm going to tighten them back up with the impact wrench, and then as I get the car down, I'm going to use a 19 millimeter socket with a torque wrench, and torque all five lug nuts in a star pattern to 100 foot-pounds. Then, go ahead and reinstall your hub cab, lining up the notch in the hub cap with the valve stem, and then go ahead and tighten up those plastic lug nut covers
We hope this video helps you out. Brought to you by www.1AAuto.com, your source for quality replacement parts and the best service on the Internet. Please feel free to call us toll-free, 888-844-3393. We're the company that's here for you on the Internet and in person.
Shop Products


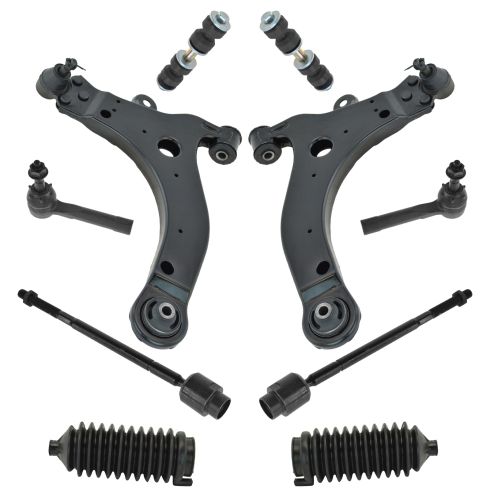
2004-11 Chevrolet Impala with RPO Code FE4 (Special Ride & Handling Suspension) without Police Package Front 10 Piece Steering & Suspension Kit TRQ PSA58863
- (2) Front Outer Tie Rods
- (2) Front Lower Control Arms with Ball Joints
- (2) Front Sway Bar Links
- (2) Front Steering Rack & Pinion Bellows
- (2) Front Inner Tie Rods
- 10 Piece

How to Replace Rear Sway Bar Bushings 2002-08 Audi A4
New Sway Bar Bushing from 1AAuto.com How to remove, replace, and install rear sway bar bushings on 02, 03, 04, 05, 06, 07, 08, Audi, A4, S4

