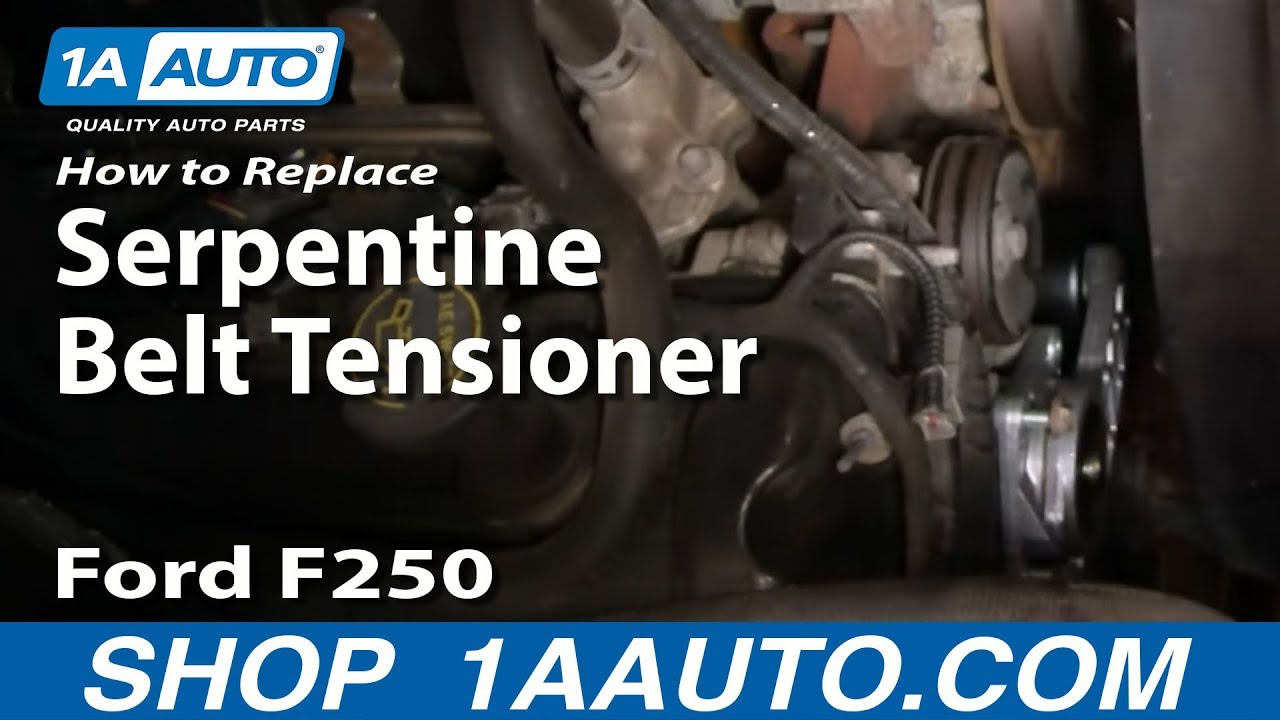
How to Replace Serpentine Belt Tensioner 1999-2004 Ford F250 Super Duty Truck
Created on: 2011-11-16
This video will show the sequence for removing and installing the serpentine belt and serp belt tensioner. Follow along with our experts to DIY!
-
step 1 :Removing the Serpentine Belt
- Familiarize yourself with the belt routing diagram
- Attach a 1/4 inch drive ratchet to the serpentine belt tensioner
- Push the ratchet clockwise to loosen the belt
- Pull the belt off the alternator
- Release the tensioner
- Pull the belt off and out
-
step 2 :Removing the Serpentine Belt Tensioner
- Remove the three 10mm bolts from the tensioner
- Pull off the serpentine belt tensioner
-
step 3 :Installing the New Belt Tensioner
- Start one 10mm bolt into the new belt tensioner
- Insert the three 10mm bolts into the belt tensioner
- Tighten the 10mm bolts to 25 foot-pounds of torque
-
step 4 :Installing the New Belt
- Push a loop between the idler and tensioner pulleys
- Loop the belt around the A/C compressor pulley
- Bring it around the crankshaft pulley
- Bring it around the water pump pulley
- Bring it around the power steering pulley
- Check that the belt is routed correctly
- Attach a 1/4 inch drive ratchet to the serpentine belt tensioner
- Push the ratchet clockwise to loosen the belt
- Pull the belt onto the alternator
- Release the tensioner
Tools needed
-
A Piece of Pipe (for leverage)
Socket Extensions
Torque Wrench
1/2 Inch Ratchet
10mm Socket
Ratchet
1/2 Inch Breaker Bar
Brought to you by 1AAuto.com, your source for quality replacement parts and the best service on the Internet.
In this video, we're going to show you how to replace the serpentine belt tensioner on this 2003 Ford F250 Super Duty with the 5.4 liter engine. This process is pretty much the same for the 5.4 liter as well as the 6.8 liter, although the 6.8 liter has a little less clearance to get in there. Tools you'll need are a ½ inch drive breaker bar or a ratchet handle with pipe and you'll see how I use that when I reinstall the belt. You'll also need a 10mm socket with a ratchet extension or a 10mm wrench will work. In addition you'll need a stool and you'll hear some squeaking in the background a lot in this video and that's the stool slipping underneath me as I'm leaning over the hood of the truck.
Very important: find your belt routing diagram. On this truck, it's on the driver's side, right near the radiator. It looks like this. This is a very important piece of information. This help helps you get the belt routed correctly. It can be somewhat confusing if you don't have a diagram. If this has been painted over or is missing, I would actually draw a diagram just by hand, just so you have it. It helps.
Here is your tensioner right here, take a ½ inch ratchet, insert it there. Now force your ratchet clockwise to loosen the belt, and then take if off the alternator. Push down on the ratchet, grab the belt and slowly let your tensioner back, and pull the belt off. It goes down around your compresser here. Your tensioner is held on by three bolts: here, here and here, all 10mm. So I don't bore you, I'm going to hit the fast forward button as I remove those three 10mm bolts just using a regular socket and ratchet. The bolts usually come out pretty easy. Loosen them up a few turns and then they'll turn by hand. For the last one, you may have to reach down there with your other hand and hold up the tensioner some while you remove the last bolt.
The new tensioner from 1A Auto is the exact same as the old one. I'm going to put a bolt into it. Put it down in. Start that first bolt. Just fast forward again. Just like when you take it out, you start these bolts in and they'll pretty much thread in by hand. After you thread them in by hand, then, we'll tighten them up. Now tighten these up to about 25 foot pounds or good and tight with a small ratchet like this. Everything is aluminum so you don't want to over tighten it.
Take your new belt from 1A Auto and you want to make a nice tight loop and you're going to stuff it down in between where your tensioner and idler are. You're going to then reach underneath, grab that loop, and pull it through. I know you can't really see this, but I'm just pulling it through and then putting it around my A/C compressor pulley. Keep a loop down and around the crankshaft. After you're around the crankshaft, come up and ignore the alternator pulley for right now and put it down around your power steering pulley way over here. What you do is put a little loop between your bypass pulley and tensioner, get that down around the A/C, then put your loop around the crankshaft, then pull the loop up and around the power steering pulley and then you're on everything except the alternator. Closer up, you can see the belt is way down around the A/C compressor, around the tensioner there, and around the water pump and then down around the power steering pump over here. I can pull it up some. You can see I've got my ratchet in there. Take a piece of pipe; it's going to give me extra leverage to make this job really easy. Before I pull on that, I'm going to pull by belt up and make sure to feel down around the a/c pulley and the crank pulley and the power steering pulley. Everything feels like it's on there correctly. Bring my ratchet up, use the pipe, take the tension off, put the belt on and then slowly . I don't like the way it's looking on my tensioner here. I'm just going to pull it up a little bit. Slowly release that. Take the pipe off and take the ratchet off.
We hope this video helps you out. Brought to you by www.1AAuto.com, your source for quality replacement parts and the best service on the Internet. Please feel free to call us toll-free, 888-844-3393. We're the company that's here for you on the Internet and in person.

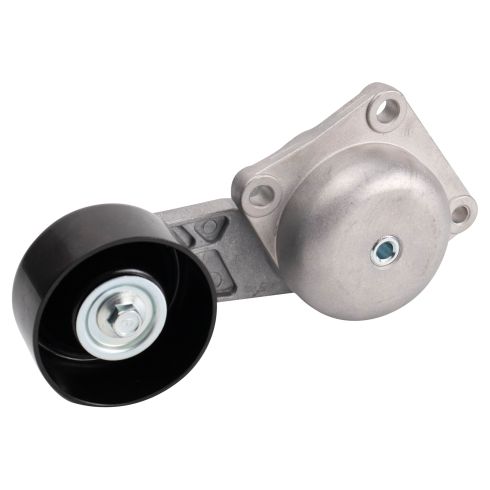
Ford Lincoln Accessory Drive Belt Tensioner TRQ BPA03783
- Pulley
- Smooth
- 17 mm
- Silver; Black
- 17 mm
- 2.99 in
- 0.67 in
- 0.67 in
- 1.48 in
- 3
- Aluminum & Steel
- 76 mm
- 37.7 mm

How to Replace Serpentine Belt Tensioner with Pulley 2006-11 Chevy Impala
Use the belt diagram and detailed instructions provided in this video to help you replace the serpentine belt and pulley on your 06-11 Chevy Impala.

