
How to Replace Rear Brakes 2014-17 Infiniti QX50
Created on: 2020-04-03
Watch this video to learn how to install rear brakes on your 2014-17 Infiniti QX50.
Tools needed
-
14mm Wrench
Torque Wrench
Socket Extensions
14mm Socket
Pry Bar
Jack Stands
19mm Wrench
19mm Socket
Liquid Thread Locker
Brake Parts Cleaner
21mm Socket
Flat Blade Screwdriver
Socket Driver
Paper Towels
Copper Anti-Seize
Wheel Chocks
Brake Grease
Drain Pan
Ratchet
Floor Jack
Wire Brush
1/2 Inch Impact Gun
Okay, friends. Let's get started on this rear brake service. Safety protection. The first thing we're going to do is make sure that your vehicle is raised and supported safely. Last thing you want is for this to come falling down and potentially hurt anybody. Once you're sure of that, we're going to remove this cover. You can find a little slot. Grab your pry bar, let's get right in there, pop this off.
Once you're behind here, you're going to see your lug nuts. And this right here, this is a locking lug. This is what the key looks like right here. Generally speaking, it can be found in your trunk. If it's not in the trunk, maybe it's moved to the glovebox or something like that. Use your 21-millimeter socket and remove all these lug nuts. Let's get our key on there and just give it a little turn until it wants to fit in. That feels great.
Last lug nuts. It's the only one holding the wheel on so be careful. Remove the wheel. Now, with the wheels out of the way, one of the first things I like to do so I don't forget is to grab this little plug. Go ahead and pull that out of there. And this is the access where your emergency brake adjustment is, which if you spin this, you'll be able to find a little star wheel in there. And I'll show you what that looks like in a minute.
But we're not going to worry about that, we are going to save this. To move along, we're going to continue on by pushing back this caliper. So I'm going to come right in between this area which is the caliper and where the rotor/pad is with my pry bar and just slowly start prying it. Nice and slow. What we're doing at this point is we're pushing in that piston and it's pushing fluid back up through the system. So, you need to go slow.
Almost there. Okay. If I look right in there, I can see that the pistons pushed it back as far as it's gonna go. Next, I'm going to continue on to removing these. This is a 14-millimeter headed bolt, and this is holding the caliper to the bracket itself. You're going to see that there's going to be a long shaft here because this is part of the slider. So what happens is, is once this is in, it's going to slide in and out inside this channel inside of the bracket.
You need to remember that this top one had the rubber boot. You'll notice when I remove the lower one, it will not have this rubber boot. I'm just gonna put this back in so it holds this from moving too much on me. Let me get that out of there. Okay. So as you can tell, it doesn't come out any further because of this arm right here. I'm not really super worried about that because what I'll do is I'll just start them both in a little bit more, and then I'm going to remove the bracket bolts. And they're just these little 19-millimeter headed bolts on the backside.
So to get these out, as you can tell, there's minimal room. I'm gonna use a 19-millimeter wrench, put it right on there, and I'm gonna use a rubber mallet to give this a nice bonk. There we are. The top one. That's what the bolt looks like. It's got a little washer. Make sure you don't lose that washer. Bolt number two looks exactly the same as the first. You don't have to worry about mixing them up. Okay.
At this point, obviously, I can get these sliders out of here. There's the bottom one. Like I said, no rubber down here. We need to remember the rubber went on the top slider bolt. There's the rubber that's off of here. We're gonna carefully hang our calipers so it's putting no pressure on that flex hose. Next, let's get the rotor up here. Let's give it a little wiggle, it should slide off. If for some reason it didn't, what we'd want to do is we'd want to line up this hole up along the very top.
And if you look inside, you can see this right here. This is the adjuster, all right? You'd want to de-adjust these ebrakes as far as you can to make it sort of let go of the inside of this rotor. Of course, it could be frozen on just due to a whole bunch of rust right here. You could try giving it a couple loving bonks and just try to break it free as well. All right, so we're at the bench. We've got our caliper bracket here. We're going to take these pads out, give them a little wiggle, take a peek. Next, I'm going to take off these tins like that.
While we're still playing with these tins, you're going to notice that with your brake pad package, it came with two different sets of tins inside of it. They all came in one bag. You can separate them just like I did. And what you'll notice is, is although they look approximately the same, if you look even closer, especially towards the center where my fingers are, there's a very big difference. This one right here is a much wider area in the center. So what I would do is I would just match them up. You can put them over each other and make sure that that lines up. Obviously, if I was using a skinnier one, try to line it up, not so much.
So it was easy enough to figure out which tins I'm going to use. These ones right here, I'm going to recycle. Of course, if you were doing a brake job and your caliper bracket required the other tins, you would go with those ones. The next thing I want to do is just turn this, and I'm going to take off these boots. They're both the same. You don't have to worry about mixing them up, but you do want to stretch them. Give them a little stretch, give them a peek. Make sure that they're not torn or worn. If you see any areas that look like they have a hole, or it's very stiff, I would replace them.
But I gotta tell you, these feel great. So what I'm going to do is I'm going to clean them, and I'll show you that in a second. At this point, we have a nice stripped caliper bracket here. There isn't anything extra on it that I can take off, so we're going to start by cleaning it up. I'll grab my little brush here. You can use whatever you want, but I just happen to have this brush.
Go right along all these meeting areas where those tins are gonna ride. Okay, so that looks decent. You want to make sure you look right along here, along these corners. If you see any build up like you can see me scraping away, you need to make sure you get that out of there. Any build-up is going to cause a raised area between the bracket and this. Once you have that and you put your pad in there, there's a possibility that that pad won't be able to function as it should. Clean these up nice, it's worth taking an extra second.
So all these mating surfaces look great. I cleaned them up, they look perfect. The next thing I want to do is clean up right inside here. This is where the sliders are going to go, and it needs to be very clean and very lubed once we're done. So to do that, I'm gonna grab this nice collection bucket. I've got my hand protection and my eye protection like always, and I want to get started on cleaning those. Grab some parts cleaner, keep your mouth closed. Here we go.
All right. A little bore brush, if you've got one, would be helpful. All right. Stomp them out. Oh, nasty. Just give it a couple extra blasts. Okay, the fluid came out clean. I'm going to take a peek inside. It doesn't look like it's very rusted, so I'm really not very worried about that at all. I'd say that this looks great. Let's let it dry, and we'll move along.
Next, I'm going to move along to cleaning these boots. It's very simple. Just take one of these rags, open it up, grab a corner, and give it a nice twist. After you do that, put it right through just like this. And then grab that boot, try to spread it out as much as possible, and just roll it all over that rag. You want to try to get the rag to touch on every little spot on the inside of that boot and get out any bit of debris that might be stuck in there.
Oh yeah, nasty. The next thing I'm going to do is grab the sliders and clean those up as well. I'm gonna clean the shaft that goes inside of the bracket. As you can tell, it looks pretty great. If you turn it and it has a little bit of discoloration but no raised or pitted areas, you're doing all right. Take a peek at that rubber boot. It should spin around, but it shouldn't slide off. If it's swollen and it wants to slide off, it's going to cause breaking issues, in which case it's simple enough to replace.
You just take a pocket screwdriver, pop it off, slide on your new one, which you'd have to get, as a kit, it'd probably come with these, and, you know, then you'd be all set. Do the same to both. Get them nice and cleaned up. I'm not going to worry about lubing these yet, which I normally would on most brake jobs. But since these have to go on while the caliper and the bracket and everything are all together, I'm going to do those at that point. I'm going to continue on though. I'm going to grab some of this Moly grease. It's just caliper grease. It doesn't have anything in there that's going to hurt the rubber.
I'm gonna go right along there just like that, and then I'm going to get right up on the lip. There's like a little lip on the caliper bracket right there, and that's where that boot's gonna ride. You need to put grease on there. That's going to help keep moisture out. Slide that up on there. Perfect. Now do the same to the other one. Try to get some of that grease inside the hole there, okay, up along the lip, super important.
Get this on there just like that. Perfect. We're going to continue on with that caliper grease. And we're going to go right along those mating surfaces for where the caliper bracket and the tins connect. And this is going to help with vibration dampening and of course keeping moisture out of there. Super important. One thing that I would mention is that you don't want to put on so much that it's globby and that it could come squirting out.
Once you put these tins on, you don't want it to come pushing out towards the center there where the rotor is going to be and potentially get in between the braking surfaces. So just make a nice thin layer, something to keep the moisture out. Go ahead and put these tins on there. They slide right on, easy peasy. This caliper bracket's good to go. Let's get back over to the vehicle.
Next thing we're going to do is take our little brush and clean up this hub. This is right where the rotor is going to mate up against, so you want to make sure it's nice and smooth. Next thing we're going to do is clean this down right into that collection receptacle, of course.
All right, once you have this all cleaned down, you're going to use a little bit of copper never-seize. Up along the top up here is where your adjuster is. I like to go right on the threads, the area where it will get threaded in. That looks good. Right down along here, you're gonna see your ebrake mechanism. Give that a little spray as well. If you happen to get any on the shoes on the braking surface, you need to make sure you clean that down.
Now, we're going to hit the hub, continuing with the copper never-seize. So next we're going to clean the braking surface on the rotor. It's important to remember you have the backside, the front side, and then, of course, where the emergency brake is going to ride. You need to have all those surfaces clean.
Slide it right on there. Just make sure it can still spin. So now we're going to move along to adjusting up the emergency brake. You just want to give this a spin and take a listen. You wanna hear a very, very slight drag, okay? As soon as you hear that drag, you're just going to take it back one click or one little turn. To do that, you want to go so you can see that little adjuster screw right through this hole.
Take a small screwdriver, whatever you've got, just come right through here. When you take a screwdriver and you go up against that wheel, if you pull down while it's up against the wheel, that's going to de-adjust it. If you go like this, and you pull your screwdriver handle up, that's going to adjust the tension more. Let me do a little bit more. Okay. See? That's too much. If you left it like this, that's going to be a major issue.
I'm gonna go back two clicks, a little bit. There we go. This feels great. Don't forget to put in your little rubber plug. It's very important. And I like to do it before I put the whole breaks together just in case maybe you push it through on accident. See, it's very easy. It was ready to go through. Perfect. The next thing we're going to do is grab the caliper. This is the muscle of the brake, obviously. We've got our piston pushed all the way in. I'm gonna take my little brush and just kind of brush this around and get off as much of that old brake dust as possible. Obviously, you don't want to breathe it in.
Next, I'm going to take a little bit of this break caliper Moly grease. I'm gonna go right along the metal part of the piston, just like that. That's right where it's gonna be touching up against the pad. And then I'm going to go right on the inside of this ear, and right there. These are all the areas that's going to be touching against the brake pad. This is going to help with vibration dampening and noise reduction.
So next, I'm just going to put a thin coating of Moly grease right on these. You don't need to put too much, but I do like to get right up along that lip, up along here. You don't need to go up on the threads though, just the lip where that boot's gonna ride. And definitely, don't use too much grease on this portion because as you put this into the boot, you're going to notice that it pushes all the grease up and then it might get into the threaded area.
If you want to use a little bit of thread locker here, it's completely up to you, but I don't deem it necessary on this particular part. So we've got our bracket, we've got our two pads. The pad that has the squealer or the wear indicator is going to go on the inside, all right? So the side that has the boots, that would be considered the inside portion of the bracket. I'm just gonna slide it right in there like that, fits in nice.
It's gonna slide around real easy. So this part is going to be one of the hardest parts of the whole job, is just trying to get everything to stay together while you lay it up on the top. Put it right there. Beautiful. So now, if you look, you can see everything sitting right in there where it needs to be. I would turn it more, but everything's loose and I don't want it to fall apart. So now I'm just gonna grab the caliper, hold the pads in there, and I'm gonna go like this. And that's just so I can make sure that I know which side is going to be the top, which is this side right here. Set it back down.
Now I'm going to grab my sliders, right? Get a little bit of grease on there. This is the one with the rubber boot. The one with the rubber is going to go on that portion that I told you to make sure is on the top. I'm going to go right in over here. Let's see if I can turn this. It's hard to do that way. This way. Slider right in. Now, grab the other slider. Okay. Now that I have both of those started, I'm going to snug them up.
Okay, that one's snug. Okay. Now that I've done that, I want to show you something that's very important. If you take your pocket screwdriver and you go right along the boot, you can tell that it's not up on the lip where it's supposed to sit. If you left it like this, there's a very good possibility that moisture is going to make its way in there. So just go ahead and give it a little squeeze. Work it so it's sitting in the lip up along the top as far as it can go.
And then, of course, make sure you didn't pull it off of the lip on the bracket. Do the same to both boots. So now it's time to get the caliper on here. I'm just gonna slide it right over the rotor, okay? I've got my two caliper bracket bolts, and I have the two washers, of course. I like to use a little bit of thread locker. We'll call that your prerogative, and go right in here. I'm going to start to bolt these in before I snug any of them up.
Okay, so now it's time to torque the caliper to the bracket. That's going to be these bolts right here. Obviously, if you're using a straight socket with your torque wrench, you're probably not going to get up in there. You can just use a swivel socket, that'll work. I'm gonna start with the top, and I'm going to torque it to 32 foot-pounds. Torqued, torqued. Now, it's important to make sure that you torque down the caliper brackets and knuckle bolts. To do that, I'm gonna grab my torque wrench with my socket, and I'm going to set it to 62 foot-pounds.
This one's even less likely to get in there, so I'm just gonna grab my wrench. Okay. Beep. I'd say that's approximately 62 foot-pounds. It's definitely tight, and I used thread locker. So I torqued the bolts that hold the bracket to the knuckle. I torqued the slider bolts that hold the caliper to the bracket. So next we're going to make our way under the hood. And right on the driver's side, you're gonna see this panel right here. And it says right on it, "Brake Fluid."
Grab these little tabs, lift this up. There's your master cylinder. As you can tell, you have a maximum line and a minimum line. Just give it a little wiggle and check to make sure your brake fluid's up close to that maximum line. Once it is, go ahead and get inside your vehicle. We're going to pump up the brakes till it's nice and firm. Then we're gonna come back out here and double-check to make sure this is full. So I'm just gonna pump this up nice and slow.
Okay, it's nice and firm, very close to the top. I wouldn't expect it to be all the way at the top, but I can feel that it's not dropping anymore. At this point, I know that my calipers are all nice and pumped up. Let's go double check that brake fluid. Okay. So as you can tell, the brake fluid is a little bit low. I'm just gonna lift this up. I'm gonna look right on the cap, and it tells us to use DOT 3 brake fluid. So, you need to use DOT 3. I'm gonna go ahead and add some right up to that maximum line.
And that's perfect. The last thing that you want is to come up above the maximum line and that can cause an issue. Make sure you cover it as soon as possible, and make sure it's nice and snug. After that, I'm gonna put this cover on here. All right, so now that we got one side pieced together, let's go ahead and do the same to the other side. It's time to get the wheel up on here.
All right, so now it's time to snug up the wheel. We've got our little wheel lock key here. Generally speaking, you don't want to use an air gun to tighten these up. So all I'm gonna do is actually just bottom it out with this. I'm not gonna put any pressure on it because I don't want to break it. Awesome. Now we're going to torque these to manufacturer's specifications. The next thing we're going to do and probably one of the most important is to torque the wheels. We're gonna do this in a crisscross pattern. Torque them to 80 foot-pounds.
Make sure you grab that off of there. Those are all torqued. Let's grab that center cover. When you look at your center cover, you're going to notice on the inside, you can see something that looks a lot like a valve stem, which looks like this. That's where we're going to line it up, just like that. You can see that these markings line up as well. Give it a loving bonk, make sure it's completely on. That looks great. Take her for a road test.
Shop Products


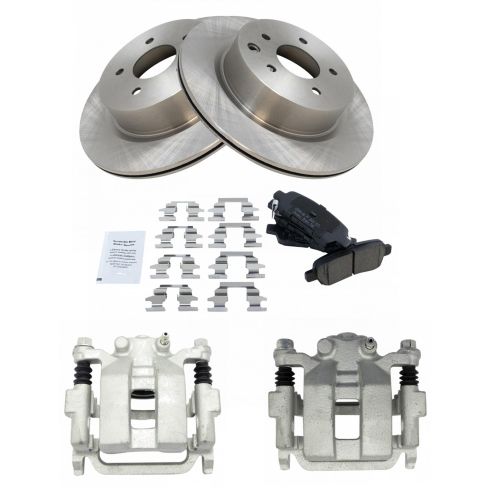
Nissan 350Z Infiniti G35 M35 M45 Rear Ceramic Brake Pad & Rotor Kit with Calipers TRQ BKA19100
- Vented
- Premium Posi
- 5 Lug
- Ceramic
- 12.12 in. (308mm)
- (2) Rear Brake Rotors
- (1) Rear Ceramic Brake Pad Set with Contact Point Grease & Hardware
- (2) Rear Brake Calipers with Hardware

How to Replace Rear Brake Backing Plates 2002-09 Chevy Trailblazer
Watch this video to learn how to replace the rear brake backing plates on your 02-09 Chevy Trailblazer or GMC Envoy.

