How to Replace Rear Brake Calipers On Any Car
Created on: 2019-09-15
Check out this video to learn how to replace rear brake calipers if your vehicle has twist type pistons.
-
step 1 :Removing the Wheel
- Loosen the lug nuts while the wheel is still in contact with the ground, if working with hand tools
- Raise and support the vehicle
- Remove the lug nuts
- Remove the wheel
-
step 2 :Removing the Brake Caliper
- Remove the brake flex hose and ABS wire from any retaining brackets to prevent tugging or breaking either line
- Loosen the brake flex hose banjo bolt
- Remove the emergency brake cable from the caliper
- Remove the two caliper slider bolts
- Pull the caliper free from the rotor and support it with a hanger
- Remove the brake pads
- Remove the brake caliper bracket bolts
- Remove the brake caliper bracket
- Secure pinch-off pliers on the brake flex hose
- Have a drain pan ready to catch brake fluid
- Remove the flex hose banjo bolt to remove the hose fitting from the caliper
- Make sure to locate, remove, and discard the two copper crush washers
-
step 3 :Servicing the Brake Caliper
- Compare the new brake caliper to the old, making sure they are an exact match, including the locations and orientations for hose fittings, bleeder screw, etc.
- Remove the slider bolts to disassemble the new caliper assembly
- Remove the caliper slider pins and boots
- Apply grease to the slider pins, and inside the boots
- Reinstall the slider pins and boots
- Apply brake grease to the grooves where the pad retainers will sit
- Install the pad retainers into the grooves. Use the old brake caliper as reference for their orientation, if necessary
-
step 4 :Installing the Brake Caliper
- Install the caliper bracket into the wheel knuckle
- Torque the caliper bracket bolts to the manufacturer specification
- Apply a thin coat of brake grease to the tabs of the brake pads that will ride in the caliper bracket grooves
- Apply brake grease to the inside surfaces of the brake caliper that will contact the pads
- Slide the caliper over the pads and align it with the slider pins
- Install the caliper slider bolts, and torque them to manufacturer specification
- Slide a copper crush washer over the banjo bolt, insert the banjo bolt into the brake hose fitting, then slide the second copper crush washer over the banjo bolt
- Install the banjo bolt into the caliper, and torque it to manufacturer specification
- Remove the pinch-off pliers from the flex hose
- Reposition the brake hose and ABS wire in their retaining clips or brackets
- Connect the emergency brake cable
- Press the brake pedal repeatedly until it is firm
- Open the bleeder screw until there is a steady flow of brake fluid
- Close the bleeder screw
- Place the cap over the bleeder screw
- Perform a full brake bleed on the vehicle
-
step 5 :Installing the Wheel
- Lift the wheel onto the wheel studs
- Install the lug nuts and tighten them by hand in a crossing pattern
- Lower the vehicle with minimal weight on the wheel
- Torque the lug nuts to manufacturer specification
- Lower the vehicle completely
Tools needed
-
Socket Extensions
Torque Wrench
Jack Stands
Complete Metric Wrench Set
Pocket Screwdriver
Pliers
Hose Pinch-Off Pliers
Brake Grease
Complete Hex Socket Set
Complete SAE Socket Set
Ratchet
Complete SAE Wrench Set
Floor Jack
Complete Torx Bit Set
1/2 Inch Breaker Bar
Complete Metric Socket Set
Hey, friends, it's Len here at 1A Auto. Today I wanted to talk to you about something, e-brake integrated calipers. These calipers are a little bit different than other calipers that you may see with pistons that you can push back very easily. These have a twist type piston and that's because of back here, you've got a whole extra mechanism going on here. The reason for this is because you don't have e-brake shoes behind your road or here. I'll show you a little bit more about that right now.
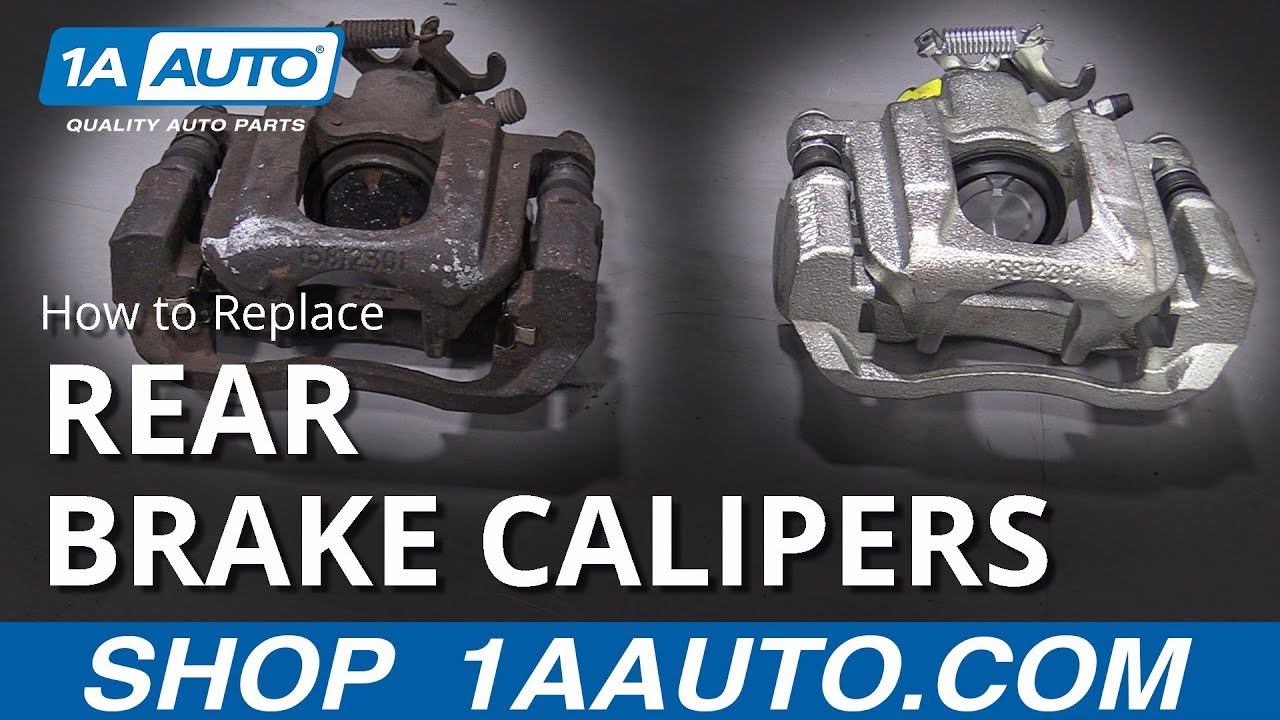
Okay, so we've got our calipers out on the bench over here and these are two very different calipers. One is of course for the front and one's for the rear, but basically I wanted to show you the difference in the piston, which is this part right in here. Okay. This one has two little slots right there. Then if you look at this one, this has a hole in the center and just a round circular piston like that. If you see around circular piston like this with a hole, that means you can go ahead and push it back with something as simple as something like this. Or even if you wanted to, you could have a tool like this, which just ratchets.
If you're dealing with a caliper that looks like this, which is an e-brake integrated caliper, you have this unit on the back, which essentially you have your e-brake cable comes through here. It holds the outer sheathing right there, and then the inner part comes here, right onto there. You pull on your e-brake, it pulls on this right here, which I can't do by hand because I'm not super strong. Anyway, pulls this in turn, pushes this piston out and applies pressure to your brake pad up against your rotor, which will make friction, and make you stop in case of an emergency.
Or if you're parked someplace you just want to use your parking brake. Okay. The difference with this piston right here also would be you can't use a tool like this to push it in. This will have no effect. These, the reason why they have these little cutouts like this is because you need to twist these pistons in as you push. And it sounds like it's complicated and it really kind of is, but at the same time it's not. If you were to use some long nose pliers, of course you wouldn't have the bracket on it at this point, but you would just go right in. Go right into those grooves, twist at the same time as you push, and the piston will work its way in.
You cannot push this directly in without twisting at the same time. So you could use these pliers like I was saying. I'll turn those over. Or you could use something like this. This is available at 1aauto.com. Has all different sides, so it doesn't matter what size piston you have. More than likely, there's an application that'll fit into these grooves and make it so you can use a ratchet and extension, twist while you push, and drive that piston in. So that would be the difference. Look at the backs.
The non-integrated does not have that whole mechanism back here. All right. So if this type of caliper was on the rear, which it's very possible that it could be, there's a lot of cars out there that don't have e-brake integrated calipers in the rear. It would look just like this and there's nothing that you really have to worry about. It's easy peasy. You just put it on, bleed out the system, down the road you go. This one right here, you have to take the e-brake cable off of here, pull it out of here, get that out of there. There's a couple more things you'd have to do and I'll go ahead and show you that right now. And as always, if you need any parts, you can always check us out at 1aauto.com. Thanks.
Okay, so we've got the vehicle raised and supported off the ground safely and we're going to remove all five of these lug nuts. A little bonk, break it free. All right, so one of the first things we're going to do is get our ABS wire off of our little clips here. These are basically just little hooky dos they go like this and the cable slides in there. That just makes it so when we go to take the caliper off, we don't have to worry about giving our abs wire a tug. We're going to break free this banjo bolt. The banjo bolt holds the brake line to the caliper. That's where the fluid comes from. It's broken free.
I'm just going to snug it up just a teeny bit. I got my collection receptacle under there. Okay, so we have our emergency brake cable. It comes through this bracket on the caliper, and then it comes over here and it hooks onto this. The e-brake cable, generally speaking, we'll have something that holds the cable to the bracket, whether it's a clip that'll just slide in right like this, or if it's like this, and it has a couple ears that you need to squeeze in.
There's multiple ways that it could be, but whatever holds it in, you need to make it so you can get this cable out. For this application that has the two ears you need to squeeze, so I'm going to use this tool. Just slides over the cable, slide it right down there as far as you can so it's up against this bracket. Grab your cable, give it a little twist. We're just going to see if we can pull it, at the same time it's pulling this. There we are, out of there. I'm going to slide it through here and just like that. The way it came out is right here in this bracket. There's a little hole for the cable to come through. That was nice of them. I'll take that.
It's got a little groove here and it slides over this hook. So now theoretically what you could do, take out this bolt and take out this bolt, and take the caliper right off of the bracket. Or if you wanted to, you could just take out the caliper bracket bolts, which are the bigger bolt heads down there. There's two of them, there's two for the bracket, and there's also two for the caliper to the bracket. So you can pick whichever one you want. If you take these out for the caliper to the bracket, it might make it easier to get the pads off if you're using the pads.
If you're not using the pads then I don't see any reason why I wouldn't just take out the caliper bracket bolts and skip the skep. So it's up to you. It's your prerogative. For me personally, I'm just going to go ahead and remove these. So these bolts right here are called the caliper bolts that go to the sliders. So caliper slider bolts. Go right way here. There we are.
So here's our caliper. Okay, this is the muscle. When you step on your brake, the fluid comes through here, up into the caliper, and then it forces out the piston. The piston comes out, presses your brake pad up against the rotor. Once this is hitting, the caliper sliders move and it makes it so the outer portion of the caliper also presses against the outer pad. And then it completes the squeeze, creates friction, and makes you stop. Here's our brake pads. So if your brake pads look like they're new or almost new, you could reuse something like this. But if they look like these type of brake pads which are already worn down to the metal, I would definitely not reuse these.
You have these? Recycle them. 1aauto.com brand new. We'll set these aside and we'll continue. So we have our caliper bracket pool here. This is the caliper bracket of course, caliper bracket bolt here, and one right here. When we remove both of those, the caliper bracket is going to be able to come right off. So use whatever size socket you need with your ratchet. I like to make it so the bolt is almost all the way out. Then I'm going to come up here, I'm going to do the other one. And the reason for putting this in a few threads is just so when I'm taking this one out, first of all, the bracket's not flopping around and it doesn't have potential to go ahead and hurt me by slapping me in the face.
But secondly, so that once I get this out, I might not think I have it out all the way, but it is, and then the caliper bracket falls down, hits me in the foot, falls into the collection bucket, or anything like that potentially hurting me or making a mess. Okay. Both of these are loose. The upper bolt, second bolt, there's our bracket. We'll set this aside. We can move along. One of the next things we want to use is something like this. This is just a hose crimping plier. It's not sharp. Okay.
There's nothing sharp about it and it's not meant to cut into the hose in any way. What it is actually meant to do though is to just kind of crimp down onto the hose and restrict the amount of flow for a brake fluid to come out. So when we take the line off of the caliper, we'll have minimal fluid coming out. Just going to put it on here. You can put it wherever you like. Clamp it right down. There we are. Now we can move ahead to taking off the banjo bolt. Once we take this off. Of course there's going to be brake fluid. You need to have hand protection. I'm going to grab some eye protection of course, and of course a bucket on the ground to collect any fluid that may spill out so we can protect mother nature.
Just going to take this, we're turning this counter-clockwise. It's coming out. A little bit too tight for fingers here, so I'll just continue with my socket and ratchet. We'll make sure we drain out as much of the fluid out of the caliper as we can here. We have our caliper banjo bolt. We'll take that out in one second, but here's the caliper without the bracket. So I'm just going to use a lug nut. It's going to go right on here and yes, it's something that I could have done earlier, but that's just going to help prevent this rotor from flopping around too much, and potentially getting rust or anything behind the rotor in between the bearing hub and the rotor.
If you gets something in between there the rotor could be off kilter, you're going to have a brake pulsation. So with that like that we can move ahead. Come over here to the banjo bolt and the brake line. We just need to get this banjo bolt out of here so we can inspect it. Make sure it's in good enough condition to reuse. This is the banjo bolt. Get this off of here. The brake fluid comes through your brake hose, goes through this hole right there through the hollowed out bolt, which is screwed into the caliper. So it basically injects fluid into the caliper and presses out that piston. That's your banjo bolt. We'll save this.
You want to make sure you get off both gaskets on your hose. That's what the gasket looks like right here in my hand. If you happen to leave this on and you don't realize that you left it on and then you go ahead and you put on another set of gaskets, that's going to be double gasketed and more than likely it'll leak and you're going to have braking issues. So you need to make sure you double-check that there is no gasket on that hose. I'm going to just kind of pop it off like that.
Put it right in the bucket, nothing on the hose. It's not damaged. I would say this hose is in good and reusable condition. If it's not and you find that there's a lot of gunk and debris or it's painted and you don't think that it's going to make a good seal, you can either clean it up or replace the flex hose. That'll be a project for another day.
Okay. Just to show you what we're dealing with here, we want to make sure that we've got the same caliper. Looks like it's the same shape. Got our bracket, the caliper itself. We've got our mechanisms up here for the emergency brake/parking brake. The new caliper has that, as well. Your bleeder screw location is super important. That looks good. Got the area where your hose goes onto. We'll put them up on top of each other real quick just to make sure we have the same bracket. It's the same length like that. We already know that it's the same height. We just had them the same. So now that we know we have the same caliper that we're removing from the vehicle, we can continue with our service.
So we've got our caliper with our bracket right here. We're just going to take off these little bolts right here. These are just the caliper to bracket bolts. We can take the muscle off of there. I always call the caliper the muscle, it's got the piston, gives it the squeeze, right? Got our bracket here with sliders. Something that I'd like to mention is that even though this caliper is new, you like to assume it comes with everything that it needs to have. It's greased, everything's nice and situated perfectly. It's always a good habit to double check because you just never know. Okay. You just never know. That's why I'm here to show you so you know. There we go.
We're going to come right over here, grab the slider, pull it out. Just make sure that there's lubricant on there. If you don't feel as though there's enough, just use a little bit of caliper grease here. It's nothing too special. Yeah, ours is a different color. The caliper really doesn't care about that though. As long as it's lubricated, it's happy. And I like to bring the caliper grease right up along this Ridge right here. Okay. So now when I pushed this in, the grease is going to go up into the ridge and along the ridge where the boot's going to ride and it's going to make it nice and waterproof. Super important.
We don't want any moisture getting inside here and freezing up this slider. If the slider's frozen, then your caliper's not going to be able to function properly. Now I'm just going to grab the whole thing with the boot and all, I want to make sure I get it greased along the edge right along here. So it rides in with that boot as well. And this is just to make sure that no moisture gets in there. We need zero moisture in this situation. Okay. Doesn't seem like it's probably a super big deal, but it really is. There you are. Do the same to the other side. So we've got our little bag of goodies that comes with almost every caliper and this just has some tins and of course our gaskets that we're going to replace.
You always want to replace these gaskets. We'll set our bag aside. These tins go along here. Okay. Before you put the tins on though, you need to use a little bit more of that caliper grease. Go right down along in here and up along this little ridge right here. So along this edge, the center edge, this edge up along there, and then right here. It doesn't need to be pretty, you don't need to spend all day doing it or anything. You just want to make sure that there's some sort of lubricant that helps keeps moisture out of there and it also helps with vibration dampening and noise reduction.
We've got our tins. You'll notice that the tins, there's two different types of tins on this. We have those two tins in those two tins. You've got a long flat area right here and then you've got this other area that comes up and then it flips up this way, right? So the long flat area goes down along the bottom of the caliper bracket and the part that goes up and then back out, that comes up along the top right along this ridge right here. Another important thing to remember is on the back, you'll notice that there's a little edge here and there's a big old flippy do right there. This flippy do needs to go on the outside, away from the rotor. You can not put this towards the rotor or else you will hear brake noise.
It's going to be very bad and you're going to be mad and you're going to go back to the video and figure out what went wrong, and Len's going to say, "Your little flippy do right here needs to go facing out away from the rotor." We're going to grab one, we've got our flippy do here. We've got our nice flat edge right here. We know that the flat edge goes up along the top where we looped. So I'm going to grab the edge along where the road is going to go, which is along in here. I'm going to go just like this at an angle and then I'm going to squeeze it.
Just slide it right in there. Should clip in there nice and firm. It doesn't wobble around. You don't want it to wobble around or fall off. We've got another one. Same thing, flippy do, flat edge and go right here. It's pretty easy to figure out. Probably don't even need to tell you about this one. We have all four of these shims lubricated between the shim and the caliper bracket. Super important. You don't want any moisture getting in between there. If you get moisture in there, you're going to get rust. It's going to swell up and your brake pads will not be able to move inside the bracket.
We're going to apply more of that caliper grease now. We're going to go right along this piston and then right along this ear and this ear. Those would be considered the contact points of the caliper where the caliper grabs onto the pad and it touches.
You want to lube those contact points on the caliper. He's a little bit of lube, easy peasy. Nothing too special about it. Some people will grab the pad and they just put this stuff all over the whole pad and it just makes like this big booger-y mess. Then you're driving down the road and you get dirt sticking to everything, right? And you got dirty cruddy stuff in there. Why you want all that? And you just wasted grease. Let's not do that. Just go right to the contact points. Easy peasy. Let's get this over to the vehicle and get it mounted up.
We have our caliper bracket, our two caliper bracket bolts. I'm just going to slide it right over the rotor. Try to match up the holes. Start one end. You don't tighten it down until you have the other one started. If I tighten this down and I need it to move this around because this bolt isn't lined up, what am I going to do? I'm going to have to loosen it up. Let's skip that. Now that we know we have both of them started, we can go ahead and bottom them out. Now that we have both of these bottomed out, we're going to go ahead and torque these down to manufacturer's specifications.
Torqued. Torqued. Let's move along. So now we're just going to add a little bit of caliper grease right to the ear of the pads where it goes into the tins on the bracket. That's just going to help them slide around a little bit. It's also going to help keep moisture out of there. You don't need to put on very much. The last thing you want is for this to blob in and get in between the friction surfaces of your rotor and your brake pad. Grease in between there obviously wouldn't be the best thing for it. We're just going to take our pads. It's important to notice one of the pads has what you would call a wear indicator or some people call it a squealer. Essentially, once your brake pad gets down to the warn position about one 32nd, this'll start hitting your rotor and it'll start going "EeEeEeEeEe" as you're driving, that's going to let you know, "Hey, time for a brake job."
So the pad with the wear indicator goes on the inside where the piston of the caliper is. We're going to put the meat of the pad facing up against the rotor. I probably don't need to say it, but I'm going to say it anyway. Same thing for this side. This is the non-squealer pad. Just like that. When you put them in, if you have to force them or give them a couple of bonks with a hammer obviously something's wrong there. These go in nice and easy. I think that looks good. They slide around like they're supposed to. We can move along with our caliper.
All right, it's time to put some muscle into this. We have our caliper. It's going to go right over the bracket and the pads. We already have it pre-lubed. I'm just going to slide it right over. You can push in your sliders. We've got our caliper, two bracket bolts. Both of those are started. We can go ahead and tighten them down. So now we're just going to hold the slider from rotating and we use some pliers. You could try to use a wrench, but a lot of times wrenches are too thick to fit in there and if you can get it on there before it's tightened, by the time you do tighten it up, you're going to tighten the wrench in between there. It's going to be a big old pain in the butt to get it out, so I just hold it with pliers.
Just make sure that's snug. We're just going to bottom these out and then we'll torque them down to the manufacturer specifications. There we are. Let's grab our torque wrench. All right, so we're going to torque this down to our manufacturer specifications. There we are. I'm just going to hit one more time. Those are both tight. We have two new crush gaskets or crush washers. You definitely do not want to use your old ones. For these, I'm going to put one right on the banjo bolt, slide it all the way down. I'm going to come over with my brake hose, slide it through there. Take my second one, it goes on the other side, and so you've got one on one side of the brake hose and one on the other.
Take this yellow thing out of here that just keeps moisture and debris out of there during shipping. We can set this aside. We'll put it in our old caliper. Bring this down, wind it up so it's straight. It should fit right in. I like to give it a little wiggle while I try to turn in the banjo bolt a lot of times that'll help get it in a little bit. There we are. It started. We're going to snug this up and then we'll torque it down to manufacturer specifications.
Got our torque wrench out now. There we are. Just want to make sure that the line can not move around, that those washers are nice and crushed in. Looks like they're starting to flatten out a little bit, so that's good. That's going to make a great seal. We can take our hose pliers off. Set these aside. We have our ABS wire. Let's get this back to being reconnected. Okay, so we grabbed our e-brake cable. This right here is going to go right over this hook, just like that. Now we're just going to pull on the outer sheathing of the cable until it comes back far enough to get behind this bracket and slide this part of the inner cable through the slot.
There we are. Oops, I got my gloves caught. It's important to make sure that you have this all the way inside this. If it's hanging out or it's not all the way in, it could be an issue. It's going to apply pressure to your e-brake while you're trying to drive and this wheel is going to be hanging up. We have the cable in there. It looks good. This is functioning like it should. I can see it moving around. Okay, so now we're just going to pump up the brake. If your vehicle is closer to the ground and you can climb in, great. It's not, and it's up on the lift like this. I'm just going to use my pry bar. I'm going to pump up the break just like this.
What this is going to do is it's going to push fluid down to that caliper, fill up the piston area and it's going to force any air that is in that caliper to where the bleeder screw is. And then once we're done pumping this up, which is pretty much now. Yep. We're going to go back there and open up that bleeder screw and it should start burping up some air. So we're just going to take the boot off of here. Set that aside and use our 10 millimeter. Or use whatever size you need for your particular application I should say.
Bring this up. You want to make sure you have your collection receptacle down there and we're just going to watch. You should start seeing some bubbles come up and then you'll see some fluid start coming out. Once it's a solid stream of fluid, you know that you're pretty much all set and at that point you would just close it up. Do the same procedure on the other side of the vehicle. And once you've done that you can continue with a regular brake bleed.
We have a fairly steady stream of fluid coming out at this point. Obviously I have a gloved hand, I can do this. Do not do this with your bare hand. So now we would just do the same to the other side of the vehicle and then I would do a brake bleed and if you don't know how to do one, you can check out our video on that. Easy peasy. All right, so we'll just clean this down. Give it a little blast with some parts cleaner. We've got our cap.
You want to make sure that you get this cap back on there. It's going to keep moisture and debris from getting down in here. If you get moisture down in there, it works its way all the way down to where it meets up with the caliper, it rusts and pretty much adheres the bleeder screw to the caliper on the inside. And then when you go to open this, It's just going to peel right off and be broken. And then you're going to need to get yourself a brand new caliper again.
So that's going to save us some money. Okay friends, it's time to get the wheel up on here. Just like that. That one lug nut started on. So now it's time to bottom out these lug nuts. We're going to go in a star pattern or crisscross. The reason for that is because if you tighten them down in a circular pattern, it could be off kilter. You think it's tight, you drive down the road, you hit a bump. Next thing you know your wheels loose again. It's very dangerous. Let's go crisscross star pattern. Now that we've tightened those down, we're going to torque these to manufacturer's specifications.
There we are. We'll just go around one more time. Small price to pay for safety. There we are. Easy peasy. Thanks for watching.
Visit 1aauto.com for quality auto parts shipped to your door. The place for DIY auto repair. And if you enjoyed this video, please click the subscribe button.

How to Replace Rear Brake Caliper 2004-08 Ford F150
This video shows you how to install a new rear brake caliper on your 2004-08 Ford F-150.

