
How to Replace Radiator Fan 2009-17 Chevy Traverse
Created on: 2018-02-23
How to repair, install, fix, change or replace a broken radiator fan. If your car overheats or runs hot and the radiator cooling fan will not turn on then this may be your solution. This video shows the process for the 09, 10, 11, 12, 13, 14, 15, 16, 17 Chevy Traverse, GMC Acadia, Buick Enclave, or Saturn Outlook.
-
step 1 :Draining the Coolant
- Make sure the engine is cool
- Open the hood
- Have a drain pan ready
- Loosen the lower radiator hose clamp with slip joint pliers
- Pull the hose off the engine
- Direct the fluid into the drain bucket
- Allow the coolant to drain completely
-
step 2 :Removing the Hood Shroud
- Pry the plastic clips out of the hood shroud with a flat blade screwdriver
- Peel the weatherstip ends off the hood shroud
- Pull the shroud up and off
-
step 3 :Removing the Front Bumper Cover
- Remove the T20 Torx bolts from the top of the bumper cover
- Remove the 7mm bolt from each inner fender
- Remove the two T20 bolts behind each inner fender
- Remove the T20 bolts from the bottom of the bumper cover
- Remove the 10mm bolt from the bumper cover
- With the help of an assistant, pull off the bumper cover
- Disconnect the parking light wiring harnesses
-
step 4 :Removing the Hood Latch
- Remove the four 10mm bolts from the support
- Remove the support
- Unclip the push clips on the rubber air guide with a trim tool
- Slide the air guide down and out
- For the passenger side, push the air guide out of the way but do not remove
- Remove the 13mm bolts from the hood latch
- Unclip the electrical connector
- Pull the hood latch out and disconnect the electrical connector
-
step 5 :Removing the Radiator
- Loosen the 10mm bolts from the top radiator mounts
- Loosen the hose clamp from the upper radiator hose
- Work the radiator hose off of the radiator
- Remove the second hose from the radiator neck
- Unclip the radiator from the a/c condenser
- Evenly pull the radiator up without stressing the lines
- Have glove fingers and zip-ties ready
- Pull the rubber cap from the cooling line
- Pull the clip on the cooling line out with a pick
- Disconnect the cooling line and place a glove finger on the end and zip-tie it
- Repeat this process for the second cooling line
- Disconnect the cooling fan electrical connector
- Pull the radiator and cooling fans up, separately from the condenser
-
step 6 :Separating the Radiator from the Cooling Fans
- Pry up the clip securing the fan to the radiator with a flat blade screwdriver
- Remove the 10mm bolts from the fan shroud
- Unclip the fan shroud from the radiator and remove it
-
step 7 :Installing the Cooling Fans to the Radiator
- Clip the cooling fan shroud to the radiator
- Tighten the 10mm bolts to the fan shroud
- Press in the clips to secure the fan to the radiator
- Clip in the securing clip to the radiator
- Clip in the air guide to the radiator
- Tighten the radiator cap
- Press on the rubber plugs to the bottom of the radiator
- Insert the lower radiator hose to the radiator
- Tighten the lower radiator hose clamp
-
step 8 :Installing the Radiator
- Carefully insert the radiator into place
- Clip the a/c condenser to the radiator
- Remove the cooling line caps
- Remove the glove from the cooling lines
- Connect the cooling line to the radiator
- Secure the clip to the cooling line
- Place the rubber onto the cooling line
- Repeat this process for the second cooling line
- Connect the upper hoses to the radiator
- Secure the hose clamps with pliers
- Tighten the 10mm bolts to the radiator mounts
- Slide up the air guides into place
- Clip in the air guides
-
step 9 :Installing the Hood Latch
- Connect the hood latch harness
- Clip the harness in
- Press the hood latch into place
- Tighten the 13mm bolt to the hood latch
- Reinstall the bumper support
- Tighten the four 10mm bolts to the support
-
step 10 :Installing the Front Bumper Cover and Lower Radiator Hose
- Connect the parking light wiring harnesses
- With the help of an assistant, lift the bumper cover into place
- Push in the bumper cover clips
- Insert the T20 bolts at the top of the bumper cover
- Insert the T20 bolts at the bottom of the bumper cover
- Insert the 10mm bolt in the bottom of the bumper cover
- Insert the two T20 bolts behind each inner fender
- Install the 7mm bolt into each inner fender
- Connect the lower radiator hose
- Tighten the lower radiator hose clamp with pliers
-
step 11 :Filling the Coolant
- Push the lower radiator hose onto the engine
- Tighten the hose clamp with slip joint pliers
- Twist the radiator cap off the radiator
- Add coolant to the radiator, using a funnel
- Add coolant to the overflow reservoir, using a funnel
- Twist on the radiator cap
-
step 12 :Bleeding the Cooling System
- Start the engine
- Bring the engine to between 2,000 and 2,500 RPM
- Bring the engine to operating temperature
- Check the coolant level
- Add coolant to the overflow reservoir as necessary
-
step 13 :Installing the Hood Shroud
- Put the shroud into place
- Clip the weatherstrip ends onto the shroud
- Push the clips into the hood shroud
Tools needed
-
Funnel
Socket Extensions
Torque Wrench
Rust Penetrant
Jack Stands
Anti-Freeze
Trim Tool Set
Gloves
Flat Blade Screwdriver
T20 Driver
Paper Towels
Wire Ties
Slip-Joint Pliers
Ratchet
Floor Jack
Complete Metric Socket Set
Hi, I’m Mike from 1A Auto. We’ve been selling auto parts for over 30 years!
Go inside the vehicle. Open up the hood. Got our drain bucket in place to catch of and dispose of the coolant properly. You can either drain the coolant from the lower radiator hose attached to the radiator, or you can remove the hose clamp and the hose from the top here from the engine, and then direct the hose down into the bucket, which is what I'm going to do. The clamp would be the same in the bottom one.
I'm just using some slip joint pliers. So if you squeeze it just the right way, it's got a little lock. It'll lock together and I can slide it down. Reach down and work on getting that hose off. You should always do this when the vehicle is cool. It's going to come gushing out here.
To remove this plastic shield that's in the front of the engine compartment, there are 10 clips. Take a small flat bladed screwdriver and our trim clip tool, and pop them up. To loosen them, you need to go in like this. Pull them out. If the middle comes out, it's okay. And then this rubber seal is clipped in here. Just kind of pop it out. Use a small flat bladed screwdriver, and just pop it up. Use a trim clip tool. These may break when you're taking them out. You might want to have some new ones on hand. If the middle comes out, it just pushes right back in there. Just repeat that for all the clips. These are a little trickier because they're deep inside here. Just try to get this in here, pry them up. Just go along and do the same for all of them. This should just lift right off now. Then we'll put it aside.
There's six T20 Torx bolts or Torx screws on top of the radiator support. That hold the bumper on and remove those. Top of the bumper is loose. We're going to lift the vehicle up to about waist high. You can take the bumper off with the car on the ground. But this will make it easier for us and easier to show what we're doing.
Use a seven millimeter socket, extension, and a ratchet. There are two seven millimeter bolts here. Going to remove them. They're holding the bumper to the fender. Just going to tilt the wheel in. You may need to do that. You're going to repeat this for both sides of the car. Two T20 Torx screws that are holding the fender liner to the bumper. You've got all the bolts loose, kind of tug on the bumper and see it's starting to come loose. Just repeat this for the other side.
For both sides, remove the two T20 Torx on the bottom of the fender liner where it connects to the bumper. It's a 10 millimeter bolt on each side of this little bracket, that's holding the front bumper on. Remove both of those. This bracket was already broken, but you would take this bolt out.
To the other side, bumper clips into brackets. So I'm just going to pull on it. Pull it out of the clips. Sometimes you have to give it a good tug. Just go all the way right along the edge. Go do the other side now, the same way. I'm going to support the bumper. Just like that. Pull it away from the vehicle. Our fog lights, our front marker lights—I'm going to unplug those. Do the same for both sides. I'll put our bumper aside.
To remove this front support, there are two bolts on each side on the top. And then a single bolt on each side on the bottom. Start with the top two bolts. Use a 10 millimeter socket, extension, and ratchet. Remove these. Put those aside. This will lift right off. There's a rubber air guide on each side of the radiator. We'll need to unclip it. It's got three of these metal style push clips. We'll use our trim clip tool, and kind of slide it under there. So I'll pop it off. Kind of one-way clips, you just kind of work them off. They come off with a little bit of force. If they get mangled, don't worry about it. They'll push right back on and lock in place again. Just going to repeat that for all of them.
Got that one there. Do the same for the one that's kind of in the middle here. It's hard to get to. This air guide also held in with two plastic clips. Pry them out with a small bladed screwdriver. Do the same for the one on the bottom. It's also hooked into this bottom one here, with this tree clip. Slide this all the way out. Just because it clips around the radiator, it's going to be in the way when I'm trying take the radiator out. Put that aside so we can reuse it.
Going to repeat these steps for the opposite side. This air guide cannot be removed because it goes around the AC lines. You don't want to disconnect those because you'll release all of your Freon and you won't have any working A/C. So just push it out and aside. And those will just, this air guide will just stay there while we replace the radiator.
Then remove the hood latch out of the way. These are 13 millimeter bolts. Just using a ratcheting wrench or you can use a socket and a ratchet. Remove both bolts that are holding it on, because the radiator will need the extra clearance to take it out. Unclip the electrical connector. Just take some needle nose pliers. Push it in and pop that out. Just unlock the connector and pull it apart. Can just lay it aside for now.
Use a 10 millimeter socket, ratchet and extension. Remove these bolts holding on the top radiator mounts. Pull those off and put them aside. Same for the other side. Use some slip joint pliers to remove this clamp. There is a lock on it. So when you squeeze it together, get it just right, and they'll lock. You can push it back. It'll lock in the open position, and you can move it off the radiator now. Just work it back and forth. Pull it right off, okay. Need to get this one off too. It's just a barbed fitting with the hose on it. Pull that right off. So now our radiator is pretty loose. It is snapped into the condenser for your air conditioning. Now be very careful with this. You don't want to damage it. If you puncture it, your Freon will escape and you won't have any air conditioning. And you'll have to have it professionally replaced because you need specialized equipment to deal with air conditioning.
So it is clipped in at the top on both sides. And then just slides into some pins. So we're going to unclip it. Do the same for both. You may need pliers. It's very tiny rock stuck in here. That was preventing them from being pushed together. So you're not going to have too much forward movement on those. But it is sitting in little grooves. So I'm going to gently pick up on it. And just do the same for both sides kind of evenly. Just like that. You don't want to over stress the lines, that air guide. That air guide got hung up on there. That's totally loose.
So the radiator's loose. Before I pull the transmission cooler lines off, I took a latex glove and cut a couple fingers off of it. I have some cable ties ready. I'm going to put those over the ends of lines so they don't leak everywhere while they're off of the radiator. There's a little rubber cap that's going to come off. Just kind of pull straight off. And then inside of there is a metal spring clip. Going to use a pick and pull it out. Just like that. Kind of pry it outwards. Try not to drop it. Take it right out. Going to put that aside. I don't want to lose it. And this should come right out, just like that.
And now I'll take one of the glove fingers, just put it over the opening. This is the top one. So it's less likely to be leaking. The bottom one will probably leak a lot. Just put the cable ties around it. This keeps dirt and stuff out of there, and also keeps it from dripping all over the place while you change the radiator. And remove the lower transmission cooler line. Pull that rubber cap off. Go in with our pick, and pick the middle clip out. Pull it right out. I'll put it aside.
This plastic clip just kind of springs open, and I'll just push it out. I had to actually turn it to the side like that. I can work on getting it out of the radiator. Just kind of wiggle it back and forth. It'll come out, and some fluid might come out of the radiator. And I can actually move this quite a bit, so let me pull it up. And I'll put a glove on, a glove finger on to it. Just zip it down. That will sit there. So those are off of the radiator now.
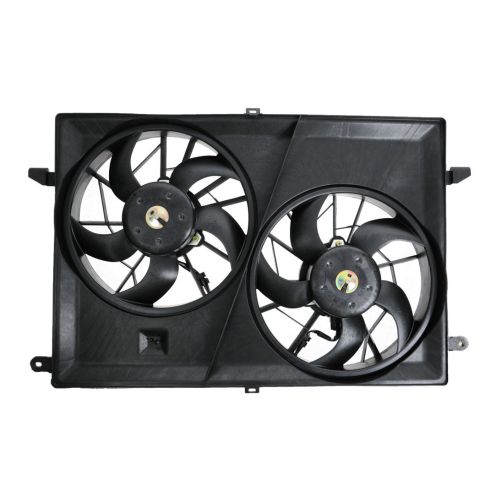
To unplug the cooling fans is a lock here. Push that in. That separates the connector. Now fold the radiator kind of backwards. The lower hose is still attached, so that's going to come out with it. Pull it up off the mounts. Try not to pull it with the condenser. It's got hung up on the plastic shield over here, the air guide. Pull these out of the way. Lift that up. Now it is caught on the lower radiator hose. So I'm just going to pull that up and out of the way. This is our radiator and cooling fan assembly we pulled out. We're going to separate these parts on the bench.
Cooling fan shroud actually has two small clips: one on the bottom and one on the top. I'm going to use a small flat bladed screwdriver there and just a push in clip. Gently pry it up. So we can get the center part comes out. Pop the middle part out. Push it back together, and we'll reuse those. Do the same for the other side.
Shroud is held to the radiator with two 10 millimeter bolts: one on each side in the top. And then it snaps into these clips into the bottom. Just going to use a 10 millimeter socket, extension, and ratchet, and remove these. Just kind of slide it up and off those tabs. Couple things we want to take off this to use on our new radiator. Want to remove the lower radiator hose. So I'm going to use some slip joint pliers. The clamp will lock just like the other ones. That sparked. Pull it up over those, and pull it right off the radiator. Put that aside. You're going to reuse it.
I took the radiator out of the vehicle. There are these rubber plugs that it sits on in the lower radiator support. This one's stuck to the radiator. The other one's stuck in the car. So just make sure that these either stuck to your radiator or they're stuck in the car, because otherwise you're not going to be able to mount the bottom of the radiator in the vehicle.
So I'm going to take this one off and I'll go put it back in the car. Now remove the radiator cap, so we can reuse it. It just unscrews. There's also this little air guide. Just unclips from it, going to reuse this. Going to reuse this clip. It’s got some barbs on it. Push through, just kind of carefully work it out. Try to save it to reuse it. Put rust penetrant on here. Help it slide out of there. That can be reused.
Here's our original radiator from our vehicle and a brand new one from 1AAuto.com—Same exact dimensions and same exact style. Sits on protective caps on the lower and upper radiator opening. It also has protective caps over where the transmission cooler lines go. This radiator has the exact same mounting points for the top and the bottom. It'll fit great and work great in your vehicle.
Install our new fan shroud onto our new radiator. Clip down this way and clip down. Push it in and push it in. Reinstall the original bolts. This is the metal threaded insert and then a plastic mounting point on the radiator, so don't over tighten it. Just bring it down. Feel like it's tight. You can stop. Do the same for this side.
Reinstall those little clips at the top and bottom. This actually says on it radiator. So this is going to go on the lower part. Just going to wipe it down. Put it right over. That was roughly in that area. Pull the clamp down. Try to line it up where it was. Just do that, pry it down, it'll snap into place. And now it's locked on.
Reinstall the radiator cap. It just threads back on. Going to leave these blue caps on for now. That way nothing gets inside there when we're trying to install it. Clip this air guide back on. Just clips right over the edge of the radiator. Reinstall this line clip. It just pushes right in.
Now we're going to reinstall the radiator. Carefully slide it into the opening. I'm just keeping an eye out for all the lines that are in here and the condenser. I'm going to feed the lower radiator hose inside here, so it's out of the way. Slide it down. I'm trying to line up the radiator in the lower mounts. Condenser is on the wrong side of it, so gently lift the condenser out. Pull our radiator up at the same time. Slide it into place.
I'm going to slide the condenser into the lower hooks, and I've got it sitting over on this side. And then it's going to sit down in and it can clip to the radiator. Just push it in both sides. Just like that.
Reconnect the transmission cooler lines. This is the lower one. All right, you're going to take that blue cap off that's down there. And these have a round lip on them and that should snap right into that metal clip. It'll clip when it's in place. Then this one fits into this plastic clip just like that. And take the rubber cap that was covering it and slide that back down. Put that in place. Do the same for the top one. Take the blue cap off.
Now I want to bring this up, the plastic cover. Clip it right into place. Just like that. Put the cap back on it. Snap that into the clip. Plug the electrical connector in. Install the upper radiator hose. Pull that rubber cap off. Put the hose in position. Get the clamp roughly where it was, hold it in place. Unlock it with a flat bladed screwdriver. Now it's locked on. We'll overflow and get reattached in this barbed fitting right there.
Reinstall the upper radiator mounts. Get them lined up where I can see where the bolt outline was before. And they're just going in the little metal inserts in the plastic. So I feel it get tight. I'll stop. Do the same for the other side. Install the air guide on the driver's side. Slide it up from the bottom. And kind of guide it in here just like that. Over that mount there, over the mount that's in the middle and the one on the bottom. This came out over here. Put the push clips back in. Put through the rubber first up into the bumper beam. Push that, and don't forget this one down here. So that has to come up and it pushes in through here.
So reinstall these little locking washers. You just kind of push over. You do the same for both sides. Reattach the air guide on the other side as well. And reinstall the hood latch. Plug it back in. It'll click when it's in place. Push the harness back in where it was. Put the hood latch back on. You can see the dust outline, the dirt outline where it was. Line it up roughly where it was. And then you can also see the outline about where the bolts were. If need be you can adjust it up, down, left, and right afterwards. Tighten this down.
Now reinstall this plastic bumper support underneath the hood latch. Sit it in place. It's caught on this rubber part. So I'm going to lay it on top of it. That's better. Reinstall the top bolts. Do the same for both sides. Install the lower bolts on both sides. And we'll just tighten them down. They're just metal inserts in the plastic of this upper front support. So we're not going to go too tight. Tighten up the bottom one. Do the same for the other side.
Reinstall the bumper. Don't forget to reinstall the turn signal lamps. Both sides just snap them into the connector. It'll click when it's in. Put the bumper back into place. Push it up into the bracket. Lift it up and in. Get both sides set. Just clip it into place. Reinstall the bolts, screws and clips. If your bracket isn't broken here, this one's broken but you reinstall the 10 millimeter bolt. It holds the bottom of the bumper on. Do the same for the other side. Reinstall the two Torx screws. Do the same for the other side.
Reinstall the two seven millimeter bolts or screws: one had a wider head, and one had a smaller head. The smaller head one was towards the inside. Reinstall the six Torx screws along the top of the bumper. Reinstall the lower radiator hose to the engine. Put that right in place. It'll go on right to that little stop right there. Get the clamp roughly where it was. Take a flat bladed screwdriver. Pry it down. There it is, snapped into place and it's sealed up.
Remove the radiator cap. It just unscrews. We're going to fill this system at the radiator. You could fill it through the overflow bottle. It would just take a long time to fill. So I'm going to fill up the radiator and then I'm going to top off the overflow. You could use a regular funnel. We've got a special funnel we're going to use. But it doesn't really matter because it will pressurize and bleed through the overflow.
And we'll do that after we fill it. Going to use a 50-50 mix of the appropriate coolant, which is Dex-Cool and fresh water. The line is on the back of the reservoir. I filled the radiator, I'm going to remove the funnel. I might lose a little bit of coolant. It's almost topped at the cold level. I'm just going to let a little coolant in. There it is. Put this back into our bottle. And remove this and replace our radiator cap. Our radiator is filled to the top, which is right where I want it. And I need to run the vehicle, check for leaks.
And then bleed the system. I'm going to start the vehicle in a safe place to have it running, so outside. Going to bring the RPMs up to between 2000 and 2500 RPM until it comes up to operating temperature. Then let it idle for three minutes, shut it off, let the vehicle cool, and then we'll recheck the coolant level. And top off as necessary. After that, the job will be complete. Install the upper cover in the engine compartment. Going to slide it under that ground point. It's going to go over these rubber mounts here, both sides. Let's go under this weather strip, same thing for both sides. Reinstall all the push clips. It's easier to push the clips in if you pull out the center part. This is the last one. And that is complete. Close your hood.
Thanks for watching. Visit us at 1AAuto.com for quality auto parts, fast and free shipping, and the best customer service in the industry.
Shop Products
Chevrolet GMC Buick Saturn Dual Radiator & Condenser Fan Assembly TRQ RFA83529
- 2

How To Replace Radiator Cooling Fan 2002-06 Nissan Altima
Replacing the radiator cooling fan? This repair is not as complicated as you might think. Learn to do it yourself with this video!

