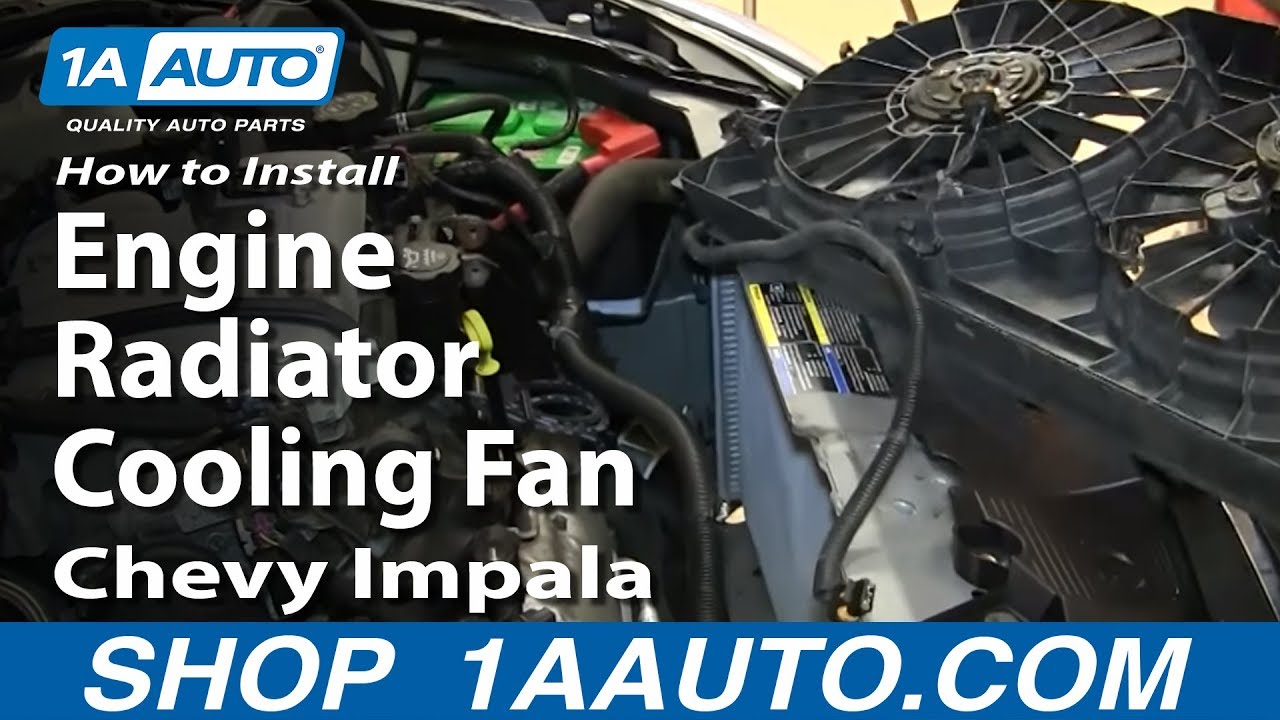
How to Replace Radiator Cooling Fan Assembly 2006-11 Chevy Impala
Created on: 2013-08-27
Watch this video to learn how to replace the radiator fan in your 06-11 Chevy Impala. The fan is an important element in your cooling system!
-
step 1 :Removing the Engine Mounts
- Remove the four 15mm bolts from the engine mounts
- Remove the two 13mm bolts from the engine mounts
- Twist off the oil filler tube
- Pull off the engine cover
- Twist on the oil filler tube
- Hold one engine mount bolt with a 15mm wrench
- Remove the engine mount nut with a 15mm socket and ratchet
- Hold the other engine mount bolt with a 15mm wrench
- Remove the engine mount nut with a 15mm socket and ratchet
- Pull off the engine mounts
-
step 2 :Removing the Radiator Fan
- Unclip the wiring harness from the radiator fan with a flat blade screwdriver
- Disconnect the wiring harnesses from the radiator fan
- Remove the two 10mm bolts from the radiator fan brackets
- Pull off the radiator fan brackets
- Remove the three 10mm bolts that hold the radiator fan to the radiator
- Pull the radiator fan out, around the coolant hose
-
step 3 :Installing the New Radiator Fan
- Transfer the wiring harness clips from the old radiator fan to the new one
- Push the new radiator fan into the engine compartment around the coolant hose
- Put the radiator fan into place using the locating tabs
- Insert the three 10mm bolts into the radiator fan
- Put the fan brackets into place
- Insert the two 10mm bolts into the fan bracket
- Connect the wiring harnesses to the radiator fan
- Clip the wiring harness to the fan
-
step 4 :Reinstalling the Engine Mounts
- Put the engine mounts into place
- Insert the 15mm nuts and bolts into the engine mounts
- Pull the engine mounts forward with a pry bar
- Start the four 15mm bolts into the engine mounts
- Start the two 13mm bolts into the engine mounts
- Tighten all the engine mount bolts to between 50 to 55 foot-pounds of torque
- Twist off the oil filler tube
- Put on the engine cover
- Twist on the oil filler tube
Tools needed
-
13mm Socket
Flat Blade Screwdriver
15mm Socket
Pry Bar
10mm Socket
Ratchet
Brought to you by 1AAuto.com, your source for quality replacement parts and the best service on the Internet.
Hi, I'm Don from 1A Auto. I hope this how-to video helps you out, and next time you need parts for your vehicle, think of 1AAuto.com. Thanks.
In this video, we are going to replace a radiator fan on this 2006 Chevy Impala, pretty much the same as any 2006 to 2012 Impala. One way to test your radiator fan is it should always be on when your air conditioning is on. If it does not work when your air conditioning is worked, check the fuses and relays first. Then, if you figure that you need to replace the radiator fan, it's not too difficult. You'll need10mm, 13mm, and 15mm sockets with a ratchet. You will also need a flat blade screwdriver and a large pry bar.
Four 15mm bolts hold the front part of the upper engine mounts on; you'll need to remove those, and I'll fast forward here as we do that. Then, additionally, there are two more 13mm bolts. Remove your oil fill tube, and that just allows you to take the engine cover off, and then just put that oil cap back on just to keep things out of the engine. Now, there are two more bolts that hold the engine mounts to the engine. Use a 15mm wrench to hold the bolt side, and then a 15mm socket and ratchet to remove both nuts. Once those are removed, take the engine mounts up and out of place.
There are a series of clips holding the harness to the radiator fan assembly: a couple up top, and then a few down at the bottom. What you want to do is either pull the clips from the radiator fan assembly, or just undo the clips and pull the harness out of the clip. Either way, you will want to use those clips and transfer them to your new radiator fan assembly. We'll just fast- forward as Don removes those clips. There are two harness connections. You pull up on a tab with your thumb and pull the connection out. Two 10mm bolts hold the radiator fan at the top. I use a 10mm socket and ratchet. You could actually use just a wrench here as well. You just have to manipulate the radiator fan a little bit and pull those brackets out. There's a 10mm bolt at the top, one on the driver's side, and then one on the passenger side; I need to remove those. Those hold the radiator fan to the radiator. We will fast forward again as we use that 10mm socket and ratchet to remove those bolts. Push the passenger side corner of the radiator fan underneath the coolant hose over there. Slide it over to the passenger side a little bit, and then pull the driver's side up and out.
When you replace the radiator fan, there are two tabs on each side of the radiator, more on the lower side; they go into slots on the radiator itself down there and there. Put your new fan down in. I'm working the passenger side down under the radiator hose first. Make sure nothing binds up or gets caught in there, and then lift it up, and then down into those slots. We will fast forward as we put those three 10mm bolts that secure the fan to the radiator back in place and tighten them up.
Put both the upper brackets back in place. You work them up under the radiator support area and then onto the radiator fan. Again, we're going to fast forward here as we bolt those back in place. Securely reconnect, or, actually, route the wire harness, first, and then securely reconnect both of the leads to the radiator fan. Then make sure you put all the clips back in place so the wiring harness can't get caught anywhere. Remount the upper engine mounts on the engine side. You can see here we use a large pry bar and stick it in behind the engine mount. Just give the engine mount a pull to get the bolts started along the front support. We'll fast forward. Start all the bolts first that go onto the front support and then we will tighten those up nice and firm. You should probably tighten then up to 50 to 55 foot-pounds, and then do the same thing with the mounts that go to the engine; those bolts and nuts are 50 to 55 foot-pounds. Then remove the oil fill. Make sure that the grommets go in the correct places. Push the engine cover down on, and then replace your oil fill cap.
We hope this video helps you out. Brought to you by www.1AAuto.com, your source for quality replacement parts and the best service on the Internet. Please feel free to call us toll-free, 888-844-3393. We're the company that's here for you on the Internet and in person.
Shop Products
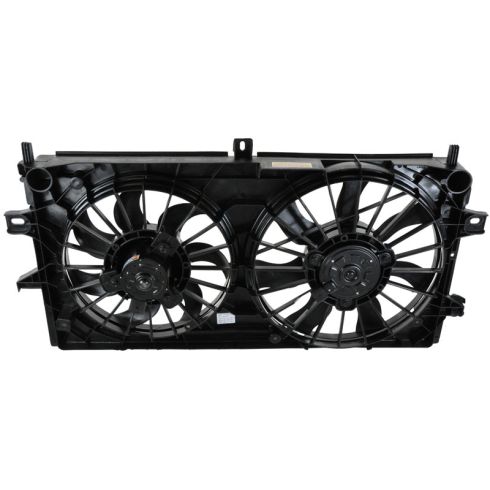
Chevrolet Impala Monte Carlo Dual Radiator & Condenser Fan Assembly TRQ RFA83408
- 2

How to Replace Radiator Cooling Fan 2003-08 Toyota Matrix
This video shows you how to install a new radiator fan from TRQ that is engineered to fit your 2003-2013 Toyota Matrix.

