
How to Replace Muffler 1997-2001 Toyota Camry
Created on: 2016-11-29
How to remove, install, change or replace a rusted or damaged muffler on 98 Toyota Camry
-
step 1 :Removing the Muffler
- Jack up and support the vehicle on jack stands
- Remove the two 14mm nuts on the flange
- Spray the exhaust hangers with rust penetrant
- Pry off the hangers from the studs
- Remove the muffler
-
step 2 :Installing the Muffler
- Reinstall the muffler into its hangers
- Clean the flange surfaces
- Insert a gasket onto the flange
- Tighten the two 14mm nuts to the flange
Tools needed
-
Socket Extensions
Flat Blade Screwdriver
14mm Socket
Rust Penetrant
Jack Stands
Ratchet
Floor Jack
Hi, I'm Mike from 1AAuto. We've been selling auto parts for over 30 years! We're dedicated to delivering quality auto parts, expert customer service, and fast and free shipping, all backed by our 100% satisfaction guarantee. We've created thousands of videos to help you install our parts with confidence. That saves you time and money, so visit us at 1AAuto.com, your trusted source for quality auto parts.
In this video, we're going to be working with our 1998 Toyota Camry 2.2-liter 4-cylinder. We're going to show you how to remove and replace the muffler on the back of your exhaust system.
If you like this video, please click subscribe. We have a ton more information on this and many other vehicles. If you need this part for your car, you can follow the link down in the description over to 1AAuto.com.
Here are the items you'll need for this repair: 14mm socket, ratchet, socket extension, flat head screwdriver, penetrating oil, jack and jack stands
Raise and support your vehicle. We're using a lift to make it easier to show you, but this job can easily be done in the driveway on a jack and jack stands. Now, normally we would show you how to replace each individual portion of the exhaust, but our entire exhaust system right from the manifold back is rotted beyond the point of repair, so we'll have to replace the entire thing.
The first big issue we noticed is the flex pipe; it has rotted away. All this mesh is coming off and it's actually split in the middle. You can hear the exhaust leaking out of here when the vehicle's running. Now, normally we could change this front cat pipe, however there is nothing left on these flanges. The hardware that's in there isn't even recognizable anymore, so even if we did get these out and get new hardware in, the flanges are too corroded for us to be confident in them sealing correctly.
Our midpipe has the same issue, rotted all the way back here at the muffler, so we can't expect this to come off and reseal properly either. The muffler itself is completely rotting through. In the case on the side, see how soft the metal is there? So we have to replace our entire exhaust system.
To remove just the muffler, undo these two nuts on the flange. Separate it and remove the front and rear hangers.
To remove the exhaust hangers, spray them with some penetrating oil. There’s one at the front of the muffler and one at the rear. Slide them off the studs by hand, and remove your muffler.
Remove the hangers from the stud. It may help to use a flat blade screwdriver since these ones are pretty tight to the muffler. Do the same thing with the rear most hanger.
Our muffler is almost identical with the same bend and support, as well as the two bolt flange with the studs already welded in, the same hanger in the back, and our front hanger actually faces in the opposite direction as factory but it will make our installing our muffler a little bit easier.
Reinstall the muffler into its hangers. It should just press right on. Make sure you clean the surfaces if you're using an old pipe. We have a new one, so we'll just install a new gasket onto our flange.
Mount the muffler and the midpipe together. We have two 14 millimeter flange nuts that we had in the shop. If you saved your old hardware, these studs are OEM size so, you can just reuse it, but ours was corroded, so we'll have to replace it with this stuff that we had. Tighten it down with a 14 millimeter socket and ratchet. Especially when using old exhaust parts, if you are able to, you want to get these down as tight as you possibly can without breaking them. This stuff can be a little tricky to get to seal properly.
Thanks for watching. Visit us at 1AAuto.com for quality auto parts, fast and free shipping, and the best customer service in the industry.
Shop Products
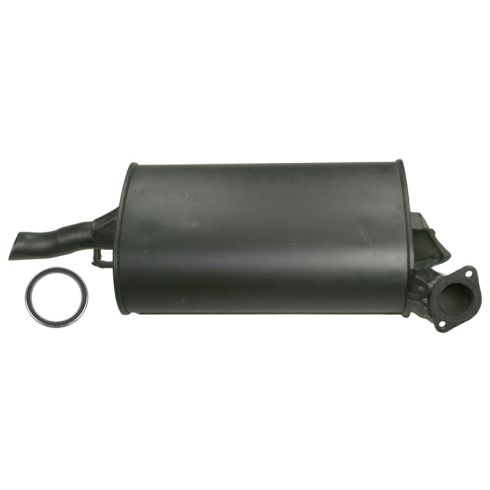
Toyota Camry Rear Muffler with Gasket DIY Solutions EXH00613
- (1) Rear Muffler
- (1) Exhaust Pipe Flange Gasket

How to Replace Front Exhaust Pipe 2008-12 Ford Escape
How to remove the intermediate exhaust pipe on 08, 09, 10, 11, 12 Ford Escape

