How To Replace Front Wheel Bearing Hub 2007-13 Chevy Silverado Truck
Created on: 2013-10-18
Watch this video to learn how to fix groaning or vibrating at your wheels. The experts at 1A Auto show you how to replace a front wheel hub on your 07-13 Chevy Silverado and GMC Sierra.
-
step 1 :Removing the Wheel
- Pry off the center cap with a flat blade screwdriver
- Remove the hub nut cover with a hammer and chisel
- Remove the hub nut with a 36mm socket and a breaker bar or a ratchet with pipe for leverage
- Make sure the axle moves freely
- Loosen the lug nuts with the vehicle on the ground
- Raise the vehicle with a floor jack
- Secure the vehicle on jack stands
- Remove the lug nuts
- Pull off the wheel
-
step 2 :Inspecting the Brakes
- Turn the rotor by hand or turn the steering wheel to turn the rotor
- Check the thickness of the brake pads
- Check the brake pad wear indicator
- Check for gouges on both sides of the rotor
-
step 3 :Removing the Brake Caliper and Pads
- Remove the two 19mm bolts from the brake caliper
- Pull the caliper aside
- Pry the brake pads off with a flat blade screwdriver
- Remove the brake pad slides
-
step 4 :Removing the Brake Caliper Bracket and Rotor
- Remove the two 18mm bolts from the brake caliper bracket
- Pull off the brake caliper bracket
- Remove the T30 Torx screw from the brake rotor
- Pull the rotor off by hand
- If the rotor will not come off by hand, apply penetrating oil to the studs
- Tighten M10 bolts into the rotor to press it off
-
step 5 :Removing the Hub
- Apply penetrating oil to the hub bolts
- Remove two of the three 15mm bolts from the hub mount
- Loosen the third 15mm bolt
- Use a hammer to loosen up the hub
- Disconnect the ABS sensor wiring harness near the chassis
- Remove the third 13mm bolt
- Pull off the hub and backing plate
- Disconnect the ABS sensor wiring harness at the hub
-
step 6 :Installing the New Hub
- Clean the steering knuckle with a wire brush
- Apply white grease to the hub flange
- Push the hub through the backing plate and on to the steering knuckle
- Start the three 15mm bolts by hand
- Tighten the 15mm bolts to 133 foot-pounds of torque
- Route and reconnect the abs sensor wire at both ends
-
step 7 :Reinstalling the Brake Caliper Bracket and Rotor
- Slide the rotor into place
- Thread one lug nut to hold the rotor in place
- Put the brake caliper bracket into place
- Start the 18mm bolts by hand
- Tighten the 18mm bolts to 100 foot-pounds
-
step 8 :Reinstalling the Brake Caliper and Pads
- Apply white grease to the brake pads
- Clean the rotor with brake parts cleaner or mineral spirits
- Install the new brake pads into the bracket
- Put an old pad in the caliper
- Use a large C-clamp and the old pad to push the pistons back
- Put the caliper on
- Thread bolts by hand
- Tighten bolts to 50 foot-pounds
- Remove the placeholder lug nut
-
step 9 :Reattaching the Wheel
- Slide the wheel into place
- Start the lug nuts by hand
- Tighten the lug nuts preliminarily
- Lower the vehicle to the ground
- Put on the hub nut
- Tighten the hub nut to 156 foot-pounds
- Tighten the lug nuts to between 100-110 foot-pounds in a crossing or star pattern
- Reattach the center cap, inserting the tongue into the wheel groove
-
step 10 :Testing the Brakes
- Pump your brakes repeatedly until they feel firm
- Test your brakes at 5 miles per hour and then 10 miles per hour
- Road test the vehicle
Tools needed
-
A Piece of Pipe (for leverage)
Large C-Clamp
Torque Wrench
Hammer
15mm Socket
Rust Penetrant
Pry Bar
18mm Socket
19mm Socket
Brake Parts Cleaner
M10 x 7cm bolts
Flat Blade Screwdriver
T30 Driver
Chisel
White Grease
Mineral Spirits
Ratchet
Floor Jack
1/2 Inch Breaker Bar
36mm Socket
Brought to you by 1AAuto.com, your source for quality replacement parts and the best service on the Internet.
Hi, I'm Mike from 1A Auto. I hope this how-to video helps you out, and next time you need parts for your vehicle, think of 1AAuto.com. Thanks.
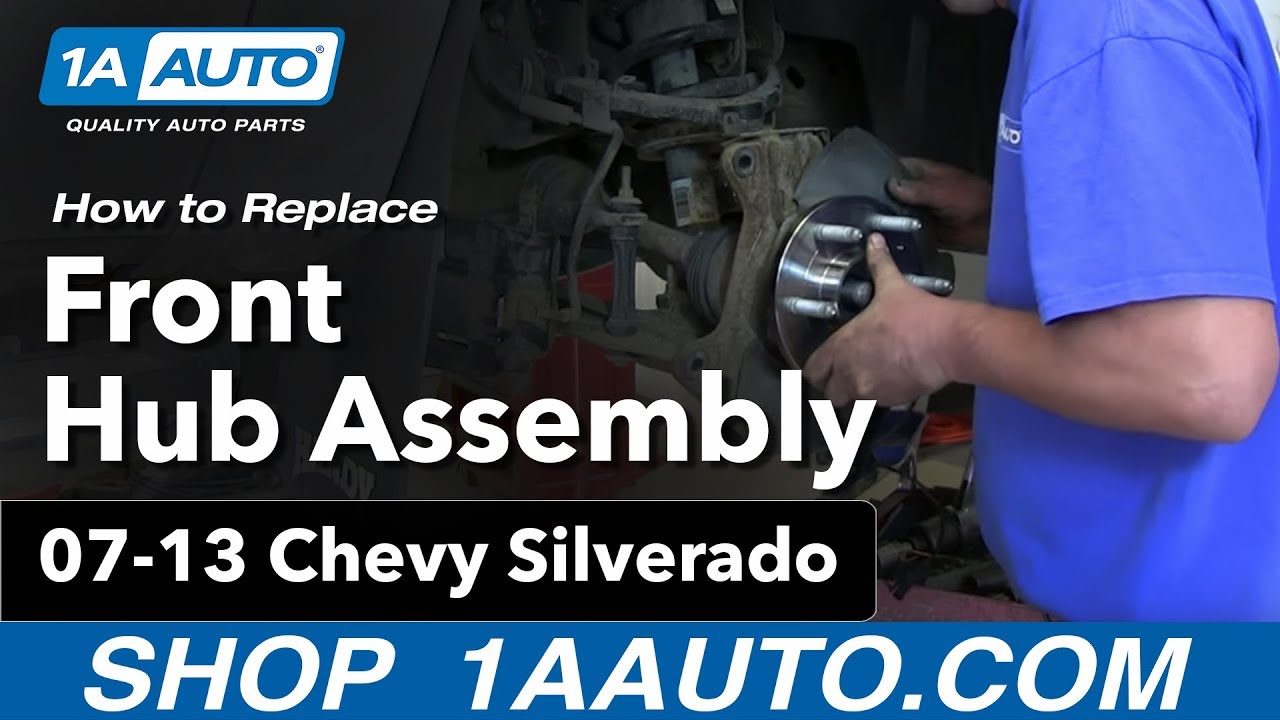
In this video, we're going to replace the front hub on this 2011 Chevy Silverado. It's a 1500, four-wheel drive. We're going to replace the right-hand or passenger side, the same procedure of the left-hand driver's side. This is the same for a 2007 through 2013 Silverado 1500 as well as GMC Sierra 1500 with four-wheel drive.
Items you'll need are a new hub or hubs from 1AAuto.com, jack and jack stands, 15 to 22mm sockets with ratchet. You'll need a breaker bar, and/or a pipe for some extra leverage, T-30 torx bit with driver, 36mm socket for the center hub nuts, some penetrating oil, wire brush, small pry bar, hammer, grease and a torque wrench.
Take your flat-blade screw driver and pry off the center cap. I apologize. I'm going a little bit out of order here. You can see we already have the wheel off. If you don't have the benefit of air tools, you're going to want to remove this cap by using a screw driver or a coal chisel and hammer or a large set of pliers, and remove that cap to expose that center nut. The center hub nut is 36mm. If you have an impact wrench do it that way. If not, you'll need a large breaker bar or a pipe for some extra leverage, 36mm socket, hold the brakes and remove the center hub nut. Once the nut is off, just make sure that your axle is free. After you get that nut off, then you can loosen your lug nuts and raise and secure the vehicle and remove your wheel and tire.
By hand, or using the steering wheel, turn so you can access the back of the caliper. Check for any abnormal wear. Make sure that the inside and outside pads are worn about the same amount. Also, on the rotor, make sure there's no deep grooves or uneven wear. This can indicate other problems with your brake system. There are two 19mm bolts that hold the caliper on up there and there. We'll fast-forward as we use a 19mm socket and a ratchet to remove those bolts. Once you have the bolts off, just put the caliper up and out of the way. Use a screwdriver and pry the brake pads out. You can see the outer one comes out pretty easily. We had a little trouble with the inner one. We actually switched to a larger screwdriver. You can see, after a little more force it comes out. This brake pad sticking in there like that indicates there's a problem, and you want to do some clean-up and some lubrication to prevent this. There are two 18mm bolts that hold the caliper bracket to the steering knuckle there and there. You can see here, we give it a try with just the socket and ratchet, but then we use a pipe for some extra leverage and loosen up that bottom one. Then, we'll loosen up the top one, and remove the bolts and remove that caliper bracket.
There's a T-30 Torx screw that holds the rotor to the hub. We're just using a T-30 torx bit with a ratchet to remove that. Then, on this truck, the rotor actually pulls off quite easily. If your rotors don't come off easy, douse the back side and around the studs with penetrating oil. Then, use two M-10 bolts. There's two threaded holes in the rotor. You put the bolts in, and tighten them up, and they press the rotor off.
Three 15mm bolts hold the hub in. You see them there and there Another one on here. You want to spray down the back side with penetrating oil. When I say the back side, I mean here where you can see the arrows are pointing. You want to douse the back side of the bolts where they come through the hub flange. The arrows are pointing at two of them. There's obviously one more for the third bolt that's morphed with the front. Here, we're using a 15mm socket with a ratchet and a small extension. You can see, you need a little bit of extra leverage with the pipe and the bolts come off. With some extra leverage they come out fairly easily. We'll fast-forward as he does the other two. Note here, as we work on the last one, don't take this bolt all the way out yet. You'll want to use a hammer. You might have to use a lot of force to get the hub to break free. Do that before you take that last bolt all the way out. That way the hub doesn't go flying.
Secure your brake caliper. Now, you can disconnect your ABS harness. Pull the connection out of the clip to the frame. There's a little button that you press to disconnect. Then, pull the rest of the clips from the control arm and steering knuckle. Now that we've got the thing free and disconnected, we're just taking that last bolt out the rest of the way. Then pull the hub off. Then, that last clip is easier to get to what the hub and backing plate out of the way. Just use a pair of pliers, squeeze the pins on the back and release the clip.
Here, you can see the worn-out part on the left, the new part from 1A Auto. Same connector, everything is going to bolt in exactly the same. Wire brush the steering knuckle to clean it up some, and grease the hub flange. Make sure you put the hub through the backing plate, then onto the axle and steering knuckle. Press it on there as you start the bolts in from the back side. Just a few notes as we speed up: Make sure you start all three bolts in first. You don't want to tighten any one of them up until you get them all started. Then, tighten them up evenly and you will want to torque them. Torque the three bolts to 133 foot-pounds. Now, route the ABS harness back in place and reconnect it.
Free your caliper. Then, reinstall your rotor. We're just going to put a lug nut on there to hold it in place, and start putting our brakes back together. We'll continue to fast-forward as we put the caliper bracket in place, and start the two bolts that hold it in place, and then tighten them up preliminarily. Use a torque wrench to tighten those up to 100 foot pounds.
Use brake grease or white lithium grease, and grease the ends of the pads where they'll sit in the caliper brackets. You can use mineral spirits or brake cleaner, even gasoline, anything that evaporates quickly, and clean off your brakes before putting the rest of it back together.
Put the rear pad in first. Put one side in first, and then press the other side in. It should go in fairly easily The same thing for the front pad.Now, you need to reset the caliper piston. We've put the old inner brake pad back in there. Then, just use a large sea clamp. As we tighten it up, you'll see the pistons go back into the caliper. Now, put the caliper back in place. Sometimes, those slide bolts will get stuck a little bit, so you have to push them in a little bit to get the caliper to slide down in correctly. Put the caliper in place and start the two bolts on that hold it. We're going to torque these two bolts to 50 foot pounds.
Fast-forward as we remove that lug nut, and then put our wheel back on. Put the lug nuts back on by hand first, then tighten them up preliminarily. Put that center bolt back on and tighten it to 156 foot pounds. Torque the lug nuts to 100 to 110 foot pounds each using a crossing pattern. Then, that center cap does have a little tongue that goes into a groove on the wheel. Put that in place. Them, most important pump your brakes a few times. Make sure that the brakes are working good before road-testing your vehicle.
We hope this helps you out. Brought to you by www.1AAuto.com, your source for quality replacement parts and the best service on the Internet. Please feel free to call us toll-free, 888-844-3393. We're the company that's here for you on the Internet and in person.
Shop Products


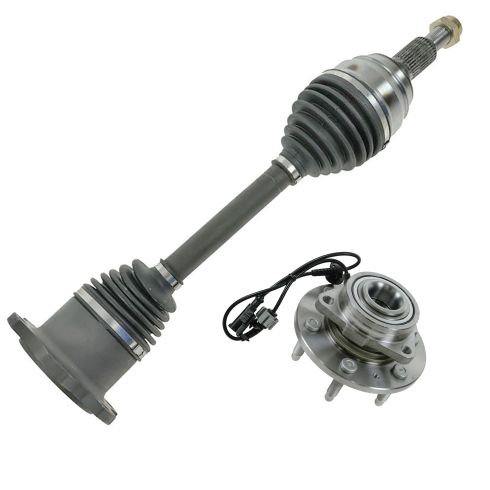
Chevrolet GMC Cadillac Front 2 Piece Drivetrain Kit TRQ PSA85334
- Tapered Roller Bearing
- 2 Piece
- (1) Front CV Axle Assembly
- (1) Front Wheel Bearing & Hub Assembly

How to Replace Wheel Bearing Hub Assembly 1995-2001 Ford Explorer
Watch this video for step-by-step instructions for replacing the front hub in your 95-01 Ford Explorer.

