How to Replace Front Struts 1996-2007 Ford Taurus
Created on: 2010-11-10
Watch this video to learn how to fix a sagging or loose suspension. The experts at 1A Auto show how to replace the front shocks in your 96-07 Ford Taurus or 96-05 Mercury Sable.
-
step 1 :Remove the wheel
- Loosen the lug nuts with your lug wrench
- Raise and secure the vehicle
- Remove the lug nuts and wheel
-
step 2 :Remove the front strut
- Use penetrating oil on the strut and shock bolts.
- Unbolt and unclip the ABS sensor line.
- Remove the upper stabilizer bolt with an 18 mm wrench.
- Unbolt the lower end of the strut and use a hammer to work the bolt out.
- Use a hammer to separate the steering knuckle and the strut.
- Remove the three 13 mm bolts at the top of the strut.
-
step 3 :Install the new strut
- Finesse the strut into place and bolt in the three 13 mm bolts
- Torque the three 13 mm bolts to 35 ft lbs.
- Taking care not to damage the brake lines, work the bottom of the strut into the steering knuckle.
- Bolt in the bottom of the strut, torquing the bottom bolt to 100 ft lbs.
- Bolt the stabilizer link back in, using your 18 mm wrench to tighten it up.
- Clip the ABS sensor and brake line bracket back together and bolt it back in place.
-
step 4 :Put the wheel back on
- Put the wheel on and hand tighten the lug nuts.
- Lower the car
- Torque the lug nuts using a star pattern from 75-100 ft lbs
Tools needed
-
Socket Extensions
Jack Stands
10mm Wrench
Large Hammer
Ratchet
Floor Jack
11mm Wrench
12mm Wrench
13mm Wrench
11mm Socket
14mm Wrench
12mm Socket
13mm Socket
15mm Wrench
14mm Socket
16mm Wrench
17mm Wrench
15mm Socket
18mm Wrench
16mm Socket
17mm Socket
19mm Wrench
18mm Socket
21mm wrench
10mm Socket
Brought to you by 1AAuto.com, your source for quality replacement parts and the best service on the internet.
Hi. I'm Mike Green. I'm one of the owners of 1A Auto. I want to help you save time and money preparing and maintaining your vehicle. I'm going to use my twenty plus years experience restoring and repairing cars and trucks like this, to show you the correct way to install parts from 1AAuto.com. The right parts installed correctly. That's going to save you time and money. Thank you, and enjoy the video.
In this video we're going to replace the front strut on this 2001 Ford Taurus and process is pretty much the same for any '96 to '07 Taurus. Tools you'll need are not all that uncommon, Jack and Jack stands, 10 to 18 millimeter wrenches, and 10 to 21 millimeter sockets with ratchets and extensions, and a large hammer. Once you know how to do it, it's not that difficult of a job. It does require some strengths in spots, probably not the everyday do it yourself for job, but not that complicated nonetheless.
We'll start by removing the wheel. If you have benefit the air tools, that's great, if you don't have the benefit of air tools, what you want to do is first loosen your lug knots while the wheel is still on the ground, then raise the car, and take the lug nuts the rest of the way off. Use penetrating oil to spray the upper stabilizer bolt, and then the large bolt that pinches the strut in the steering knuckle. Although soak, there's a 10 millimeter bolt right here that you can remove, it holds the break line bracket. We'll kind of speed through that, then you pull that break line bracket out, and then you slide the bracket that has the ABS sensor up, and pull that clip off. The upper stabilizer bolts, you'll need an 18 millimeter wrench and then you can see I've got a 10 millimeter wrench on there, in case I need to hold that shaft still, and it turns out that this actually comes apart without even having to hold that in place.
You pull that link out and then I'm just putting the bolt back on for safe keeping, and now the bolt that holds the lower end of the strut. It's an 18 millimeter wrench that I'm going to use to hold it. This is a 21 millimeter. I'm just taking them, pull the rest way off by hand and then I accidentally dropped it actually. A small hammer or a hammer, and just drive that bolt out. You have to drive it all the way out to that bolt actually does hold on to the strut, and once you get it out, you can usually pull it out right by hand. Then you need a good size hammer, and you just hit the top of the steering knuckle. If you look real close you can basically see the disc sliding down off of the strut, and we'll speed it up a little bit here. Until, and then separate the steering knuckle and the strut. Remove these three 13 millimeter bolts and the one here. You pull the strut down, pull the top out, and just got to make sure, the stuff tries to get caught on it, the stabilizer and the wires trying to get caught. Here, left side is the new strut from 1A Auto. You can see the one from 1A Auto is all the same, the spring is already part of it so you don't have to worry about compressing a spring. The new strut just goes right in.
The old strut is actually in fine shape on this car so I am going to reinstall that. Just want to show you that the new strut from 1A Auto is going to bolt right in. We'll get to put it back in here. You want the flat part of this plate towards the outside of the car, and now you'll see all these brackets towards the inside of the car, feed it down into the wiring a little bit. Get it up and in. Move this stuff out a little bit. Feed it in front of the axle. You should have it there. You get one there, hold a bit. The free bolt started. Torque these to 35 foot pounds each. Now you want to pull these, your break line and your ABS sensor wire. You push your suspension down and pull your strut and go over. It's in.
Make sure your bracket is going down into the slot, in the steering knuckle here. Push it then, and just again make sure that it gets wind up with that slot. As long as you have that bracket lined up into the slot, in the steering knuckle, then start jacking it up then it goes together. It goes right on and you want to put the rest in, this bolt in, and once that bolt goes through, you're all set. Now, here I'm going to put the knot on the other side of that and that bolt you want to tighten up to a hundred foot pounds of torque. We want the tension back off, make sure you get this on the backside of the truck. Put your sway bar link back in, put this clip back on. Be careful of your fingers. You slide this down over, and now my backside, this little tab goes right through the hole in this clip in the strut, and holds everything together, and then the bolt, they're bolted together.
We'll fast forward through tightening that up. There's no specific torque. Just make that bolt tight. Here, we use a little tapping of the hammer. It doesn't usually take much to get that stabilizer link through the strut. Put the bolt on, and then use your 18 millimeter wrench and possibly your 10 millimeter and get that link nice and tight again, no specific torque specification. Just get it good and tight. You just have to take off a little bit with the impact line. With the tire around, you want to tighten up the wall knots anywhere from 75 to 100-foot pounds, and use the star pattern, so one, two, cross, cross, cross.
We hope this helps you out, brought to you by www.1AAuto.com, your source for quality replacement parts and the best service on the internet. Please feel free to call us toll free, 888-844-3393 with the company that serve you on the internet and in person.
Shop Products


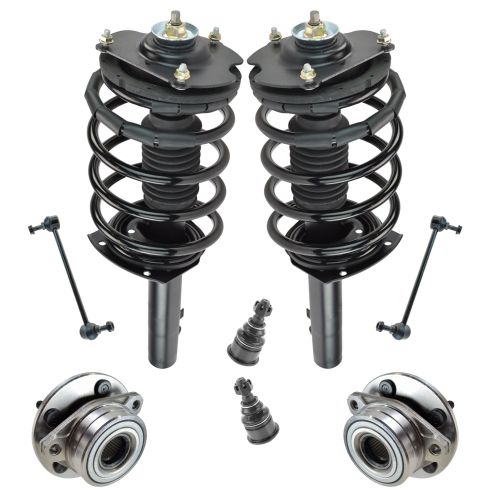
Ford Taurus Mercury Sable Front 8 Piece Steering, Suspension, & Drivetrain Kit TRQ PSA58654
- (2) Front Lower Ball Joints
- (2) Front Sway Bar Links
- (2) Front Wheel Bearing & Hub Assemblies
- (2) Front Strut & Spring Assemblies
- Ball Bearing
- 8 Piece

How To Install Replace Remove Rear Shocks Struts 2002-06 Nissan Altima
If the rear shocks on your 02-06 Nissan Altima are bouncy or clunking, it's probably time to replace them! Watch this video to learn how to do it yourself!

