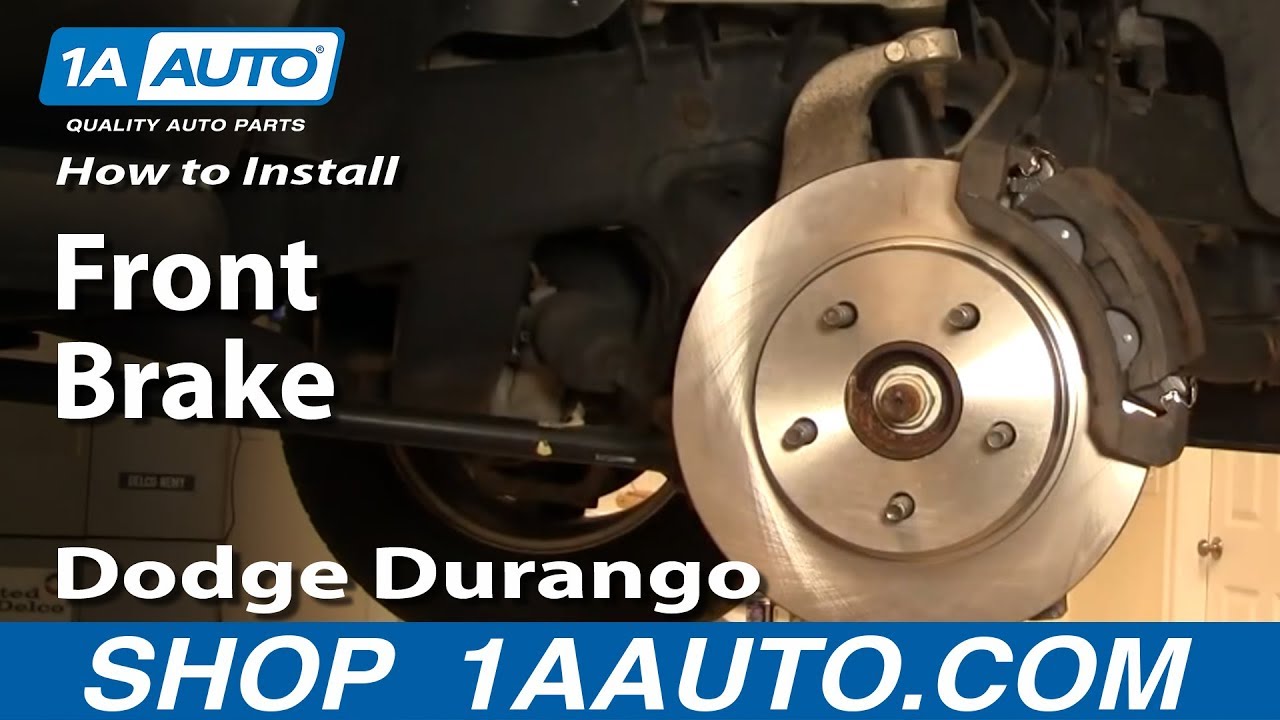
How To Replace Front Brakes 2004-09 Dodge Durango
Created on: 2012-08-03
How to repair, install, fix, change or replace your own worn, squeaky, fading old front brakes on Dodge Durango,years 04, 05, 06, 07, 08, and 09.
-
step 1 :Removing the Wheel
- Loosen the lug nuts with the vehicle on the ground
- Raise the vehicle with a floor jack
- Secure the vehicle on jack stands
- Remove the lug nuts
- Pull of the wheel
-
step 2 :Removing the Brake Pads
- Turn the wheel by hand or with the steering wheel
- Use a flat blade screwdriver or pry bar to push the brake pistons in
- Remove two 13mm bolts from the brake caliper
- Pull the caliper aside
- Pry the brake pads off with a flat blade screwdriver
-
step 3 :Inspecting the Brakes
- Check the thickness of the brake pads
- Check the brake pad wear indicator
- Check for gouges on both sides of the rotor
-
step 4 :Removing the Brake Rotor
- Remove two 22mm bolts from the brake caliper bracket using a breaker bar or pipe for leverage
- Pull off the brake caliper bracket
- Loosen up the brake rotor by tapping it with a hammer
- Pull the rotor off
- If the rotor will not come off, thread the lug nuts and strike the hub area of the rotor with the ball end of a ball peen hammer
- Remove the lug nuts and slide off the rotor
-
step 5 :Installing the New Brakes
- Slide the rotor on
- Put an old pad in the caliper
- Use a large C-clamp and the old pad to push the pistons back
- Clean the brake pad slides with a wire brush
- Put the bracket back into place
- Start the 22mm bolts by hand
- Tighten the 22mm bolts preliminarily
- Tighten the 22mm bolts to 110 foot-pounds of torque
- Install the new brake pads into the bracket with the wear indicator on the top side
- Push the caliper slides out
- Put the caliper on starting with the bottom tab
- Thread the 13mm bolts by hand
- Tighten bolts to between 20-22 foot-pounds
-
step 6 :Reattaching the Wheel
- Turn the wheel straight by hand or with the steering wheel
- Slide the wheel into place
- Start the lug nuts by hand
- Tighten the lug nuts preliminarily
- Lower the vehicle to the ground
- Tighten the lug nuts to between 100-120 foot-pounds in a crossing or star pattern
-
step 7 :Testing the Brakes
- Pump your brakes repeatedly until they feel firm
- Test your brakes at 5 miles per hour and then 10 miles per hour
- Road test the vehicle
Tools needed
-
13mm Socket
A Piece of Pipe (for leverage)
Large C-Clamp
Torque Wrench
Pry Bar
Jack Stands
Flat Blade Screwdriver
Large Hammer
Ratchet
Wire Brush
Floor Jack
1/2 Inch Breaker Bar
22mm Socket
Brought to you by 1AAuto.com, your source for quality replacement parts and the best service on the Internet.
Hi, I'm Mike from 1A Auto. I hope this how-to video helps you out, and next time you need parts for your vehicle, think of 1AAuto.com. Thanks.
In this video, we're going to show you how to replace the front brakes on this 2005 Dodge Durango, pretty much the same for any 2004 to 2009 Durango as well as the same year Chrysler Aspen. The tools you'll need are jack and jack stands, 13mm to 22mm sockets with a ratchet, large flat blade screwdriver or small pry bar, hammer, a wire brush, a large C-clamp and a torque wrench.
If you don't have the benefit of air tools start with your vehicle on the ground, loosen the lug nuts first then raise and support the vehicle, and remove the lug nuts, wheel and tire. Okay, turn the wheel by hand or with the steering wheel to get better access to the back of the caliper. Next take a large screwdriver or a small pry bar, put it right in here and pry it out. This helps to return the piston back into the caliper a little bit, it loosens it up. Next, there are two 13mm bolts to remove, here and up here. These bolts should not be on there too tight so you should be able to get off with the small ratchet. Once those are out, then your caliper should come off. Here I just find that I need to pry out and reset the pistons a little more with the big screwdriver. Take the caliper and put it up there. Then the pads come right out.
You can see the pads are pretty thin. On this side, do the same thing. On these rotors, take the back of your fingernail and you can run it on the front and back side, you want to feel for any deep grooves. If there's no deep grooves and you have no pulsating in your brake pedal then you can usually install new pads as long as these are in good shape. I'm going to show you how to put new rotors on.
You're going to remove two larger bolts here and here next. These two bolts are going to be on there very tight, so either you want a breaker bar like this or what I do a lot is I take my ratchet and I put a piece of pipe on there, that gives me some extra leverage and then you just slowly add force to the pipe until the bolts start breaking free. Always go nice and slow and smoothly. I'll just speed it up here as I just use my ratchet to remove those two bolts the rest of the way. Those bolts are 22mms. That bracket comes off. Your hope is that, with a little tapping, the rotor will come off. If that doesn't work, what I do is I put the lug nuts back on and use the ball head on the ball peen hammer.
Here's a new rotor from 1A Auto; put it right in place. The next thing you want to do is take one of your old pads, and bring your caliper down. It's tough to show you, but just stick your old pad in there. Then take a large C-clamp like this, put into place and then as you tighten the C-clamp, the pistons get pushed back into the caliper. In order to put the new pads on you'll have to do this. Release that. Take that out. Now these pistons are back, pushed into the caliper.
Now on our caliper bracket, I'm just going to take a wire brush and clean off these stainless steel slides. Put our bracket on. I'm just going to fast forward here. Basically just move the bracket around a little bit, push those bolts in and thread them clockwise and they'll go in. Then tighten them up preliminarily with your ratchet and socket. Pull these to 110 foot pounds.
Here are new pads from 1A Auto. You generally want this wear indicator on the outside, facing the top. They go in just like before, put them right in place and together. Then bring our -- on the caliper there's slides here, make sure they are nice and free and you want to push them all the way, push them out as far as you can. Now, put the bottom on first. There's a little tab down here, get that under the slide here. What you might have to do sometimes is push your disk in and make sure all the pads are in the right place. Pull this out a little bit and get everything down into place. It's just a matter of finding the holes for the bolts. Get them started. Then these bolts should be tightened up around 20 to 22 foot pounds. I usually pull them tight with a small wrench like this.
Then straighten the steering back out either with your hands or by using the steering wheel. Then remount your wheel and tire, put the lug nuts on by hand first, then tighten them preliminarily before you put the vehicle down on the ground. Obviously we show you the passenger's side, but you'll want to do the driver's side. Always do your brakes in pairs. Now tighten your lug nuts up anywhere from a 100 to 120 foot pounds. Last but not least, make sure that you pump your brake pedal until you get it nice and firm and then do test stops from five and ten miles an hour before you road test the vehicle. We hope this helps you out. Brought to you by www.1aauto.com, your source for quality replacement parts and the best service on the Internet.
We hope this helps you out. Brought to you by www.1AAuto.com, your source for quality replacement parts and the best service on the Internet. Please feel free to call us toll-free, 888-844-3393. We're the company that's here for you on the Internet and in person.
Shop Products


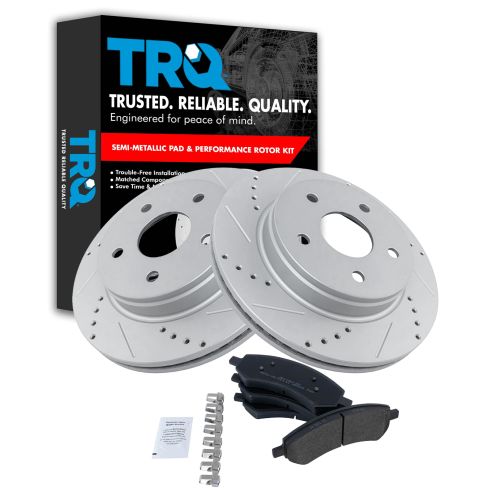
Dodge Ram Chrysler Front Semi-Metallic Performance Brake Pad & Rotor Kit TRQ Performance BKA12045
- Cross Drilled & Slotted
- Premium Posi
- Semi-Metallic
- Vented
- 13.19 in. (335mm)
- 5 Lug
- Performance
- Premium G-Coated
- (1) Front Semi-Metallic Brake Pad Set with Contact Point Grease & Hardware
- (2) Front G-Coated Performance Brake Rotors

How To Replace Front Brakes 1990-97 Honda Accord
Replace squeaky, old, or faded front brakes with the help of the 1A mechanics in this helpful how-to video

