How to Replace Front Brake Calipers On Any Car
Created on: 2019-09-16
No video for your specific vehicle? No problem! See how to replace a brake caliper in general terms. The process is very similar for most modern cars!
-
step 1 :Removing the Wheel
- Loosen the lug nuts while the wheel is still in contact with the ground, if working with hand tools
- Raise and support the vehicle
- Remove the lug nuts
- Remove the wheel
-
step 2 :Removing the Brake Caliper
- Loosen the brake flex hose banjo bolt
- Remove the two caliper slider bolts
- Pull the caliper free from the rotor and support it with a hanger
- Remove the brake pads
- Remove the brake caliper bracket bolts
- Remove the brake caliper bracket
- Secure pinch-off pliers on the brake flex hose
- Have a drain pan ready to catch brake fluid
- Remove the flex hose banjo bolt to remove the hose fitting from the caliper
- Make sure to locate, remove, and discard the two copper crush washers
-
step 3 :Servicing the Brake Caliper
- Compare the new brake caliper to the old, making sure they are an exact match, including the locations and orientations for hose fittings, bleeder screw, etc.
- Remove the slider bolts to disassemble the new caliper assembly
- Apply brake grease to the grooves where the pad retainers will sit
- Install the pad retainers into the grooves. Use the old brake caliper as reference for their orientation, if necessary
- Remove the caliper slider pins and boots
- Apply grease to the slider pins, and inside the boots
- Reinstall the slider pins and boots
-
step 4 :Installing the Brake Caliper
- Install the caliper bracket into the wheel knuckle
- Torque the caliper bracket bolts to the manufacturer specification
- Apply a thin coat of brake grease to the tabs of the brake pads that will ride in the caliper bracket grooves
- Apply brake grease to the inside surfaces of the brake caliper that will contact the pads
- Slide the caliper over the pads and align it with the slider pins
- Install the caliper slider bolts, and torque them to manufacturer specification
- Slide a copper crush washer over the banjo bolt, insert the banjo bolt into the brake hose fitting, then slide the second copper crush washer over the banjo bolt
- Install the banjo bolt into the caliper, and torque it to manufacturer specification
- Remove the pinch-off pliers from the flex hose
- Press the brake pedal repeatedly until it is firm
- Open the bleeder screw until there is a steady flow of brake fluid
- Close the bleeder screw
- Place the cap over the bleeder screw
- Perform a full brake bleed on the vehicle
-
step 5 :Installing the Wheel
- Lift the wheel onto the wheel studs
- Install the lug nuts and tighten them by hand in a crossing pattern
- Lower the vehicle with minimal weight on the wheel
- Torque the lug nuts to manufacturer specification
- Lower the vehicle completely
Tools needed
-
Socket Extensions
Torque Wrench
Jack Stands
Complete Metric Wrench Set
Pocket Screwdriver
Pliers
Hose Pinch-Off Pliers
Brake Grease
Complete Hex Socket Set
Complete SAE Socket Set
Complete SAE Wrench Set
Floor Jack
Complete Torx Bit Set
1/2 Inch Breaker Bar
Complete Metric Socket Set
Hey friends, it's Len here from 1A Auto. Today we're going to be working on something super simple. We're going to be replacing front calipers on this vehicle. We're going to be making the video non-vehicle specific, so you don't have to worry about what year, make and model, or anything like that. We just kind of want to give you a heads up on things you should expect and the how to's of replacing a front caliper. It should be fairly easy. So, let's get right into it.
Okay, so one of the first things that we need to do after we get the vehicle raised off the ground, we're going to remove the lug nuts. I'm going to wear safety glasses because I'm going to be using my impact gun.
That fourth lug nut, I'm going to leave on there a little bit. That's just so if the wheel comes loose, it won't come falling off and hurt me. Break the wheel free here. Sometimes they don't want to break free. Can use a little bit of leverage. Go right up against the caliper in the wheel. Bonk, bonk. Took the wheel off. We'll wheel it out of the way safely.
Okay, so now that we have the wheel off, one of the first things that we're going to do for replacing the caliper, we're just going to break free this banjo bolt right here while the caliper is still attached to the knuckle. Once it's broken free, just go ahead and snug it up a little bit just so it's bottomed out and it's not leaking.
These bleeder screw covers right here, they're like gold. Okay? Take it off of there. Maybe the new caliper came with one. Maybe it didn't. If it didn't, you're going to reuse it on your new caliber. If it did, I would just put it aside someplace and hold on to it. These things are great because what they do is they protect moisture from getting inside your bleeder screw and causing them to seize up inside your caliper, making it impossible to take out the bleeder screw to let fluid through.
We're going to move on to taking out the caliper slider bolts, which are these right here. We're going to hold the slider because the slider will want to spin. It's going to move around nice and free in there. Use my pliers for that. Got my socket on the other end here.
That's what our bolt looks like. I'm just going to put it back in. Just a couple of little threads here. That's just so when I take this one out, the caliper can't come flopping around, potentially hurt me. Safety first is the number one concern at 1AAuto, always.
To replace the caliper, some people don't even take these out. They'll just take off the caliper bracket bolts right here. Take the whole caliper off and then try to squeeze the pads out of there. It may work, it may not work. For the purpose of this video, I'm just going to separate the caliper.
This is the muscle of the caliper right here, the piston. When you push on your brake, it forces fluid down through your brake flex hose here into this area, which in turn forces this piston out, squeezes your pad against the rotor, creates friction and makes you stop. If this piston is frozen and it doesn't want to move, which is the probable reason why you're replacing your caliper in the first place, you would replace it.
With that said, we'll just hang this for now on there. Put this up here out of the way. There we are. So now we've got our caliper bracket right here with our pads. The pad should just slide right out of here just like that. If your pads are in good condition, you can reuse them. If they're not, you can go on 1aauto.com, get yourself some nice new pads. They'll probably look something like this. We'll set this aside. Okay, so now that we have the pads out of there, we're going to remove these bolts right here. These hold the bracket to the knuckle itself.
Two bolts look exactly the same. There's our bracket. All right, so it's time to get this caliper back down off of here now. Take that out of there. At this point, you're going to want something like this. These are just hose pliers. What they do is they squeeze, but they don't completely close, and they're not sharp at all. They just kind of go around the hose. They pinch it off so fluid can't make its way through. I'll show you the reason for that as soon as I get this up on here.
Give it a little squeeze, pull it up there. So now when we take out this banjo bolt, there's going to be fluid still left in this line right here, and there's going to be fluid inside the caliber. You need to make sure you have your safety glasses on, your hand protection, brake fluid is hydroscopic, or at least the brake fluid in this. That means it absorbs moisture and it's also going to be very bad for your eyes if you get it in your eyes. All right, we've got our collection bucket down there. We're going to take this off.
Oh, we are so on your flex hose, you want to pay special attention to make sure that you get the gaskets off of here. That's what that copper is right there. There's one on this side and one on this side. Sometimes they won't be stuck on the brake hose, so you may not see them on your particular application. They could be stuck on that banjo bolt or maybe they fell off and they're inside your collection bucket, but either way you just go like this with suppliers or a small screwdriver or whatever you want.
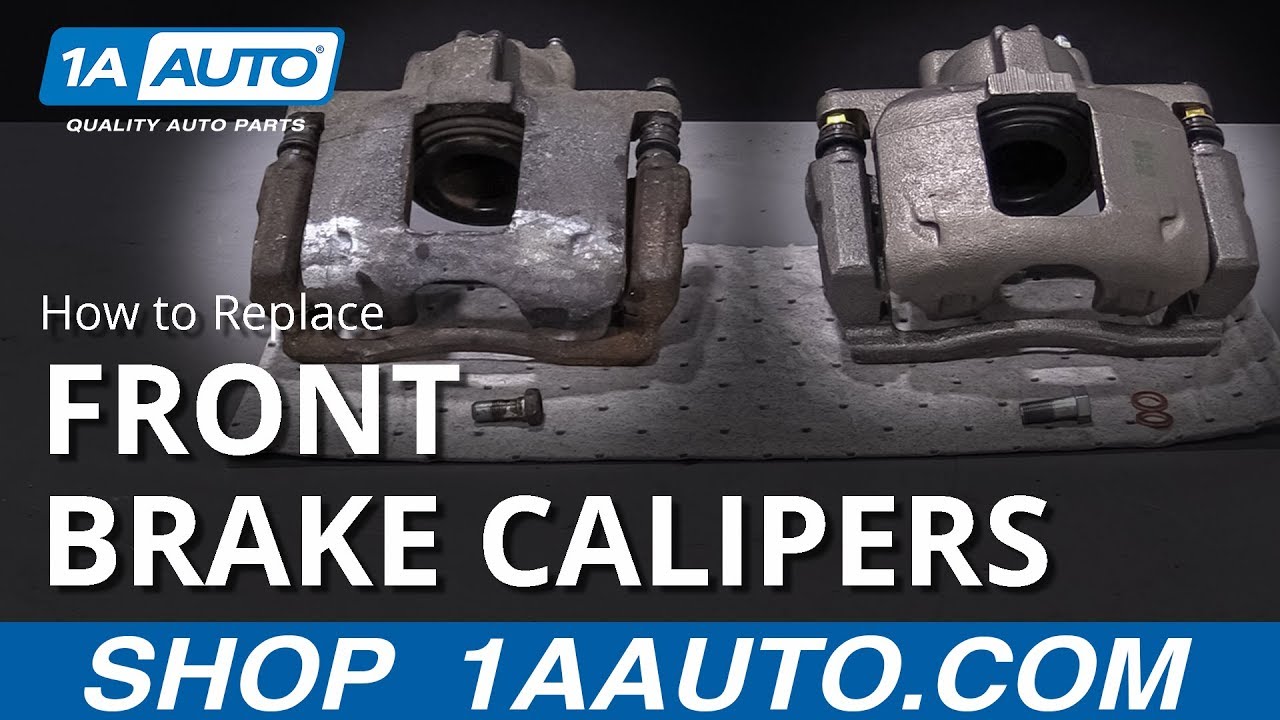
Pop it right off of there. Same to this one. There we are. This is what they look like. It's just this little copper gasket/washer. When you tighten up that banjo bolt, this is going to crush down a little bit and it's going to make it so no moisture can make its way in and no brake fluid makes its way out. You do not reuse these. So we brought our old caliper over here and we've got it next to a brand new caliber.
The reason for this is because we want to make sure that we're dealing with the same thing. Okay? We don't want two different pieces here. They need to be the exact same. We have our old caliper. Take a good look at it. You can see the shape and everything. We've got our new caliper, same thing. Take a good look at it. Make sure you've got the same type of piston in here. You got your ears. It's the same length coming across, right like this.
The bracket's the same height. This is super important. If your new caliper has a bracket that sticks up this far, you're not dealing with the same thing, and you're going to have a major issue. The new caliper, generally speaking, will come with a new banjo bolt. If it comes with a new banjo bolt, you go ahead and use that. They'll also come with brand new crush washers, which is also very important. Like I said before, you do not reuse your old washers or gaskets.
This caliper has everything that you need to be able to install it into the vehicle. You got your new bolts here, brand new sliders. And of course, a brand new bleeder screw. With all that said, I don't see any reason why this wouldn't be perfect to install into the vehicle, so I'm going to go ahead and do it. As always, if you need any parts, you can always check us out at 1aauto.com. Thanks.
Okay, so we have our brand new caliber. I know that you want it to come prepped, but it still requires a little bit of preparation. It is what it is. What you do, you take out this right here. That goes to the slider. This bolt right here goes to this slider, separate the two
We've got our two bolts. They're both the exact same. We'll take the caliper portion of it and set it aside for now. So now that we've got that separated, what we're going to do, we're going to take a little bit of caliper grease. It doesn't need to be a special kind of grease or anything. You don't need to go out for a name brand. But it does need to be a type of grease that holds up to heat well because your brakes create friction. Friction creates heat. Heat melts stuff like this really. So essentially you just need grease that won't liquefy with the extreme amount of heat. We're going to do all four corners of this right here.
You don't need very much. You just need a good coating. The reason for this is because it's going to help keep moisture out of there and make it so the metal doesn't rust and build up and then cause your pads to freeze up in there. It's also going to help with noise reduction, vibration dampening. Now we're going to take our tins. A quick explanation about these tins would be on the backside. You'll notice there's a small ear and then a big old hooky do ear. The hooky do goes out and away from the rotor. If you put it the wrong way, this is going to be in and it might hit up against your rotor and cause breaking issues and a lot of noise.
Also, you'll notice on the tins you have a longer area and then a shorter area. The longer area, right along here, goes towards the bottom of the bracket. Yours may even have this little lip right here. That's a good indication that that's the top and that would ride up along this edge right here. So we're going to take our tin, start from the inside and then just push it like that. The little hooky do should go right along the outside and hold your tin from falling off.
Grab another one. Do the same thing and so on. Now that we have all of our tins on here, we're going to move ahead to our sliders. I'll turn the bracket around so it's easier for you. I'm just going to grab the boot. I'm going to twist it and pull it right off of here. You'll notice on the bracket itself, it has a little lip right here. That's for this boot to sit into. It's lets right in this groove and the lip holds it on. That's going to help keep moisture out.
On the other end of this, I can't do it right this second. I guess I could go like this. Put it back in. Hold the boot, try to grab the slider off of it. We're just going to grab this just like that. You'll notice on the slider we have the same groove. That's where this side of the boot sits into. Take that right off of there. I'm going to do the same over here. Some people don't take this all apart because they figure they have a new caliper. Why take it apart? It should all be fine. Right? Maybe it is, and I'm not trying to say anybody did a bad job or that I'm any better than anybody else. But I just want to offer you some food for thought. If for some reason these sliders didn't come with any grease on them, maybe in the assembly line, it skipped that step. I don't know. I don't have a good excuse for it because in my head there isn't any.
It could come dry, in which case you have a dry piece of metal on a dry piece of metal with no lubricant in there to prevent moisture from setting into the metal and causing rust. If that happened, this slider might be frozen and it won't go in and out like it's supposed to, which will cause brake drag, overheating, a pulsation over time and just overall issues with brake pads in general. You need to make sure that your caliper slider is lubricated. I'm just going to use a little bit of caliper lube here. The color of this lube is black. It's not just super, super dirty. I take it, I go all the way up into this lip up here, and that's super important. I'll show you why. You take your boot, bring it all the way up on there.
You're going to give it a little twist and that's going to get that grease going all the way around inside that lip and it's going to make it so moisture can't get in. We don't have any moisture in here. We're doing all right. It won't be able to seize up. Now that I have that on there, I'm just going to continue lubing this. All right, I'm going to put even a little bit extra on there. Now I'm going to bring it into the caliper bracket. Slide it down. We've got a nice glob there. Give a little twist. I can see you coming up. It's going to get in that ridge. I'm just going to squeeze it so it goes up on there. There we are. Now that it's up on there, we'll just give it a little twist. We know we have grease all inside that ridge, all inside this one.
There is no way that any moisture is going to get in between this slider and this bracket. This is going to move freely for a long, long time. We'll do the same to the other side and we'll be able to continue. All right, so we have our bracket. We have our bracket bolts. We're going to go right over the rotor, line up the bracket holes with the holes in your knuckle. Take one of your bracket bolts. Put it through and start it in.
Once you have that one so it started, you're going to go up to this one. Get this one started. Now we have them both started. We'll bottom them out and then we'll torque them down to manufacturer's specifications. Okay, so we're going to tighten these up just so they're bottomed out. Now let's torque them down. Okay, so we're going to use our socket and our torque wrench. We're going to tighten this down to manufacturer's specifications.
It's definitely tight. Here we are. If you want to double check them, just double checking. Small price to pay for safety. Tight, tight. Let's move along. So now what a lot of people like to do is just add a teeny bit of lubrication along the ears of the pads. That's just to help keep the moisture out of there as well. Helps them slide a little bit. When we put our pads in, you have the pad with the wear indicator and then the pad without. The one with the wear indicator goes on the inside, or the side facing the piston. We're just going to take it, put our little ear in there. Put our ear in the other side. Here you go. Do the same for this one. Just start it in there.
There we are. It flows around. It's not stuck in there in any way. You want to make sure that your pads are not jammed inside here. They need to be able to squeeze against the rotor when you're braking. When you release the brake pedal, they're going to move away from the rotor a little bit, which will allow the rotor to cool down. All right, so now we have the actual caliper, and here's the piston. Here's your little ears that push up against the outer pad. It's a good idea to use a teeny bit of lubricant around the piston itself and on the ears.
The reason for that is vibration dampening and moisture control of course. Just put that on there. It looks decent. I'm not too worried about it. We're just going to bring this right over and put it onto the pads just like this. Now that we have it on there, we'll grab our bolts that hold the caliper to the slider. Just start one in there. Cool, so now we're just going to snug these up and then we'll torque them down to manufacturer specifications. Before we go though, I just want to talk a little bit more about when we were putting lubricant on the caliper itself.
Some people like to put it on the pad directly and just smear it all over the place, in which case you would have lube all right here, which is going to do what? It's going to collect brake dust, road debris, gunk, all sorts of crud. Right? Then it could work its way in between here, and it's going to get in between the caliper and the pad and cause issues. Why do any of that? Just put it right on where it's supposed to go, right on the contact points. And you're good to go. So let's go ahead and snug these up.
If when you're tightening it, you see this spin, no problem. Hold it with your pliers. There we are. Do the same to this one. There we hare. Let's torque those down. We're going to torque these down to manufacturer specifications. There you are. If you want to go around and do them again go ahead. Tight. So we have our new banjo bolt and our two new crush gaskets. We're going to put one of these gaskets directly onto the banjo bolt, just like that. Take your brake flex hose, put it through, just like that. Take your other gasket, bring it over to the vehicle, right up to the caliper, started in by hand of course. Once you know you have a few good threads, you can go ahead and snug it right up.
There we are. All right, so we're going to tighten this down now to manufacturer specifications. We know that this is tight. We can move along. Okay, so now that we have the caliper mounted, we're going to take off this. Now what we need to do is pump up the brake so the pedal's firm. We're going to open up this bleeder screw right here. We're going to let it come out. We're going to let the fluid come out until it's a nice trickle of solid fluid.
We'll close it up and then you would want to continue with a brake bleed. So I'm just going to pump up the brake pedal. Right now the vehicle's up in the air for me, so I'm using a pry bar just to push. But if it was lower, and you can get in, you can use your foot of course. But essentially, just pump up the brake so that that front caliper piston will be extended as far as it can go up against the pad, which is squeezing the rotor.
That's getting better. This is forcing all the air up towards that bleeder screw. Hopefully when we open the bleeder screw it will come out and then it will be nice, solid fluid. So now we're going to use a wrench. We're going to open up our bleeder screw. Fluid may come out, so you need to wear eye protection and hand protection. And of course, have a nice bucket to collect any fluid that will come out.
Open this up. We're going to wait a little while for fluid to make its way down through here, fill up this portion of the caliper, force the air up and out. Then it'll have a nice strong trickle of fluid coming out. We'll close it up and then it would be time to go ahead and bleed it. So there we are. This is a nice solid stream of fluid. I'm just going to close this back up now. There we are.
So now that we know we have that nice trickle of fluid, we would go over and do the other side of the vehicle if you're doing both calipers at the same time. Once you're done with that, you would continue on to a manual brake bleed. If you don't know how to do that, you can check out our video. So now that it's all bled out, we're just going to use a little bit of parts cleaner, nice handy rag. We just want to make sure we get off as much of that brake fluid as possible while we still have a collection bucket there. Obviously, any chemical going into the ground is no good. That looks pretty great. We're going to use our little boot or cover. It's going to go right over the bleeder screw. The reason for that is to keep the moisture and debris out of there.
All set. Now what we need to do is go ahead and put the wheel on here and torque it down. Like this, lift it up on my leg. Easy peasy. Get that one lug nut started on there pretty well. Now we're just going to bottom these out. We're going to go in a star pattern. It's important to go on a star pattern so that way there, if you were to go in a circular pattern, you could make the wheel tighten up off kilter like this and think you have it tight. Then when you drive down the road, bonk, hit a bump, and this is what your wheel is doing. So just do a star, or criss-cross. Call it what you want. There we are. Now we'll torque those down to manufacturer specifications. If you want to, you can go around again. There we are, easy peasy.
Thanks for watching. Visit 1aauto.com for quality auto parts shipped to your door, the place for DIY auto repair. And if you enjoyed this video, please click the subscribe button.

How to Replace Front Brake Caliper 2000-06 Chevy Tahoe
This video shows you how to a (front/rear)brake caliper on your 2000-2006 Chevy Tahoe.

