
How to Replace Distributor Cap 1996-2000 Chevy Tahoe
Created on: 2012-03-23
Watch this video to learn how to fix engine misfiring or stumbling. The experts at 1A Auto show how to replace the distributor cap and rotor on your 88-02 Chevy or GMC C1500 or K1500 truck.
-
step 1 :Removing the Air Intake System
- Take of your air filter cover.
- Disconnect the clips and hose holding in the air filter.
- Remove the 12mm nut on the air intake apparatus.
- Remove the apparatus.
-
step 2 :Removing the Distributor Cap
- Twist off and remove the coil wire.
- Twist off and remove the other eight wires.
- Remove the two T20 torx screws from the distributor cap.
- Remove the cap.
- Using a T15 torx driver remove the two screws securing the rotor.
-
step 3 :Replacing the Rotor and Distributor Cap
- Lower the rotor into place and replace the two T15 torx screws.
- Put the cap into place and replace the two T20 torx screws.
- Follow the wires from the spark plug and match up the wires to the distributor cap. (1 is the farthest from the driver on the drivers side. 3 is the next one on the drivers side).
- Match up all 8 wires. And the coil wire.
-
step 4 :Reinstalling the Air Intake System
- Put the air intake system back into place.
- Reconnect the sensors and hoses.
- Reinstall the air filter.
- Reconnect all clips.
- Check air intake system connections for loose connections
Tools needed
-
12mm Socket
Socket Extensions
T15 Torx Driver
T20 Driver
Ratchet
Brought to you by 1AAuto.com, your source for quality replacement parts and the best service on the internet.
Hi, I'm Mike from 1A Auto. I hope this How To video helps you out and next time you need parts of your vehicle, think of 1AAuto.com. Thanks.
In this video, we're going to show you how to change your cap and rotor and this is just all part of doing a basic tune up on one of these, this is a '96 Tahoe. It has the 5.7 liter Vortec engine, same engine that's in any 1995 to 1999 Chevy or GMC pickup as well as 1995 to 2000 SUVs of this body style. The only tools you'll need are a 12-mm socket with a ratchet and extension to remove your air intake system and then you'll need a T15 and T20 Torx drivers.
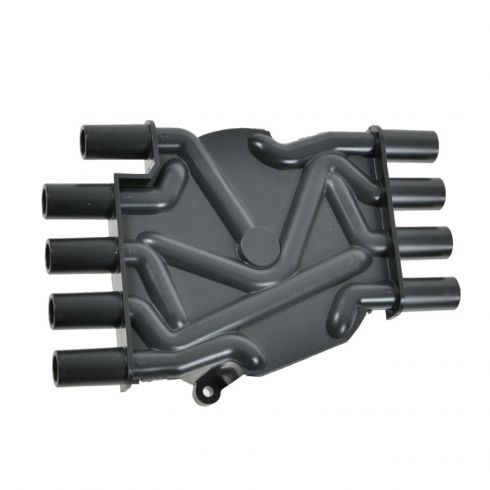
We're going start off, take off your air cleaner cover here then we're going to unplug this. I'm reaching down underneath and you can grab the little clip that holds it on, pull the clip back and just like that. Disconnect this up here as this comes up and we'll also going to disconnect this hose right here. Then you're going to want to remove this nut, this silver one right down in here. Just fast forward here as we remove that. That is a 12mm nut. As I remove that, basically take this whole apparatus right out and gives me a lot clearer view. You go to replace your cap and rotor. Here's your new cap. You can see there's going to be two screws that hold it in and then on the cap, it actually has you're firing order. C for coil, six, four, two and eight, then over here five, three, seven and one.
These numbers correspond to the number of cylinder and on most V8s, all GM V8s and most V8s, the driver side or left bank is the odd, passenger side or right hand bank is the even. The first one towards the front of the car is your number one cylinder, three cylinder, five cylinder, seven cylinder is closest to the passenger compartment and on the passenger side your two cylinder is first towards the front, four, six and eight is closest to the passenger compartment. Basically with that, what you can do is, come right in here. Remove your coil wire first and then you can just kind of unplug and take your other wires out of the way and the wires, you kind of twist, kind of give them a quarter of a twist as you're unplugging them.
Now with the wires off, I can kind of look down in and see there's one of my screws and the other one is kind of opposite of that. The cap's here. You just have to use a T20 Torx driver and get it into the screw. I'm just going to fast forward as I remove that other screw from the backside and so you know I am standing on a stool so I can get into the engine compartment this far. Here's what the underside of the cap looks like. You can see that these are kind of gray and scored. Now, go down to a smaller T15 Torx driver and there are two screws that hold the rotor on. I'm going to speed it up here again as I remove those screws. You want to note which way the contact is pointing on your rotor and just makes it easier when you go to put the new one on. Just make sure it's pointing generally the same way.
I've got my new rotor. So here is my new rotor, I've got the two screws in there. You can see, it really can't go on incorrectly. Put it down on. At this point it's just about as simple as it looks. You put it back down in place the way it was, make sure you get those screws lined up and then tighten them up with your T15 Torx driver. You want to make them nice and tight. You don't have to over tighten them but they should be nice and firm. I'm going to put the cap on and make sure that the side that has the five connections,that one being the coil, is over towards the passenger side of the truck.
I'm going to put this down on. Again, just speed up here. Put the rotor on. I'm sorry, just put the cap on and then take your T20 Torx screws, put them into your driver, put them right down and you can see I'm using a magnetic driver. Put them down in and tighten them up. Now you just want to basically follow each wire up. Let's see. This is the number one wire, make sure you put it into the number one. This goes back to what I said before on the left side or driver side, the spark plug all the way towards the front is the number one spark plug. The next one is the three, five and then seven is the rearmost, so you just make sure that you follow the one plug all the way up or the on, the wire that's connected to the number one spark plug followed up. Make sure you connect it to the number one receptacle on the distributor cap and keep going that way.
I just switch over to the passenger side. Same thing on the passenger side. I do the coil first and then the furthest forward spark plug is the number two spark plug, just follow it up and make sure you connect the wire that's connected to the number two spark plug to the number two terminal on the distributor cap. That goes the same for the four, six and eight, two being the furthest forward and eight being the furthest rearward. After that, put your air intake back together. You can put it on into place. Make sure reconnect both of the connections, the airflow sensors and put it back into the air box, tighten up that 12-mm knot and reconnect to the PVC, put your air filter in and your air box back together. Even though I didn't loosen any of the clamps on the air intake hose, I did check them and I found that one was loose, so just make sure you tighten up all those connections and check them.
We hope this helps you out. Brought to you by www.1AAuto.com, your source for quality replacement parts and the best service on the internet. Please feel free to call us toll free 888-844-3393. We're the company that here for you on the internet and in person.


How to Replace Distributor Cap 1994-2002 Dodge Ram 2500
This video shows you how to install a new TRQ distributor cap on your 1994-2002 Dodge Ram 2500.

