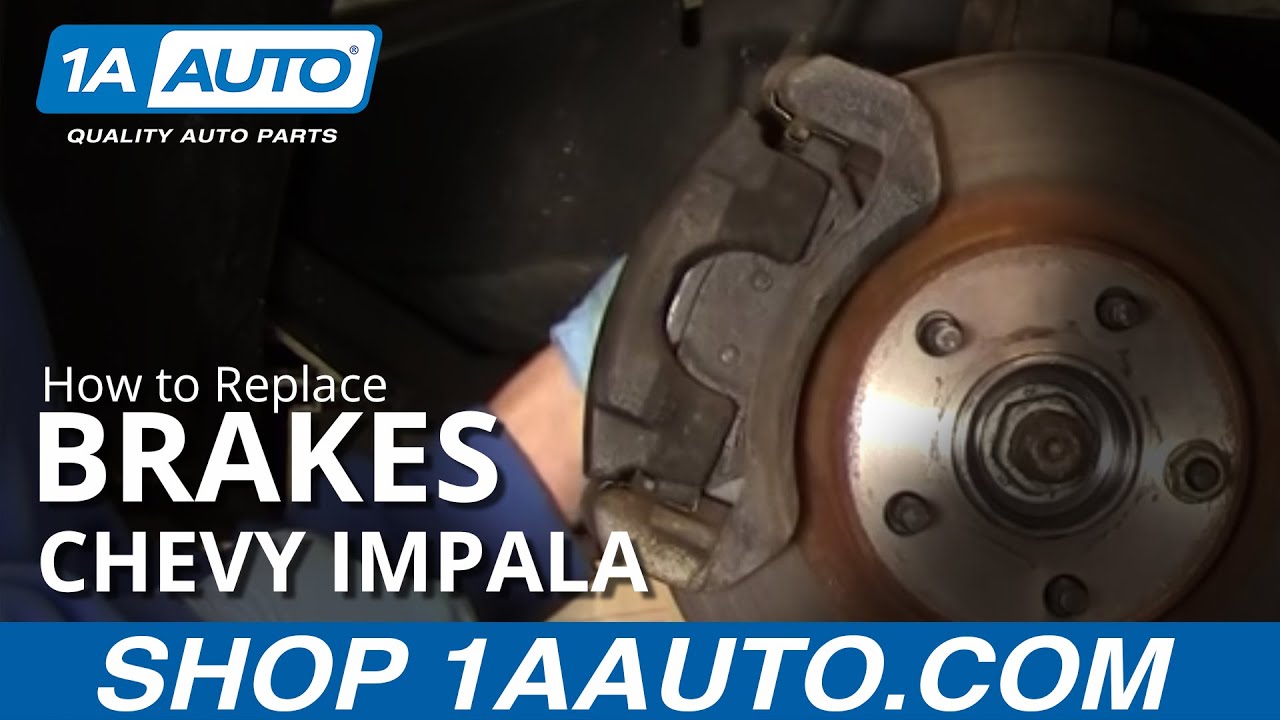
How to Replace Brake Kit 2000-05 Chevy Impala
Created on: 2011-03-06
If your 00-05 Chevy Impala brakes are squeaking, its probably time for a new set! Replace your own with expert help from 1A Auto in this tutorial video!
-
step 1 :Removing the Brake Caliper
- Pry center cap or hubcap to access and remove the lug nuts
- Jack up the car and remove the wheel
- Place a screw driver or pry bar into the hole on the caliper and pry out so that the piston drops into the caliper
- Undo the two 15mm bolts on the back of the caliper
- Pull caliper off, using a screw driver to pry it off if necessary
- Secure caliper bracket safely to avoid stressing the brake line
-
step 2 :Removing the Caliper Bracket and Rotor
- Pry brake pads out of the caliper bracket
- Remove the two 15 mm bolts on the back side of the caliper bracket (use pipe with the ratchet for more leverage)
- Remove bracket and rotor
-
step 3 :Reinstallation of Brake Caliper
- Replace rotor and secure with a lug nut
- Replace the caliper bracket and tighten bolts to 90ft/lbs
- Remove caliper bracket slides and clean with a wire brush
- Slide brake pads into place
- Pull caliper down and use a c-clamp to push the piston all the way into the caliper
- Place the caliper back on to the bracket
- Clean caliper bolts and add small amount of oil
- Replace caliper bolts. Torque them to 50ft/lbs.
- Remove lug nut and replace wheel.
- Tighten lug nuts in a star pattern and replace cap.
- Before driving, pump brakes until pedal goes solid.
Tools needed
-
15mm Socket
19mm Socket
A Piece of Pipe (for leverage)
Flat Blade Screwdriver
Large C-Clamp
Ratchet
Torque Wrench
Wire Brush
Brought to you 1AAuto.com your source for quality replacement parts and the best service on the internet.
Hi, I'm Mike Green. I'm one of the owners of 1A Auto. I want to help you save time and money repairing and maintaining your vehicle. I'm going to use my 20 plus years of experience restoring and repairing cars and trucks like this to show you the correct way to install parts from 1aauto.com. The right parts installed correctly. That's going to save you time and money. Thank you and enjoy the video.
In this video, we're going to show you how to remove and replace the front brakes. I found that this car actually has fairly new front brakes on it, so we're not actually putting new parts on it, just showing you how to take them off and putting them back correctly.
This process is the same for all 2000 and 2005 Impalas, and it's similar for a whole bunch of different cars that have front disk brakes, flat blade screwdrivers, a large size, 15 millimeter, 19 millimeter socket and ratchet, which obviously can be different per vehicle. A breaker bar or pipe, you might need that for leverage, and the torque wrench to get it back together correctly.
First use a screwdriver to remove the center cap. This car has aluminum wheels. If you have a hubcap it might be a little different. You may need to use a wrench to loosen up your lug nuts first while your wheels on the ground, then raise and support your car, and always follow the instructions with the jack and jack stands to jack a car. You can either place a jack or place your jack stand. You can also jack right up here onto the sub frame where the two beams meet.
I have the fortune of having air tools, so I'm going to use them. Just remove the wheel here. You can also use just turn the steering wheel and turn your wheel so you can access the brakes easily. To remove the calipers, you're going to remove two 15 millimeter bolts, one down there and one right up there.
Before you do that, you take a screwdriver or a large pry bar and put it in this hole. If your brakes are worn down more than on this car, you may have to use more angle but then you pry out and that helps to push your piston down into the caliper and makes it easier to get the caliper off.
Now, I'm going to remove those two bolts, and they shouldn't be too tight. They're usually tightened up to about 50 to 60 foot pounds, and we're going to speed it up here.
Depending on how much you pushed the piston back in, you can pull the caliper up and off. Have a screwdriver handy as I now appear with one, and just use a screwdriver to pry off the caliper and put it up top for now. Be careful not to stress your line and then the brake pads just come right off. They just pry right out of the caliper bracket.
Actually, this car has new brakes on it. I'm doing this to show you, but to remove the hub, you remove the caliper bracket by removing those two bolts, and those again are 15 millimeter bolts. You can't quite see it, but I did secure my caliper up top with a wire tie, and now I'm going to use my ratchet and a big piece of pipe.
That pipe helps me get leverage and I'm just going to pull nice and easy. I just keep applying pressure until that bolt breaks loose. Get it going some, and then I'll do the same thing up top. I'll keep continuing to add torque until it breaks loose and get it going and then I'll drop my pipe and just use my air tools to zip them out the rest of the way.
Now my caliper bracket comes up and off, and then, your rotor just comes right off like that. Now here, obviously, the rotor just goes back onto the hub and then I'll hit fast forward. I just use a lug nut to hold the hub in place while I put the brakes together.
We'll grab our bolts, and I got the large 15 millimeter bolts and put the caliper bracket on. Here is just a view from the front so you can see the caliper goes on the opposite side of the steering knuckle, closer to the rotor, and then the bolts go into it.
Now, we want to get those tightened and then tighten them up to 90 foot pounds using a torque wrench. The caliper brackets are stainless steel clips. They're slides. They pull off, and then you want to use a wire brush and just clean those up.
Those are what the calipers slide back and forth in, and then once you clean them up with the brush you can clip them back on. Obviously, this could be done with the caliper bracket off, but if you're just replacing your pads, you want to do it this way.
Now, take your pads, and they basically just slide right into those clips. There's the front side. You put them down into one side first, and then slide them into the other side, and then we'll put the back side in.
Now you want to pull your caliper down and use a large c-clamp. What I'm doing is forcing the piston all the way back into the caliper. If we slope back down here, you can see that piston with the clamp is pushing in is going back into the caliper. You do this and reset it. It lets you put your brake pads on or it lets you get the caliper down onto the brake pads very easily.
It's very important that when you put your vehicle back together, before you drive it out on the road, you want to pump your brakes about four or five times. That allows the piston to work its way back out to the proper place.
You want to make sure you pump your brakes, make sure it holds the car in gear and then do a stop from like 5 miles an hour and 10 miles an hour. Make sure the brakes are working before you drive it on the road.
Now, you can put your caliper down onto your pads. I'm just going to put that clamp down, and there are the little boots that are on the caliper bracket. You squeeze those down as you put the caliper onto the bracket. Then you grab your long bolts. These are pretty clean and well-lubricated. What you want to do is make sure you clean them off a little bit, put some grease on it, just a little bit, a sparing amount. They should slide in nicely. You might have to just kind of move those rubber boots around a little bit and work them in, and then start them by hand.
We'll fast forward as we're just putting those two caliper bolts on. I'll slope back down here. We're using a torque wrench and we're going to torque this bolts up to 50 foot pounds.
Back to fast forward here as we finish up torqueing up those bolts. Once those are done, then you want to remove that lug nut that's holding the rotor, and then you'll spin your wheel straight so it makes it easier to get the tire back on.
Now we'll put the wheel back on and you want to start all the lug nuts by hand so you don't cross-thread them, then you use your wrench or even just by hand. You just want to get the lug nuts preliminary tightened up, just so they kind of hold the wheel in place, and then you'll torque them after you let the car down back onto the ground.
We're back on the ground. We're going to torque our lug nuts to a 100 foot pounds, and you see I'm using a star pattern, basically drawing a star as I torque the lug nuts. Now we'll install our cap, and again, a very important note. Make sure whenever you do work on your brakes, get in your car, pump them a bunch of times first.
Make sure the pedal goes solid again then do a stop from like 5 miles an hour and 10 miles an hour. Before you go out on the road, make sure your brakes are working properly.
We hope this helps you out. Brought to you 1AAuto.com your source for quality replacement parts and the best service on the internet.
Please feel free to call us toll-free 888-844-3393. We're the company that's here for you on the internet and in person.
Shop Products


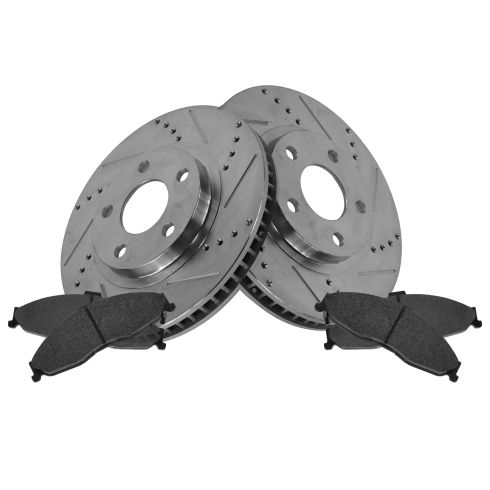
1998-02 Chevrolet Camaro Pontiac Firebird Front Semi-Metallic Performance Brake Pad & Rotor Kit DIY Solutions BFS04440
- Premium Posi
- Cross Drilled & Slotted
- Semi-Metallic
- Vented
- 11.92 in. (303mm)
- 5 Lug
- Performance
- Performance Brake Kit Features and Benefits
- Premium G-Coated
- (1) Front Semi-Metallic Brake Pad Set
- (2) Front G-Coated Performance Brake Rotors

How to Replace Front Brakes 2002-05 Mercury Mountaineer
That squealing sound means it's time for new brakes! Save money and do it yourself. Learn how by watching this video from 1A Auto!

