
How to Replace Blower Motor 1997-2006 BMW 325Xi
Created on: 2019-07-15
Watch this video to learn how to replace the blower motor in your 97-06 BMW 325Xi. 1A Auto shows you how to DIY with step by step instructions!
-
step 1 :Removing the Blower Motor
- Unlock the three twist locks to release the cabin air filter cover at the rear of the engine compartment
- Remove the cabin air filter
- Remove the four T30 screws along the rear of the cabin air filter tray
- Pry the tabs along the wiring retainer to remove the wiring and hose
- Remove the cabin air filter tray
- Remove the two T30 screws to remove the rear engine compartment partition
- Release the two retaining clips from the blower motor cover
- Remove the T20 screw from the top of the blower motor cover
- Remove the blower motor cover
- Remove the two 10 mm bolts to remove the middle engine cover
- Remove the oil fill cap and the bolt covers from the passenger side engine cover
- Remove the two 10 mm nuts to remove the passenger side engine cover
- Replace the oil fill cap
- Slide the locking tab on the blower door up to remove the blower door
- Remove the two T20 screws beside the blower assembly on the passenger side
- Remove the T20 screw above the blower motor
- Remove the blower motor shroud
- Disconnect the blower motor electrical connector
- Release the blower motor retaining clip
- Remove the blower motor
- Remove the four T20 screws from the blower motor bracket
-
step 2 :Installing the Blower Motor
- Install the blower motor bracket with the four T20 screws
- Install the blower motor with the white side facing the driver side
- Reinstall the retaining clip onto the blower motor bracket and secure it
- Reconnect the blower motor electrical connector
- Reposition the blower motor shroud and secure it with the three T20 screws
- Reinstall the blower door and slide the locking tab down to secure it
- Reinstall the blower motor cover and secure it with the top T20 screw, and the two lower retaining clips
- Reinstall the rear engine compartment partition and secure it with the the two T30 screws
- Remove the oil fill cap to reinstall the passenger side cover, secure it with two 10 mm nuts and replace the oil fill cap
- Reinstall the middle engine cover and secure it with the two 10 mm bolts
- Reinstall the cabin air filter tray and secure it with the three T30 screws
- Reinstall the wiring harness and hose into the retaining bracket and close the locking tabs
- Reinstall the cabin air filter
- Reinstall the cabin air filter cover and secure it with the three twist locks
Tools needed
-
Socket Extensions
T20 Driver
T30 Socket
10mm Socket
Ratchet
Pocket Screwdriver
Pick
What's up guys? I'm Andy from 1A Auto. In this video I'm going to show you how to replace the blower motor on this 2001 BMW 325xi. If you need this part or other parts for your vehicle, click the link in the description and head over to 1aauto.com.
Take this cover off right here. There's some turn clips right here. Just twist them. This one's a little stuck. Remove this cover. Here we go. This cover just slides out straight like that. Pull this cabin filter out. Just slide it out a position. We got to take these four screws out. I'm going to use a Torx bit. I'm just going to use a T30 socket extension and a ratchet. Take these out.
And just once you loosen them, you can do it by hand and they should stay with the cover. There's a cage on there so you just loosen them up so they're in there loose. All right, those are all loose. That's good. Now we're going to take a pocket screwdriver or a thin straight blade screwdriver, go in behind here. Release the clips on this cover right here. We want to take the wires out of here, slide these out just like that. Should be able to grab this and just rotate it up slightly then pull it out.
Next I want to take these two bolts out. There's one right here, one right there. There may possibly be a bolt right there. This vehicle doesn't have one, so just double check right there. I'm going to use a T30 socket extension and a ratchet. Once it's loose, you can do it by hand and that's also caged. That's going to stay with the panel. Just rotate it up a little bit. Pull it out. There is a little tab right here, so be careful not to break that. If you just slide this out a little bit, you can get that out. I'm going to take a 90 degree pick tool. Just get under this clip, slide it off. Just make sure you don't drop this clip. Should stay in there. Same with this one. Slide that out of the way. Yeah that's good.
There's a screw that's right there. I'm going to take that screw out. I'm going to you use a T20 socket extension and a ratchet. Just make sure you grab that screw or just use a little magnet so you don't lose it. Okay, now we're going to grab this cover right here on the side. Pull up. We're just going use a 90 degree pick , long one. Get in behind here. There's a little lock tab right here. Lift that up. There's another one on this side, lift that up a little bit. Could slide this up. All right, so you have to move those clips out of the way. Get past the clip right there, I have to get past this clip on this side. Just be careful not to bend it. Just like that. Slide this cover . All right, there we go. That's off.
To gain a little more access to this blower motor assembly, I'm going to remove these covers. It's going to make it a lot easier, I'm going to use a 10 millimeter socket and I am going to use a power ratchet. You can use a regular ratchet if you don't have one. Loosen these up, pull this out of the way. Then we're going to remove this cover as well, remove the oil fill cap and there's two little covers on this cover right here. Just use a straight blade screwdriver. Take these covers off, right here and right here. And then there's two nuts that I need to remove. I'm going to use the same 10 millimeter socket and the same power ratchet. Take a magnetic tool to grab the nuts. You grab this cover and slide it right up.
So that we don't drop anything down here by accident, we're just going to put the oil cap back on. I'm going to take some needle nose pliers. Just grab right here, grab this door, this little lock slides up and then pull this door out of the way. Set that aside and then there's some screws. There's a screw there, screw there and there's a screw up top here. Take those out when you use it. I'm going to use a T20 extension and a ratchet, take these screws out. As I loosen them up, I am going to take a magnet and just hold it next to the screws so it doesn't fall. I don't want to lose the screw. Pull that out and then do the same with the other two. Then we're just going to grab this panel right here, slide this out. Twist it a little bit to the side and then you can get it out.
Now we're going to get to this connector. There's two lock tabs on the side. You just squeeze those. Disconnect the connector. Then underneath here we're going to release this little latch right here. You can use a pick tool if you need to. You can try to get it with your fingers, but it's a little tight. Just use a 90 degree pick and just pull forward like that. Then you can slide the motor out. Keep in mind that the black side of the blades go on the passenger side. The white side goes on the driver's side. You can slide it to the side and just pull it up. Oops. There it is. We want to remove this bracket. I'm just going to take a T20 socket extension and a ratchet. Take these bolts out. There's four screws that hold this on. Grab this bracket and just slide it forward. Pull that out.
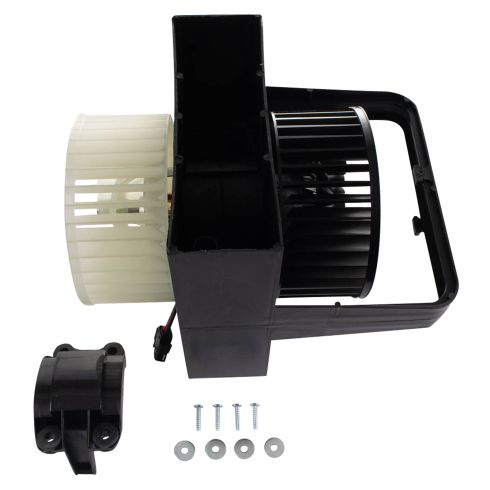
Here's the old part. Here's the new part from 1aauto.com. As you can see, the cage is the same. The connector is the same. Has the same motor configuration and it comes with a new bracket because the motor's slightly different. Get yours at 1aauto.com. You can do it yourself.
All right, we're going to take this new bracket. Just line this up. Push that down. There's some like little rubber grommets set in there nicely. I'm going to take the screws, get these screws started. Be careful not to drop them. If you do, then just use a magnet to pick them up. Then I'm going to use the T20 socket extension. Tighten these down. Just snug them down. Not too tight. It is plastic that you're screwing into. Before you put the blower motor back in, you want to make sure you vacuum in this area. Get any pine needles out or anything that has gotten in there.
Right now we're going to take the blower motor. Now the white side is going to the driver's side. The black side goes towards the passenger side. Just slide this in position. Now before I completely push it onto the bracket, I am going to take this hold down. I want to get this started so this is going to clip into the top part of the bracket. So get that clipped in and the motor's going to sit in that position and just lock it down. Just push it like that. Now if it seems like the motor's ... You're having difficulty with that, the motor has to be in a certain position for it to lock down. And take the connector, line the connector up and lock it down and there we go. That's in.
I'll take this bracket right here, slide this back in position. There is a little area right here where it's gonna clip in underneath there. Make sure you slide that on and get the holes lined up. All right, now we're going to take these screws. I'll take the T20 socket extension, and I'm just going to use my finger to hold the screw on to get it started. I'm not going to tighten that all the way down, I want to get them all started first. Get that one in there as well then this top one might be a little bit difficult. Just try to balance it on this one carefully.
You could always use a little piece of tape and tape the screw to the T20, and then take a ratchet and once they're all in, just snug them up. Not too tight. It is in plastic. Snug. Now take this door, line this back up the way it came out, and then we'll push this little lever down. Lock it in place. All right, now we'll just take this cover, slide this in position like this. Now watch out for these clips underneath here. Slide those clips to the side a little bit.
Try to get this cover over those clips. Just like that and then it's going to clip in up top. Now I'll just secure these clips in from down below. Take a right angle pick, slide this up like that. Same with this one, lock it in place. That looks good. We'll put that last screw in. We'll reinstall this bracket. Keep in mind there's these two slots on the bottom, so it has to slide down and then these two guide pins on the side. So let's slide this in position. We're going to pull out on this little bracket there. And slide that down. It's going to go there, and it's going to go right like that. Then I'm going to take a T30 socket and ratchet, tighten these two bolts up. If your vehicle had another bolt right there or a push pin, reinstall that. We're going to reinstall the engine cover. Take the oil cap off, slide this back in position with, put the oil cap back on. I'm going to install the nuts. Just take the 10 millimeter socket, get those started. That one plus this one.
I'm going to use my electric ratchet. If you don't have an electric one, you can use a manual one. Just snug that one down. Same with that. Snug it down. Take these covers, install those right there and right here. Right, we need to pay attention to these two little tabs. They're going to slide underneath the intake and I have the two bolts already lined up. Get those started. Take my 10 millimeter socket. All right, those are started. Now I'm just going to use my electric ratchet. Tighten these two bolts up and then at this point if you had covers over these, you would put those on. This vehicle doesn't have one. It's similar to these covers.
Now we're going to install this piece. I'm just going to slide this underneath here like this. Make sure you have these screws pulled back as much as possible. Once you get it lined up then we can get those started. Take a T30 socket and extension. Start taking these screws down. Just once they're all started, you can snug them down. They're all started. I'm just going to use an electric ratchet. If this weatherstrip is flipped under, flip that up. Same with this one. We can install these wires underneath. Just get that lined up. Take this wire. This one's going on the top. Just like that. Take this cover and just line this up. Just like that. Take the cabin filter, line that up just like that, and this cover slides back into position and get these started. And twist to the right. Now we can test, make sure it works. Look at all the dust.
Thanks for watching. Visit 1aauto.com for quality auto parts shipped to your door, the place for DIY auto repair. And if you enjoyed this video, please click the subscribe button.
Shop Products

How to Replace Blower Motor w Fan Cage 2001-07 Toyota Sequoia
Watch this video to learn how to replace the blower motor in your 01-07 Toyota Sequoia. 1A Auto experts show you how to do it yourself and save money!

