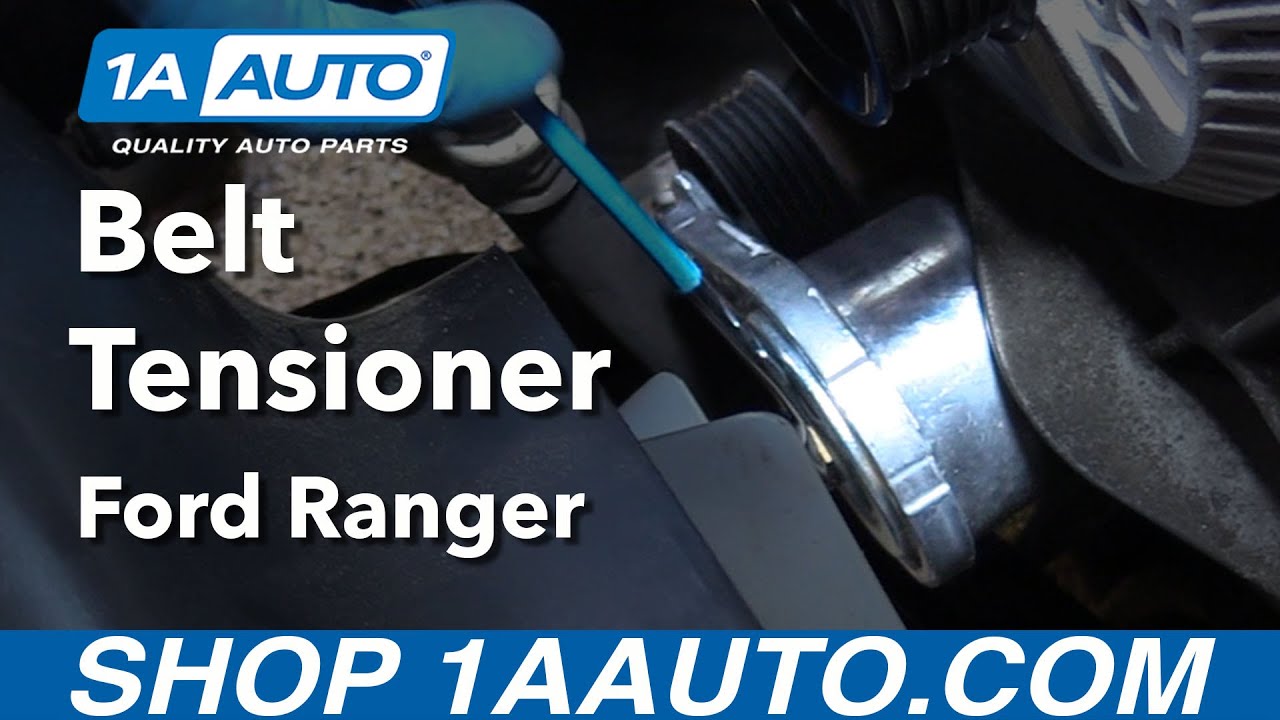
How to Replace Belt Tensioner 2001-11 Ford Ranger V6 4-0L
Created on: 2016-09-26
This video shows how to replace the intake hose, the sequence for removing and installing the serpentine belt, and how to replace the belt tensioner
-
step 1 :Removing the Intake Hose
- Familiarize yourself with the belt routing diagram
- Remove the two Phillips screws from the throttle body cover
- Remove the 7mm bolt from the throttle body cover
- Pull off the throttle body cover
- Loosen the intake hose clamps with a flat blade screwdriver
- Pull the breather tube out of the intake hose
- Pull the intake hose off the throttle body
-
step 2 :Removing the Serpentine Belt
- Turn the serpentine belt tensioner counterclockwise with a 3/8 inch drive ratchet
- Pull the serpentine belt off the pulleys
- Release the belt tensioner
- Pull out the belt
-
step 3 :Removing the Belt Tensioner
- Remove the 13mm bolt from the belt tensioner
- Apply rust penetrant to the tensioner if necessary
- Remove the belt tensioner
-
step 4 :Installing the Belt Tensioner
- Install the 13mm bolt into the tensioner
- Put the tensioner into place, using the alignment pin
- Start the 13mm bolt by hand
- Tighten the 13mm bolt to 35 foot-pounds of torque
-
step 5 :Installing the Belt
- Check the belt for cracking, dry rot, tears, or burns
- Use a new belt if necessary
- Loop the belt around the crankshaft
- Bring it around the water pump
- Bring it under the A/C compressor
- Bring it over the power steering pump
- Bring the belt from the crankshaft around the tensioner
- Bring it over the alternator
- Turn the serpentine belt tensioner counterclockwise with a 3/8 inch drive ratchet
- Pull the belt under the idler pulley
- Check that the belt is routed correctly
- Release the belt tensioner
-
step 6 :Installing the Intake Hose
- Connect the breather tube to the intake hose
- Connect the intake hose to the intake box
- Connect the intake hose to the throttle body
- Tighten the hose clamps with a flat blade screwdriver
- Putt the throttle body cover into place
- Insert the two Phillips screws into the throttle body cover
- Insert the 7mm bolt into the throttle body cover
Tools needed
-
13mm Socket
Flat Blade Screwdriver
Torque Wrench
Phillips Head Screwdriver
7mm Socket
3/8 Inch Drive Ratchet
Brought to you by 1AAuto.com, your source for quality replacement parts and the best service on the Internet.
Hi, I'm Mike from 1A Auto. I hope this how-to video helps you out, and next time you need parts for your vehicle, think of 1AAuto.com. Thanks.
In this video we're going to be working with our 2001 Ford Ranger 4.0 liter V6. We're going to show you how to remove and replace the serpentine belt tensioner. When one of these tensioners goes bad it can cause your belt to squeal or break depending on whether or not it is seized too tight or if it's not getting enough tension to keep that belt tight it can let the belt slip and squeal. You can also get a grinding noise from the bearing inside of the pulley or from the spring loaded mechanism up at the pivot. If you like this video please click subscribe, we have a ton more information on this truck as well as many other makes and models. If you need this part for your vehicle, you can follow the link down in the description over to 1AAuto.com. Here are the items you'll need for this repair.
Before removing any components of the serpentine belt be sure to check that your vehicle has a belt diagram somewhere on it. Ours is still present on the upper radiator support. You may also find them under the hood or in your owner’s manual. If you don't have one available, simply look at the belt and the path around the pulleys and draw yourself a little diagram of where everything goes to ensure that everything is installed correctly and turns in the correct direction.
We're going to remove this cover over the throttle body. Use a small Philips head screwdriver to remove these two screws and a 7mm socket and ratchet for the bolt on the back. Remove the cover from the intake.
We're going to use a flat blade screwdriver to loosen these two screw-type clamps on our intake tube. We'll then wiggle the tube off of the MAF sensor and the throttle body, remove it from the vehicle. You'll also have to remove this breather line from the back, so we'll remove the intake tube from the throttle body and the MAF. Pull it straight off the breather and remove it from the vehicle.
Your serpentine belt tensioner is located on the passenger side of the engine just below the alternator. At the bottom there's a 3/8” square drive which we'll use the end of a 3/8” drive ratchet for. Install it into the drive the same way you would install a socket onto the ratchet. Pivot counterclockwise to remove tension. We'll then remove our belt. You can kind of work it all off from one side. Carefully remove your pressure against the belt tensioner. Be sure that the ratchet isn't going to get stuck against anything or that your hand won't be caught in between. Remove the ratchet. Finish removing your serpentine belt from the vehicle.
With the belt removed, use a 13mm wrench to remove the center bolt on the belt tensioner. Once the bolt’s out, wiggle the tensioner a little bit. If it moves freely, finish removing the bolt and take the tensioner out. Otherwise you'll want to you soak it in rust penetrant because this little tab can get stuck inside of the bracket and break off making it much more difficult to remove to allow us to install and line up our new tensioner.
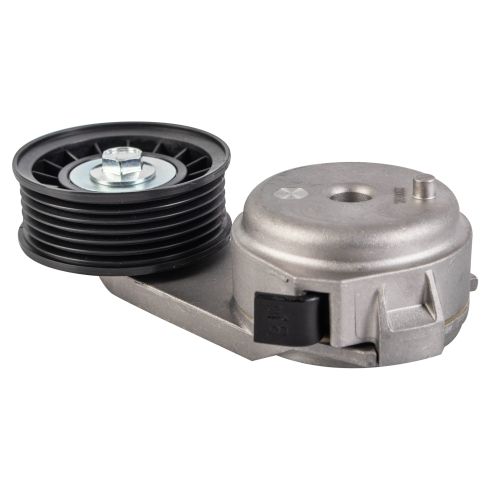
Here we have our old part that we removed from our vehicle and our new part from 1AAuto.com. As you can see these parts are exactly the same. We have the same spring mount at the top here. This is actually a little loose on the old one. We have the same bolt hole and the same alignment stud and pulley on the back. As well as having the same square drive for us to use our wrench to remove the tension from the tensioner. This new part from 1AAuto.com is going to in direct fit just like your original equipment and fix you up right.
Reinstall the bolt into the tensioner. Make sure that you line up the alignment pin into the notch on the side. You'll feel the tensioner seat fully against the bracket once that pin is lined up. Then you can start tightening down your 13mm bolt in the center. We'll do that by hand, and bring it the rest of the way down with our 13mm wrench. Torque this bolt to 35 foot-pounds.
Turn your belt inside out and inspect the ribbed side for any cracking, dry rot, any kinds of tears or burnt looking rubber. If you have anything that looks like that, you should be replacing your belt. Ours looks okay, so we can reinstall it and get some more mileage out of it.
We're going to loop our belt here, feed it down and hook it around the crankshaft to start. We're coming in from the passenger side here because that's how it's going to be easiest to route our belt. Once we're hooked around the crank we'll run the smooth part of our belt over the water pump to the driver's side. We'll go under our AC compressor at the far end. Be sure that that's seated in fully. We'll go over our power steering pump at the top here. We'll run the other side of the belt coming off of our crank around the tensioner. That's from underneath, so the ribbed part will also be touching the tensioner the same way it comes out from under the crank. The ribbed portion will go, again, over the top of our alternator. Now, when we release tension we can push down in the middle and go underneath our smooth idler pulley.
Reinstall our ratchet into the tensioner, turn it counterclockwise again, and try to get as much swing here so we can pull it over pretty far. Go underneath the smooth pulley. Inspect one more time for proper belt path and that you are not hooked on the edge of any pulley. Release the tension and your belt's on.
Reinstall the breather line and both ends of the intake tube to the throttle body and the air box. Tighten down the clamps with a flat blade screwdriver. Reinstall the engine cover and we'll tighten down the front two screws with a Philips head screwdriver and the rear with a 7mm socket and you're ready to go.
Thanks for tuning in. We hope this video helps you out. Brought to you by www.1AAuto.com, your source for quality replacement parts and the best service on the Internet. Please feel free to call us toll-free, 888-844-3393. We're the company that's here for you on the Internet and in person.

Ford Mazda Mercury Accessory Drive Belt Tensioner TRQ BPA03812
- Pulley
- 1.12 in
- 17 mm
- 1
- Silver; Black
- 17 mm
- 2.71 in
- 0.67 in
- 0.67 in
- 28.4 mm
- Grooved
- Aluminum & Thermoplastic
- 68.8 mm

How to Replace Serpentine Belt Tensioner 2002-08 Audi A4
Watch this video to learn the steps needed to replace the serpentine belt tensioner on your 02-08 Audi A4.

