
How to Replace Door Hinge Pin Bushing Kit 1995-98 Chevy Tahoe SUV
Created on: 2010-04-23
Watch this video to learn how to fix a door that's loose, misaligned, or jams. The experts at 1A Auto show you how to replace the door hinge pin on your 88098 Chevy Silverado or GMC Sierra; or 92-99 Suburban, Yukon, or Tahoe.
-
step 1 :Remove retainer
- Use your screwdriver and pliers to remove the retainer located in the groove at the top of the hinge pin.
-
step 2 :Remove spring
- Pull down with a screwdriver to pop it out.
-
step 3 :Remove pins
- Use penetrating oil and use your screwdriver and your hammer to hammer out the pin.
- Exercise care to avoid scratching window or paint.
- Once you have loosened pull the pin out the rest of the way.
-
step 4 :Repeat on bottom pins
- Use pliers and screwdriver to remove the lock ring.
- Use a rag to protect the paint and hammer upwards to loosen the pin.
-
step 5 :Remove bushings
- Have your helper support the door, with a jack underneath.
- As you pull out the bottom pin, slide the door on the jack.
- Once you have freed the door, remove the old bushings.
- Take note on how they are installed to put the new ones in the same way.
-
step 6 :install new bushings
- You want to install the bushings on the vehicle side of the hinge, with the larger bushing closer to the top of the pin and the smaller one resting on towards the end of the pin.
-
step 7 :Install new pins
- Work with your helper to line up the door and slide the new pins in.
- On the top hinge the pin will be going in upwards with the larger bushing on the bottom part of the hinge and the smaller on the top.
- On the bottom hinge the pin will be going downward with the larger bushing on the top part of the hinge and the smaller on the bottom.
-
step 8 :Replace lock rings
- Use a small socket or screwdriver and a hammer to snug down the lock ring.
-
step 9 :Watch reply video
- The final step is installing the spring, which is included in a reply video due to time constraints.
Tools needed
-
Hammer
Flat Blade Screwdriver
Floor Jack
Needle nose pliers
Assistant
Brought to you by 1AAuto.com, your source for quality replacement parts and the best service on the internet.
Hi I'm Mike Green. I'm one of the owners of 1A Auto. I want to help you save time and money repairing and maintaining your vehicle. I'm going to use my 20-plus years of experience restoring and repairing cars and trucks like this to show you the correct way to install parts from 1aauto.com. The right parts installed correctly; that's going to save you time and money. Thank you and enjoy the video.
In this video we're going to show you how to fix those sagging doors on pretty much any GM truck or SUV from about 1988 to 2000. Basically the body style that you see here. The tools you need are a regular screw driver, pliers, hammer, hydraulic jack and an assistant. You can have a lovely assistant or otherwise, and as in my video it's kind of otherwise.
The common problem with these trucks is that the hinges start to give out and doors sag. Okay at 1A Auto we sell the hinge pin and the new bushings and you can see right here what you're going to be replacing is this pin and the bushings. You can actually see that bushing is somewhat worn out right there, and also the lower one. You might as well do both of them at the same time. Okay you're going to start by removing the little retainer that's in a groove at the top of the hinge pin. I'm just using a screw driver and some pliers and prying and just twisting and pulling basically until that little retainer comes apart and pull it off.
There's actually a spring right down here that you've got to pull out, and it's very easy to get out. Getting it in is more fun, and I'll show you getting it back in but to get it out you just kind of pull down with the screw driver and then it comes right out. I'm going to coat the top here with a little bit of penetrant, and down here. You can make it slide right easily. Now I have a quarter inch extension here and you can use whatever you need to use; a piece of wood, a three-inch extension or whatever. Obviously I'm being very careful not to contact the windshield, and I'm trying not to contact my door here. Let's use this end. Okay, once again to a certain point it's coming right out. Okay so there it is. For the bottom pin it's kind of the same process. First you want to use a lock ring right underneath here, use screw drivers and pliers and what not, get that lock ring off. So you get the bottom up and out you put a little rag in there to protect the paint and now you'll need your helper.
Once you start getting that bottom pin to come up, you need to grab someone to help you hold the door. Okay so we're about to pull our bottom bushing out. We've got a jack underneath the middle of the door and the helper here, and what he's going to do is once that pin starts coming out, he's just going to support the door and then he's going to take the jack and use the jack and slide the door back away. I've got my bushings and pins, new bushings and pins ready here. So as he slides it away he's going to hold it, I'm going to put in the new bushings and stuff then we are going to slide the door back and put it all back together.
We need a screw driver to get that out. It's pretty loose now. So what I do here is I grab onto the pin with some pliers, then I put a screwdriver underneath and use the pliers and the screwdriver to kind of pry the pin up and out. So now we've got that bottom pin up and out, and the doors free. Slide it just a little bit, okay we're going to use a screw driver to pry the old bushings out.
Okay so just use your screwdriver to pry out the bushings and just try to take note of which way you pry them out so you can re-install them the same way. So here's the condition of a couple of the original bushings. This one's worn almost all the way through. So as far as these bushings go you have two different sized ones. You've got a larger one and the larger one is going to be at the head of the pin and the smaller one, okay? So on the top, the pin goes in that way. So on the top you want to put the larger bushing up this way and the smaller bushing down this way. Okay, on the bottom it goes down in this way. So you want to put the larger bushing down this way and the smaller bushing up this way.
So here I'm just going to speed through that. Just use a hammer to kind of tap the bushings into place. You're always putting the bushings into the vehicle side or the vehicle part of the hinge. Just to summarize what's going to happen over the next minute or so, I'm basically working with the helper to line up the door and then slide the bottom pin down and then slide the upper pin up and then I'll use a hammer to kind of tap them in place and then use the hammer to hit them hard into place.
Pin down in, I'm just trying to line it up here. Can you push the top of the door back, towards the back of the car? Yes, remember here too that the door is resting on the jack, so most its weight is there. The helper is just kind of steadying it, moving from side to side or from front to back. Let the door down, the back of the door down. So then we'll just drive the pins the rest of the way in. So now that we've driven the pins up and in, just take your little lock ring. Put a little socket down there. We do the same thing down here. Sorry, my head's in the way a little bit.
Okay so the last step is to install the spring and unfortunately due to time, you're going to have to check out our other videos and I'll make it a reply to this video to see how you install that spring.
Okay so now it goes in the bushings and pins. No more door play and it closes in place and doesn't fall down when it opens.
We hope this helps you out. It's brought to you by www.1AAuto.com, your source for quality replacement parts and the best service on the internet. Please feel free to call us toll free on 888-844-3393. We're the company that serves you on the internet and in person.
Shop Products


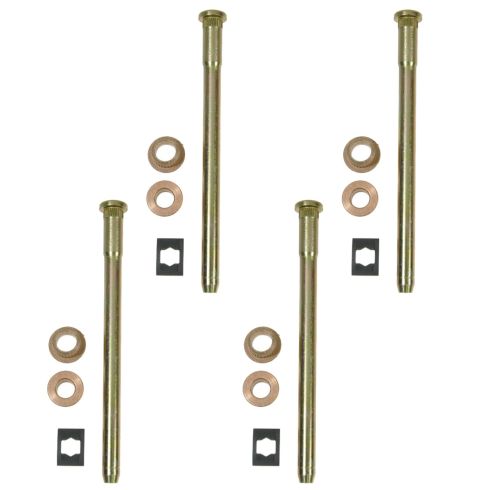
Chevrolet GMC Cadillac Driver & Passenger Side 16 Piece Door Hinge Pin & Bushing Kit Dorman Help 1ADRK00030
- (4) Pins
- (8) Bushings
- (4) Clips
- 16 Piece

How To Replace Door Latch Cable 2004-08 Ford F150
How to remove, install, or replace a broken, snapped, rusted, or jammed door latch cable on 04, 05, 06, 07, 08 Ford F150, pickup, truck.

