Replaces
Part Details
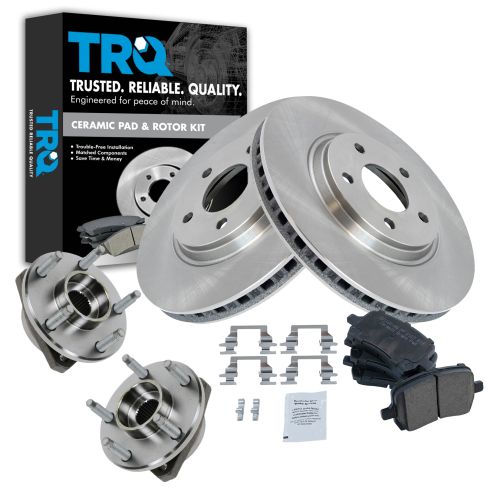
TRQ brake kits are designed to restore your brake system to like-new performance. TRQ brake pads are positive molded, thermal scorched, chamfered, and utilize a multi-layer shim for enhanced performance and service life. TRQ rotors have a non-directional finish that reduces the break-in period for new rotors as well as reducing vibrations throughout the rotor’s lifecycle. All products are fit and road-tested in our Massachusetts R&D facility to ensure we deliver on our promise of Trusted Reliable Quality.
Product Features
Item Condition:
New
Attention California Customers:
 WARNING: This product can expose you to chemicals including Lead and Lead Compounds, which are known to the State of California to cause cancer, and birth defects or other reproductive harm. For more information, go to www.P65Warnings.ca.gov.
Lifetime Warranty
This item is backed by our limited lifetime warranty. In the event that this item should fail due to manufacturing defects during intended use, we will replace the part free of charge. This warranty covers the cost of the part only.
FREE Shipping is standard on orders shipped to the lower 48 States (Contiguous United States). Standard shipping charges apply to Hawaii and Alaska.
Shipping is not available to a P.O. Box, APO/FPO/DPO addresses, US Territories, or Canada for this item.
Expedited is available on checkout to the United States, excluding Alaska, Hawaii.
Final shipping costs are available at checkout.


Created on:
Tools used
Brought to you by 1AAuto.com, your source for quality replacement parts and the best service on the Internet. Hi, I'm Mike Green. I'm one of the owners of 1A Auto. I want to help you save time and money repairing or maintaining your vehicle. I'm going to use my 20 plus years experience restoring and repairing cars and trucks like this to show you the correct way to install parts from 1AAuto.com. The right parts installed correctly, that's going to save you time and money. Thank you and enjoy the video.
In this video, we're going to show you how to replace the front breaks on this 2006 Malibu. Procedures are the same for a few other GM Vehicles as well, the Malibu's, G5, Cobalt, HHR, Solstice and Saturn Sky as well as others. Tools you'll need are jack and jack stands, 14, 15, and 19mm sockets and that could vary by car. Ratchet with a pipe or breaker bar for some extra leverage, a flat blade screw driver, a large C-clamp, wire brush and a torque wrench. Start out by using a 19mm socket or wrench and loosen the plastic covers and then remove the wheel cover. If you don't have the benefit of air tools, you want to loosen the lug nuts up while it's on the ground then raise and support your vehicle and then remove the lug nuts on the wheel. Grab hold of the steering knuckle and turn it to make it easier to reach the back of the caliper. Now, we want to inspect the condition of the breaks. The rotors are a little crusty. As far as rust, that's not always a bad thing. You want to just take your finger and run up and down the surface of the rotor. I can feel some pretty big ridges here on the edges which indicates that this may be worn down. Also, our pads, it's hard to see but if we look in here, there's very little pad life left. You can actually tell here better. This is the metal or the pad. It's almost right up against the rotor, so this needs new front brakes. First thing we're going to do is remove these two bolts here. These two bolts are 14mm and they should come off pretty easy. I'm just going to speed it up as I remove those two bolts.
Now, this should come off, but it's pretty easy on the ridges here. What you want to do is take a good size screw driver and try out with this hold and that loosens up the caliper and the caliper comes right off, put it right there for an hour and you can just try out your pads. As you can see, here's my pad, they actually is a little wear indicator. It says there's a little bit of life left, but I'd feel better replacing these. Here's my inner pad as well. Now, we need to remove this caliper bracket. We'll remove two 15mm bolts here and here. These are going to be somewhat tighter so I'm going to use my ratchet. If you have a breaker bar, that's the best thing or use a piece of pipe, put it on your ratchet, little extra leverage and it should be apart pretty easily. We'll pop one get it started. And I'm just going to speed it up again here as I remove those bolts. I found that once I turned them, probably three or four turns, they actually came out by hand. Take the rotor, pull it right off. New rotor from 1A Auto. Put it on, take a lug nut. Kind of hold it into place here. We'll cut this off. Now, I have to reset. This piston is working its way out of the caliper, so I'm just going to take my old pad like that and take a big C-clamp and make sure we're not pressing anything lighter on the back there. I'm taking up the C-clamp, the piston goes back in to the caliper. This rubber seal kind of pops out and you just work it right back in there with your fingers. Before we put this caliper bracket, two things, I want to make sure these are sliding in and out nice and freely. Then you also want to take a wire brush and just clean out these stainless steel slide. Now, take your bracket and it goes basically between the knuckle and the disk. Put your bolt in, it will find its way. This bolt, you want to tighten up to 85 foot pounds.
New pads from 1A Auto, quite a bit thicker than what we took off there and the rear one has this rear tab. You want to make sure that's on the upside, so put that one in the back. That little tab is what makes that constant squeaking noise as your breaks wear down when they get low. Put this one up front. You want to make sure that your slides are pushed in here. Bring your caliper down right on top. Two bolts. These two bolts, you want to take into 35 foot pounds. We have the wheel back in place, then you put the lug nuts on by hand and then I'm just using my impact wrench to just tighten them up preliminary. Now with the vehicle on the ground, torque the lug nuts to 100 pounds using a star pattern. Now, put your wheel cover back on. There is a hole for the valve stem, then use a socket to tighten up the retainers. Last but certainly not the least, before you drive your vehicle, make sure you pump the breaks a bunch of times to get the pedal to feel nice and firm. You have to reset those caliper pistons, then do stops from five and ten miles an hour before you road test the vehicle.
We hope this helps you out. Brought to you by www.1AAuto.com, your source for quality replacement parts and the best service on the Internet. Please feel free to call us toll free, 888-844-3393. We're the company that's here for you on the Internet and in person.
Tools used
Tools used
Okay, friends. Before we get started, make sure you safely raise and support your vehicle so your wheel is off the ground. Once you've done that, we're gonna remove all five of our 19-millimeter lug nuts. Remove your wheel.
Just to say, we're going to be servicing a lot of things on the front end of this vehicle, so if you see anything that's taken apart, that isn't necessarily in the steps that you need to see. Well, just don't really pay too much attention to that and just follow the steps ahead. All right. Now that we've got the wheel off, let's go ahead and remove the caliper bolts from the caliper bracket sliders. Using a small pry bar, I'm just going to get right in between here and see if I can apply a little bit of pressure and push back this caliper a tiny bit. You can use a wire tie or even a bungee cord. Let's get our pads out of here. Remove your caliper bracket bolts, one here and one up here. Hold that bracket. Now, we're going to remove the rotor. If you notice yours didn't want to come off, you could, of course, give it a couple loving bonks to break it free from the bearing. Before we can go ahead and put on our brand new rotor, you obviously want to clean up the mating surface. You definitely don't want any of this raised area. So, we're just going to sand it down. We'll make it look like it's brand new and we'll continue. Let's go ahead and clean up the rotor braking surfaces. Let's go ahead and put a little bit of copper never-sieze on our hub. Time to install the rotor. And I always like to hold it on with a lug nut. That way there it can't wiggle around.
Now, it's gonna be time to prep our bracket. Let's get everything off of it that doesn't need to be on there. Grab these tins, recycle those. Turn the bracket like this, and remove your sliders. When you remove them, you always want to inspect them. Make sure they're not rotted or pitted in any way. I always like to try to clean them off real quick. This one looks great. I'll set it to the corresponding side. Remove the other one. If you look at this one, you're going to see it has a nice little rubber bushing. If you were to switch this with the other side, you're going to potentially have braking issues. So, always try to make sure you have them on the same side. Some caliper brackets you can try to remove the boot. This one's actually a little bit harder and it actually damages the boot overall. So, if your boots are in good condition after you've inspected them and they're not cracked or damaged in any way, I would just continue on by cleaning out the holes the way I'm going to show you now.
At this point, you're definitely gonna want to have a collection bucket, hand protection, and eye protection. I always have it on at all times, but I'm just gonna mention it. Spray a little bit of parts cleaner inside these holes. Just be careful because fluid will come out. Take a nice bore brush, go right inside there. This is going to clean out any of the debris or gunk that's inside there. Go ahead and dump that out. Nasty. Let's give it a nice rinse. Empty that out. At this point, we need to wait for it to dry. I'm going to keep moving while it dries though and I'm going to clean up these areas of the brackets. The reason why we want to clean up these areas of the brackets is because that's where the tins are gonna ride. On top of the tins is where the pads are. If you have any rot or rust buildup underneath there, it's going to cause an issue with the pads moving inside the bracket, which would be very bad. Use a nice brush, give it a little scrape. If you find that there's large chunks that won't come off, you could try to use a screwdriver or a chisel of some sort. You want to make sure they're as smooth as possible. I have a little sanding disc tool right here that I like to use, so that's what I'm going to do.
The next thing we want to do is use some of our synthetic Moly Grease that came with our kit. I have a little brush here that I like to use. I'm going to go ahead and put it right on there on all those surfaces that I just cleaned up. The reason for adding this lubricant is for vibration dampening, noise reduction, and, of course, it'll keep moisture away from the metal. Something that I like to mention about the caliper sliders is when you're cleaning them, you want to pay special attention to this ridge right here. You want to make sure there's no debris in there or any rough edges. The reason for that is because it needs to connect right here with the boot and it needs to make a good connection and make sure that no moisture can make its way inside there. Once you're sure that you have it nice and clean, go ahead and use some more of that caliper Moly Grease. Go along the whole shaft of the slider and then, of course, make your way up and into that groove. That's gonna be super important. Go ahead and slide it into the corresponding hole. Make sure you did not mix up your sliders and then give it a nice spin just to make sure that the grease is situated. Let's do the same to the other one here. Once you have them both in, just give them a nice spin, and make sure they slide the way they should.
It's time to install our brand new tins. Go ahead and line it up. Squeeze it on there. Make sure it's completely secure. You definitely don't want this coming off. Do the same to both. Let's go ahead and get the bracket on here. I always like to use a little bit of threadlocker on my bolts. Start them both in. We'll snug them up and then we'll torque them to manufacturer specifications. Torque these to 96 foot-pounds. Now, it's going to be time to get our pads on here. But before we do that, we want to make sure that we put on our brake pad wear indicator. To do that, you need to take your pad that you're going to be placing on the inside and you want to pay attention to which corner we want to put it on. I want it to be on the lower half right here, so you can see where it's supposed to fit. Just go ahead and take that indicator and you might need to bonk it on there with something such as a hammer. Just be careful not to damage the meat of the pad. That looks pretty decent. It's completely situated. You want to make sure it's secure so it can't fall off. Go ahead and carefully put this in here. Should flow in there nice and easy. If it feels like you have to force it in or use a hammer, you didn't clean up your brackets enough. Put on the outer pad as well. Perfect.
Now, we need to prep the caliper itself. We're going to put a little bit of that caliper grease right along the metal part of the piston here and then along both of these ears. That's going to help with vibration, dampening and noise reduction overall. Now, we're going to slide this right over the sliders and, of course, over the pads Line up those sliders. We'll put in our slider bolts. Now, we're just going to bottom these out and then we'll torque them to 26 foot-pounds.
So, now, we just want to check the brake fluid level. Make sure it's at the maximum. If it isn't, use the recommended fluid, which is DOT 3 brake fluid. Make sure you close it completely because DOT 3 is hygroscopic and it'll absorb moisture. Make sure you clean down your entire braking surface just in case you have any fingerprints on it. All right. Let's just double-check everything that we fixed here. Looks great. We'll get the wheel up on. We'll start all the lug nuts, snug them up, and then we're going to torque them to 100 foot-pounds. One hundred foot-pounds. Torqued.


