Replaces
This part doesn’t fit a . Select from parts that fit.
Frequently bought together
Part Details
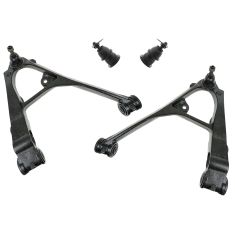
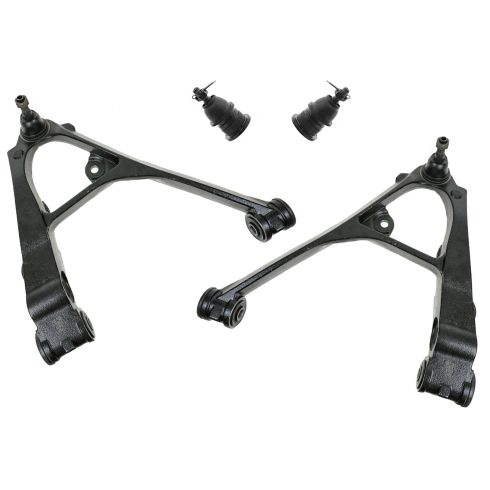
TRQ suspension kits are manufactured using premium raw materials and coatings for extended service life. Each TRQ suspension component is designed to be a direct, maintenance-free replacement to the stock unit. To extend the life of your steering and suspension components, TRQ recommends replacing components in pairs, sets, or kits. All products are fit and road-tested in our Massachusetts R&D facility to ensure we deliver on our promise of Trusted Reliable Quality.
Product Features
Our steering and suspension components are pre-greased and sealed for long life and do not require the extra maintenance typically required by greaseable versions.
Item Condition:
New
Attention California Customers:
 WARNING: This product can expose you to chemicals including Chromium (Hexavalent Compounds), which is known to the State of California to cause cancer, and birth defects or other reproductive harm. For more information, go to www.P65Warnings.ca.gov
Lifetime Warranty
This item is backed by our limited lifetime warranty. In the event that this item should fail due to manufacturing defects during intended use, we will replace the part free of charge. This warranty covers the cost of the part only.
FREE Shipping is standard on orders shipped to the lower 48 States (Contiguous United States). Standard shipping charges apply to Hawaii and Alaska.
Shipping is not available to a P.O. Box, APO/FPO/DPO addresses, US Territories, or Canada for this item.
Expedited is available on checkout to the United States, excluding Alaska, Hawaii.
Final shipping costs are available at checkout.


Created on:
Tools used
Brought to you by 1AAuto.com, your source for quality replacement parts and the best service on the Internet.
Hi, I'm Mike from 1A Auto. I hope this how-to video helps you out, and next time you need parts for your vehicle, think of 1AAuto.com. Thanks.
In this video, we're going to show you how to replace the lower control arm on this 2002 Chevy Suburban. We show you on the passenger's side, but on the driver's side it's the same procedure. It's the same part and similar process on these Suburbans from 2000 and 2006.The items you'll need include a new lower control arm from 1AAuto.com, a 14mm, 15mm, 18mm, 21mm, 22mm, 24mm, and 35mm socket and ratchet with a socket extension, a 21mm wrench, locking pliers, a hammer, a pry bar, a torque wrench, a jack and jack stand, spray paint, and the reciprocating saw depending on the condition of your vehicle. We do recommend two people for this job, and also air-powered tools.
Start off by spraying this bolt with some spray paint, so that you can match up to the same thread where it was. Then, just remove your hubcap by loosening up these lug nut caps and pulling the hubcap free, and then pry up this cap. Loosen this 35mm nut, but don't remove it. Now, you want to remove your lug nuts. If you don't have air-powered tools, you want to do it while the vehicle is on the ground, loosen them preliminarily, raise the vehicle, remove the lug nuts the rest of the way, and then pull the tire off.
Now that the paint has had a chance to dry, just loosen this bolt all the way up, which loosens up the tension on the torque tube. Remove this 24mm nut. Now, you want to loosen these, and it's a 24mm nut and a 22mm bolt. We'll just fast forward as Mike loosens both of these. You can remove the nut, but you want to keep the bolt in place. Using locking pliers, clip on to the top of your stabilizer link. Then remove this 14mm bolt. Next, you want to remove this 21mm nut. In order to do that, you're going to first want to just jack up the lower control arm. This will release some of the pressure on the shock. Then, just remove that 21mm bolt. Now, with the nut back in place, on the bottom of your lower control arm, just put the jack underneath it, and just push this up. Then hammer on the side of it and the knuckle will fall off of the lower control arm. Now you can lower the jack.
Next, you want to jack up underneath the lower control arm and remove the nut. If you have air-powered tools you can just remove this 35mm nut the rest of the way, and then remove the washer behind it. If you don't, you can use your socket and ratchet, but you will need someone to apply the brakes while you do this. You also want to remove the stabilizer link now. Ours is jammed in there, we tried with a hammer to knock it out, but we have to end up using a reciprocating saw to remove it the rest of the way. Meaning, we will need to use a new stabilizer link.
Now, you want to remove these bolts around the axle. Use a pry bar on the hub, you just hold that into place and then loosen up and remove each of those 15mm bolts. Now, just hammer the axle over to the side a little bit to break it free, and then pull it straight back and out of the wheel, and just pull it down and out. Push the shock out of the lower control arm. Then jack up the lower control arm until the wheel knuckle falls through. Now, lift up the wheel knuckle, and just let the jack fall free. You can pull it out the rest of the way. Then just remove those two bolts that you left on the back of the lower control arm. We'll fast forward as Mike does this.
Once you remove that bolt, you can just pull the control arm down. You want to have someone lift up the wheel knuckle, or you can try to do both, but it's a lot easier with an extra person to lift that up. Pull that control arm down and over. On the right is the old control arm, on the left is the new one from 1A Auto; you can see they're identical and they'll fit exactly the same. You want to get the control arm onto the torsion bar first. Sorry, we didn't take a good video, we didn't take a good angle, but I'm working the nut part of the control arm onto the torsion bar. Once I get that in place, then push up in place and work your bolts back in.
We'll just fast forward as he replaces both nuts and tightens them up preliminarily. Once you get the bolts back in you can use a jack to support the control arm, and then line up the stud or the ball joint into the steering knuckle, and then let the jack down. Then, actually put the jack underneath the steering knuckle and support just the steering knuckle. Raise the steering knuckle into place and put the bolt onto the ball joint. Then tighten that up. Tighten up those other two bolts as well. Now, feed you axle back into place, and line up the back. Just replace those 15mm bolts. We'll just fast forward as Mike does this.
Now, using your pry bar to hold the wheel still again, you just want to torque each of those bolts to 65 foot-pounds. Now, you want to put your stabilizer link back into place, starting with a washer and a grommet, then through the hole, then another grommet, then a washer, then the tube; then, before going through the next hole, another washer and grommet; then, on the top another grommet and another washer, then the nut. If you don't have much room up there, then you can just use your jack stand to help push it through. You want to do this until you can get the nut on the tall. You can tighten up this 18mm bolt back to the line of the paint. Replace the lower bolt and the shock, and just tighten that up. We'll fast forward as Mike does this.
I'm torquing the control arm bolts. You'll notice I have the jack underneath the control arm. I've basically got the full weight on the control arm, getting in position, so when you torque them they'll be in the riding position. Now tighten up your link so that the bushings are basically the same width as the washers, and replace this 35mm nut and tighten it up. Put the wheel back into place, and then replace each of your lug nuts and tighten them up. You want to tighten them preliminarily, lower the vehicle and then tighten them the rest of the way. Torque each lug nut in a crossing pattern to 100 foot-pounds. Okay, now torque your center hub nut to 160 foot-pounds, and then put the dust cap on there, which if you notice I forgot to do, then put the hubcap on.
We hope this video helps you out. Brought to you by www.1AAuto.com, your source for quality replacement parts and the best service on the Internet. Please feel free to call us toll-free, 888-844-3393. We're the company that's here for you on the Internet and in person.
Tools used
So before you do this job, you wanna keep in mind that after you're done, you're gonna have to go to an alignment shop and have the vehicle aligned so you don't burn out your tires and have premature tire wear.
Now, I'm gonna remove the wheel. Use a 22-millimeter socket. Take off the lug nuts. Take the wheel off. I'm gonna take the sway bar link out. Now this link's been replaced before. If you had the OEM link, you're gonna need to use some pliers at the top of this. For this one, I'm going to use a 14-millimeter wrench and a 14-millimeter socket on the bottom. And just take this out. If it's still good, you can reuse it.
All right, I'm gonna take these axle bolts out. Before I take this out, I just wanna mark the flange just so when I put it back together, it goes together the same way it came apart. Just use some paint or a marker. Now, I'm gonna use a 15-millimeter socket to take these bolts out. Now I can separate this and just slide this down out of the way. Now, I'll take a 36-millimeter socket and take the axle nut off, and take this washer off as well. There we go. Now, if the axle is stuck in there, you're gonna wanna use a punch and a hammer and tap it out that way. If it's not stuck, then you can just grab the axle and just slide it out.
Now we need to take the torsion bar keyways out. When we take this bolt out, you can take a tape measure and just measure where the bolt was. So a little more than half an inch, almost three quarters of an inch right there, so you can put it back to where it was. Or you can put a line on your socket and just count the threads when you take it out.
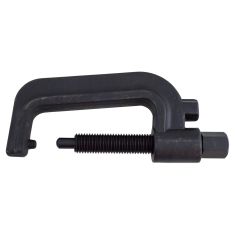
I'm using a 18-millimeter socket. Now, next I need to take this bracket out, but because the keyway is putting pressure on it, I can't take it out. So you need a special tool like this specifically made for this. There's a little nub on the top. There's a hole in this bracket right here. You just slide this through here over the cross-member as you tighten the keyway up. Once there's an air gap on top of that, you can take that bracket out.
Just try to slide this out. Watch your fingers. Once you get that out, you can take the tool off. All right. Now, I'm gonna use a punch and a big hammer and just tap. You wanna tap the torsion bar straight forward. And when it starts moving, just be careful of the keyway because the keyway could just fall. If that doesn't work, I'm gonna use an air chisel and try to slide that forward. There we go. Starting to get movement. You can take a little rust penetrant and spray down the cam and you can also spray down the lower control arm.
There we go. All right. So that popped out. And there's the keyway. All right. So there's no tension from the torsion bar on the lower control arm, but I'm gonna take a screw jack and just support the lower control arm, just about that much. And then I'm gonna take the shock bolt out. Use a 21-millimeter socket and a 21-millimeter wrench.
I'm gonna take that bolt out. Now, I can lower the screw jack. Now, the upper control arm is eventually gonna get supported by that ear right there. So once we take the control arm out, the knuckle is gonna fall a little bit, but it'll be supported right there, or even by the tension on the upper control arm bushings. I'm gonna take a 24-millimeter socket and loosen up this nut. We don't have to take it off completely. You can leave a couple threads on there. And then we're gonna separate the ball joint from the knuckle.
All right. I'm gonna use a pickle fork to separate this. There is other tools you could use that actually grab on here and just push it through. Use whatever works for you. There we go. And now I'm gonna take the control arm bushing bolts out. I'm gonna use a 15/16 wrench or a 24-millimeter wrench on the nut and then use an 18-millimeter socket on the bolt.
And I'm not gonna take the bolt out yet. I'm gonna get the other one off first. Now, there is a washer. Also, take those washers off. Now, try to slide those bolts out. You can tap them out with a hammer and use a pry bar. Just pry this out. I'll just slide the torsion bar straight forward, and then we can slide it back and just slide it out. Now we're gonna take this nut off and slide the control arm up.
When you take the torsion bar out, you wanna keep in mind which direction it came out. And if you mark it with the...which end is the back and which end is the front. Just take the grease fitting, get the grease fitting started and take a 7-millimeter wrench and just snug it up. That's good. All right. Now we'll just put this in the same way it came out. Start with the ball joint and put the nut on. Now, I'll just slide the torsion bar back in position. Remember the back goes towards the back of the vehicle. Slide this through the front, and go through the crossmember over here, and towards the back of the vehicle. All right.
All right. Now, just line the control arm up. Just be careful, watch your fingers. You can use a pry bar if you have to. Get them between here and take the bolt. Slide the bolt in. Make sure you put those little washers on, and same with this one. Now we're gonna tighten up the lower ball joint nut. Snug that up first. And then we're gonna torque it. And then torque this nut to 74 foot pounds.
So now we wanna tighten these two bolts. Now, when you tighten these down because of the bushings there, you want this lower control arm as close to ride height as possible. So I'm gonna use a screw jack and raise this up to how it would be for ride height, as close as possible. Ideally, you wanna put this all back together and torque these bolts on the ground, but it's kind of hard to access these bolts while the vehicle is on the ground. So we'll do it now. That looks good. I'm just gonna snug these up first.
Now with my 15/16 wrench and 18-millimeter socket, I will torque these to 129 foot pounds. There we go. Now, I can lower this down. As I lower this down, I'll get the shock bolt, line that up. I'll snug this up first, then I'll torque the lower shock bolt to 59 foot pounds. That's good. Now I can lower the screw jack, put it out of the way. Now, we're gonna slide the axle back in the CV shaft, and just line this up with the mark that you made. That's good right there. And get these bolts started.
Now, I'm just gonna snug these up first. Now, I'm gonna torque these bolts to 58 foot pounds. And to prevent the axle from spinning, I can use a pry bar and just hold the lug nuts, go in between the lug nuts, and just go around one at a time. I made it all the way around them. Now I'll put the washer back on and then the nut. Snug this down first. Now you can lower the vehicle down to the ground, and just use a pry bar to prevent this from spinning, or you can just torque it like this, and torque this nut to 177 foot pounds.
All right. Now, you can always take a wire brush and just clean some of the rust out of the keyway and same with the torsion bar, and just slide the keyway back in position. And slide the torsion bar in, just like that. Try to get it as close as it was when you took it apart. That looks pretty good. And you can always compare it to the other side.
Now, we'll take the tool. Tighten this back up. All right, now, we'll tighten this up. I'm gonna take that bracket and slide it through. Now the round part goes on the bottom. Just keep your fingers out of there. That's good. And loosen up on the tool. Get the bolt, get the bolt started. And when you put this back in, you can always count the turns. Going back in, put it back where it was.
You wanna take your tape measure and just double check. A little bit looser than... I love that. That looks good. You can always check your ride height adjustment afterwards at the tires and adjust accordingly. Put the sway bar link back in. There we go. And get the nuts started on top. Pick my wrench, snug this up. And then we're gonna torque this to 89 inch pounds. Make sure you're on inch pounds, not on foot pounds.
And then reinstall the wheel and then put the lug nuts on. Now, I'm gonna torque these lug nuts to 140 foot pounds in a cross pattern to tighten the wheel down evenly. I'll just go around again and double check.
Tools used
All right. So one of the first things you need to do is safely raise and support the vehicle. Once you've done that, you're gonna remove all six of your lug nuts. Remove your wheel. Now what we're gonna do is we're gonna get the ABS wire out of the way. The last thing we wanna do when we're doing any of the work on this upper control arm is to put a tug or damage this in any way. If you were to follow it up, you'll be able to see right where the connector is. I'm gonna remove that connector from the frame using my forky tool. Pull it down to where you can see it. Grab this tab. Lift it. Pull it off. These right here, you can remove. Just use a small pocket screwdriver or whatever you might have. Get right in between this area right there. We'll do the same down the line. Let's work on getting this brake hose off of the control arm now. We're gonna remove this 10-millimeter headed bolt. That's very common for them to break. Kinda wiggle it around. Get it off of there. The next thing we need to do is come right down here. We need to remove this upper ball joint nut. Once we remove that, we're gonna break the knuckle free from the upper ball joint control arm. There we go. Get that off of there. Put that nut on there. Just a couple threads and I'll show you why in a second.
The next thing we're gonna do is use our pickle fork and our hammer, then we're going to come right in between this joint and separate the two. When it separates, the knuckle is gonna wanna drop and move away. If it dropped and moved away, there's a possibility that it could put a tug on your axle or even maybe something such as your brake hose. We don't want that to happen. That's what this nuts for. It's a safety nut. Leave that there for now. So now I'm just gonna use a bungee cord or pretty much anything that you might have that can prevent this from falling down because we need to get that nut off there but we still wanna make sure we have control of this. There we are. Carefully set that aside. Let's spray this down with some penetrant. Take a peek right under here and make sure that you don't have a snap ring. A lot of vehicles won't, yours may. Now it's gonna be time to get our ball joint press set up on here. You're gonna need a cup that fits directly over the top of that ball joint up all along that control arm. You're gonna need a piece like this that has a spot in the center that the driver's gonna sit right into. Now we'll just go ahead and put this right over that ball joint stud and then we'll snug this up.
Now we're just gonna go ahead and tighten this up. And we're trying to press the ball joint up and through the control arm. You can't really see much of what's going on but what should be happening is the ball joint's gonna be coming up and separating. So it looks like that's working pretty well. I can see it starting to separate right there. So what I'm gonna do next is I'll loosen this back up and now I'm gonna try using something else as a spacer to continue driving this up. Get that boot off there. And there it is friends. Just a quick overview of the new ball joint before we go ahead and install it. If you were to look at it, it pretty much looks the same all the way around unless of course you took the boot off and then you took a peek underneath. If you look, you're gonna see there's a flat edge there and a flat edge here. You need the pivot point, which would be the opened areas of this ball joint, to be facing in and out of the vehicle or to the left and the right, not front to back. You don't want this to pivot front to back. That's not the way it needs to go. It would need to go this way so I can pivot in and out or left and right on the vehicle. All right. So we've got our ball joint here. You can see it comes with a little hole on the top. We're just gonna line that up facing straight out towards us. That looks pretty great.
Now I'm gonna take my ball joint press kit and I'm gonna use the piece that looks like this. That's gonna sit right over the top and that's where the driver is gonna go down against. You need to have something covering this ball joint. You cannot press directly against it. I'm gonna use a cup that has a hole in it on the bottom for the lower part. Come right in just like this. And having the hole in the bottom is gonna make it so that the stud will be able to come through as the ball joint presses in. Start that right on there. Now I'm gonna snug this up. All right. Let's go ahead and bottom this out. We're gonna bring the ball joint right down to the control arm. As we do this, you wanna make sure the ball joint's going as straight down as possible. If it seems as though it's going off-kilter in any direction, you need to stop, try to fix the ball joint, straighten it out. Now I'm just gonna take a look. I can see the ball joint is hitting directly against the control arm. I'm gonna double check to make sure it's all the way around. That looks perfect. While we still have the press on here and it's giving it a lot of force, I'm just gonna bonk on this control arm a couple times just to cause a little bit of vibration and maybe set this in if it's just got a little bit more to go. That's great. Let's get this out of here.
It's super important to make sure that you put your snap ring on here. The snap ring is gonna keep this ball joint from eventually or potentially working its way out of the control arm. Grab some pliers that look like this. They're gonna have two little pitons on them and they're gonna fit right inside the holes on the snap ring. Once you spread them, you'll notice that it opens up. We're gonna come right over the ball joint and we're gonna put it up into that lip that's up near the control arm. We've got that over there. Double check to make sure it's seated all the way around. It needs to be in there completely. That looks perfect. Let's grab the boot. So let's turn over our boot and take a little look right here. You're gonna see where the stud comes through. It has a little area that looks different than the rest. That area needs to be facing in-board or towards the inside of the vehicle. So we'll put that facing just like that and it's facing towards the frame. Now we can take some pliers or whatever you might have and we need to get the boot so it's sitting up on top of the ball joint. Double check the boot. Make sure it's sitting perfectly all the way around. As long as it is, now we're gonna grab the knuckle. Bring it up. We're gonna put the stud through. We're gonna need a little bit of leverage though.
I'm gonna use a nice long pry bar. Come across the top of the control arm here/ball joint and under the frame. I'll pull it down and then I'll start in the nut. Give this a little turn. Bring it up. Okay. Let's get our pry bar. Bring that ball joint down and into the knuckle. There we are. Let's start the nut on. Just go ahead and get this thing so it's snugged up. Okay. The torque for this nut is 37 foot-pounds. Will you be able to get a socket and a torque wrench in between here? Probably not. 37 foot-pounds isn't really very much but it is definitely tight. So bottom it out, give it a little bit more, and then we're gonna definitely make sure that the cotter pin hole is gonna line up between the nut and the stud. Okay. So now I'm just gonna take a peek and I can see where the slot and the nut is, and I can see where the hole and the stud is. You wanna line those up. Put the cotter pin through just like that. Now we'll just peen this down and then curl it over. This is gonna make sure that there's no way that that nut can loosen up on its own. At this point, we don't need this on there anymore. Let's get that ABS wire back connected. Give it a nice tug. Make sure it's completely connected and now make sure it's secured to the frame. The next thing you would wanna do is make sure you secure your brake hose.
Go ahead and put that bolt back in, assuming yours didn't break. If it did, you need to make sure you secure it with something such as maybe a tie of some sort, or even drill out the hole and re-tap it if you needed to. Now before we go ahead and put the wheel back up on there, just double-check everything. Make sure that your ABS wire is connected. Make sure your ball joint's sitting flush. The boot's on the way that it needs to be and you definitely have a locking cotter pin holding that nut on the stud. Now let's go ahead and torque our lug nuts to 140 foot-pounds. Center cap, go ahead and pop it on there. Now that you've finished your service, go ahead and take it for a road test and make sure you get it down to a local reputable alignment shop.
Tools used
Tools used
Take the center cap off, use a straight blade screwdriver. Use a 22-millimeter socket. Take the lug nuts off. Pull the wheel off. Now I'm gonna use a pole jack or a screw jack and just support the lower control arm right here. Just raise it up a little bit. I'm gonna take the sway bar link out. You can use a 14-millimeter wrench up top and 14-millimeter socket underneath. Loosen this up. And if you're gonna reuse this, just try to keep it all together the best you can. These bushings are gonna fall off. Here we go.
Now I'm gonna disconnect the lower shock bolt. Use a 21-millimeter wrench on the bolt side and 21-millimeter socket. Take the nut off, right there. And you might have to adjust the control arm to get the bolt out, just like that. I'm gonna use a 36-millimeter socket. Take this axle nut off and take the washer off as well. Just wanna make sure the axle is loose from the wheel bearing. Just take a punch, go to tap. That's loose, so that's good. Before we take this axle off, just mark it so that you put it back together, put it in the exact same location that you had it. Now use a 15-millimeter socket. Take these bolts out. All right. Just take a hammer, give it a tap and just separate this. Slide this down. You should be able to slide the axle right up.
We're gonna loosen up the tension on the torsion bar. We wanna take this keyway out. To take this bolt out, you want to put this back where it was when you go to put this back together. You may still have to adjust it, but at least you can get a baseline. So what you can do is just take a socket and mark it. And loosen this up. As you loosen it, just count your turns. All right. So the tension's completely off of the keyway. Now the bolt's just in this piece right here. So I'm just gonna take it out the rest of the way. I got about 14 or 15 turns out of it. That's good.
All right. So some of the tension's off that torsion bar. I'm just gonna take this screw jack, pull jack, loosen this up. I might need to put that back up, but for right now, just leave it down. Now we need to remove this adjuster bracket. You need this special tool to do this job. What you're gonna do is there's a hole on top here where this part of the tool is gonna go into that hole. And then this is gonna push up on the keyway. Right there. So we'll tighten that up. And once it's raised up just enough, then we can push that bracket out of the way. All right. And just be careful. And pull that out. Once you pull that out, we can loosen up on the tool. Lower the keyway. And remove the tool.
All right. I'm just gonna take some rust penetrant, soak this down. Let it soak for a little while, right there. All the tension's off of that. Also on the lower control arm, right there. And on the other side. I'm gonna take a punch and there's a hole right here on the backside and just use a hammer and just try to punch the torsion bar out. There we go. That pops up and this keyway slides right down like that. This bar can just hang out right here until we take those bolts out. But before we do that, we're gonna take the ball joints off. Just use a little rust penetrant. It's a little bit rusty. Take a 24-millimeter socket, remove this nut.
There's many different front-end tools you can try to use. There's some clamps that go around here and push up on the ball joint. You can take a hammer and try to break it free that way or take a pickle fork, which is what I'm gonna do. There we go. I'm gonna take a 15/16 wrench and put it on the nut right here and then use a 18-millimeter socket. Loosen this bolt up here. I'll leave the bolt in there. Just take the nut off first and then take this nut off as well, this bolt out. There is a washer on the end of those. Take the washer off. Now, just make sure you support these controls arms or just don't be underneath them when you take these bolts out. Take that bolt out. And take those bolts out. All right. And slide this up. And you can slide the arm off the torsion bar. Slide it out of your way.
Take this grease fitting and just thread it in place to the top part of the ball joint. Take a 7-millimeter wrench and just snug it up. All right. Take the control arm, slide it over the torsion bar, go all the way through. And I'll start by lining the ball joint up and then try to position the control arm. Yeah. And take that dead blow hammer, try to hammer it in place. And take the bolt, get that bolt started. Just use a pry bar and just try to line this up. And those are both good. Put the ball joint nut on. And we'll tighten this up. And use a torque wrench and torque this to 74 foot-pounds.
Now put the washer on the bolt that goes right there and then the nut, get the nut started. And same on this back one. And then I'm gonna raise this control arm up before I tighten these bolts and nuts down. You want this control arm to be as close to ride height as possible. What is advised is putting this whole thing back together, having it on the ground and when the ride height is level, then you torque these, but that's very hard to do, so we're gonna do the best we can right now. And we're gonna torque these to 129 foot-pounds.
All right. Just lower the screw jack and take the keyway. Slide it in position and slide the torsion bar back through just like that. All right. Take the tool, put it in position. And you can tighten it up. All right. That's good. And put this bracket in. And we can loosen up on the tool. And remove the tool and put the bolt in. And before we tighten this up, I'm actually gonna attach the shock bolt. All right. Now we'll just use a screw jack. Get that lined up, get a tap, and put the nut on, and then torque this to 59 foot-pounds.
All right. Now I'm just gonna lower the screw jack down. All right. Tale the CV shafts and line it up. And just make sure you line up your paint marks. Get the bolt started. And then I'm just gonna snug these up first. I'm gonna start on this side and then rotate it 180 degrees. Tighten this one up and then just go around, snug them all down. To prevent the axle from spinning, just put a pry bar in between here. And I can use a torque wrench and torque these bolts to 58 foot-pounds. Take the washer, put the washer on, put the nut on. I'm using a pry bar and go in between the lug nuts so it doesn't spin when you go to tighten this. And torque this to 177 foot-pounds.
All right. We're gonna take the link, get the link lined up. Slide that in underneath. And get the top pushing on. All right. Now we'll tighten this up. And then we can torque this to 89 inch-pounds. Good. And take a grease gun and just push it on the grease fitting. Just give it a couple pumps. It's a good idea to watch the boot. And once you see the boot moving, then that should be enough. Now we can tighten up this bolt for the height adjuster. Make sure you count how many turns when you tighten it back up. If you took it out 20 turns, put it back to 20 to get at least a baseline, and then you can adjust accordingly. Put the wheel back up. Put the lug nuts on. Now I'm gonna torque these lug nuts to 140 foot-pounds in a star pattern to tighten the wheel down evenly. And just go around again, double-check. Install the center cap.