Replaces
Part Details
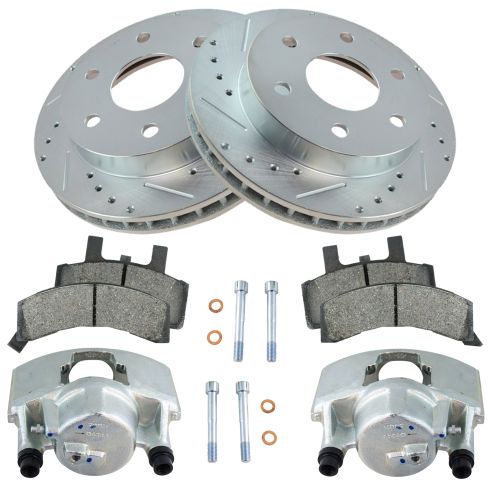
Premium Positive Molded Brake Pads Features and Benefits
Complete Repair in One Purchase - Stop searching for parts individually and complete your repair with a customized kit or set from DIY Solutions.
High-Quality Parts from Trusted Brands - DIY Solutions' kits and sets are selected from the best automotive brands and include hard-to-find and even obsolete parts you may need for your vehicle.
Guaranteed Fit - DIY Solutions ensures its selected parts are quality-tested to guarantee fit and function.
Performance Brake Kit Features and Benefits
Item Condition:
New
Attention California Customers:
 WARNING: Cancer and Reproductive Harm - www.P65Warnings.ca.gov.
Lifetime Warranty
This item is backed by our limited lifetime warranty. In the event that this item should fail due to manufacturing defects during intended use, we will replace the part free of charge. This warranty covers the cost of the part only.
FREE Shipping is standard on orders shipped to the lower 48 States (Contiguous United States). Standard shipping charges apply to Hawaii and Alaska.
Shipping is not available to a P.O. Box, APO/FPO/DPO addresses, US Territories, or Canada for this item.
Expedited is available on checkout to the United States, excluding Alaska, Hawaii.
Final shipping costs are available at checkout.


Created on:
Tools used
Brought to you by 1AAuto.com-- your source for quality replacement parts and the best service on the internet.
Hi, I'm Mike Green. I'm one of the owners of 1 A Auto. I want to help you save time and money, repairing and maintaining your vehicle. I'm going to use my 20 plus years' experience, restoring and repairing cars and trucks like this, to show you the correct way to install parts from 1 aauto.com. The right parts, installed correctly, that's going to save you time and money. Thank you and enjoy the video.
In this video, we're going to be doing a front brake job on this 1996 Chevy Tahoe. We show you obviously, the passenger side and the drivers side is going to be the same. Always replace your brakes in pairs. This is the same for the Tahoe, Suburban, and also the CK Pickups, Chevy and GMC alike. Tools you'll need are: jack and jack stands, a 22millimeter socket with a ratchet, or your tire iron, a 3/8 Allen wrench, combination wrench, a large hammer, wire brush, grease, as well as a torque wrench.
Start by removing your wheel. If you have a center cap or the lug covers, take them off carefully and then, if you don't have the benefit of air tools or impact tools as I do, you'll want to start with your vehicle on the ground, loosen the lug nuts, then raise it up, secure it and remove the lug nuts and the wheel. You can see our outer pad is actually getting a little bit thin, and on the front side, the disc is in pretty good shape, if you run your finger on it. On the back side there is a pretty good groove, we'll see what that's all about when we take it off. You want to take a large screwdriver or a pry bar and what happens is that as your brakes wear, the piston, right here, comes out of your caliper. To get your brakes apart, it helps if you force that piston back in. I'm taking a screwdriver and prying out on the caliper, and you can see that that forces the piston back in. With a good sized screwdriver, you can actually reset your pistons, pretty much all the way.
We want to remove the calipers, and back here, there are two 3/8s Allen bolts, one here and one right down here. I've got my 3/8s Allen wrench, I'm going to put it in, make sure it goes into the bolt as far as possible, then I'm going to use a regular crescent wrench on there for some extra leverage. Pull, ok, same thing for the top. I'm going to fast forward here as I finish removing those two bolts. Once you've got the bolts back out, your caliper comes off. You see your pads, the inside one just pulls right out. On the other one, put a screwdriver right in here, twist it and it comes right out. On your caliper, the bolts go through these sleeves, and those sleeves should slide pretty nice and easily. If they don't, you can use an extension and force them out, go easy though, you don't want to push too hard and have them fly right out, like that. You want to inspect these and see how worn they are. You can wire brush these, if there's some build up on them, you can wire brush these and reinstall them with a little bit of grease. This one was really difficult, this one here, I'm pushing much easier and takes a lot less to force it out.
If you want to better reset the pistons on your caliper, what you can do is put your old pad back in, take a C clamp, put it in place, tighten the clamp up, you will force that piston in the rest of the way. To remove the rotor, be very careful not to hit your studs, and if want to, you can put the lug nuts back on, that will help protect the studs from getting damaged. Usually a good hit breaks it loose. You can see on the backside, there's quite a bit of uneven wear. We will replace these rotors. New rotor from 1 A Auto, going on, in place. I like to put a lug nut right on, just to hold things where they should be.
You'll notice I'm working with new calipers. The owner of this vehicle wanted a new set put on the truck. Not always necessary, but make sure you reset the pistons, also check those sleeves, like I showed you earlier in the video, make sure the sleeves that the bolts go through are sliding nicely in the caliper. Take your inside pad, put it down in and press it in. Your outer pad, kind of slide it right down in. Just going to make sure these two shafts are back in at their starting point, looks like they're out a little bit.
I'm going to hit fast forward here. Put the bolts through, you might have to move the calipers a little back and forth to get them started. Use your Allen wrench to start them most of the way until you get them seeded. With an Allen wrench of this size, I'm basically pull it as tight as I can with that, should be about 25 to 30 foot pounds. Now you can remove that lug nut you have holding the disc on. Put your wheel on, start all your lug nuts by hand, then use a wrench to torque them, or tighten them preliminarily. Set the vehicle back down on the ground, and torque your lug nuts to 100 to 120 foot pounds. Put your cap back on, just use a socket to secure those caps. Very lastly and most importantly, make sure you pump your brakes and get a good firm brake pedal before you road test your vehicle.
We hope this helps you out, brought to you by www.1AAuto.com-- your source for quality replacement parts and the best service on the internet. Please feel free to call us toll free at 888-844-3393. We're the company that's here for you on the internet and in person.
Tools used
Tools used
Safely raise and support your vehicle on a frame so your suspension can hang. Now that we've safely raised the vehicle, let's remove this by using a small pry bar right in this little slot. Now, you can see your 22-millimeter lug nuts, remove those. Now, we're going to carefully push back the caliper piston. If you look right here, that's the piston. We want that to go all the way back as far as it can go. Some people would choose to open up their bleeder screw. If yours is in poor condition like ours is, it's probably going to break off. In which case, just push it back nice and slow.
Now, we have a steel piston here. It's not ceramic, so it's okay to go ahead and try to pry up against it. You can test it with a magnet. If the magnet holds, you know it's steel. Let's use a three-eights Allen socket and remove these slider pins. Let's grab the caliper off of here and set that aside. Let's go ahead and get this rotor off of here.
Now that's all out of the way, let's continue on by cleaning up this area right here, this area right there, and then, of course, this whole hub area. Those are all the mating surfaces. Of course, you have your rotor, and then this is where your caliper is going to be. That one looks great. If you happen to see a lot of large rust flakes like this anywhere along the knuckle, make sure you chip them off. You don't want any of that falling in between the rotor in here, or even the rotor in the brake pads. That looks pretty decent. Let's hit it with some copper Never-Seez. Now, let's go ahead and put our rotor on.
Let's get that new rotor on there. Make sure you take one of your lug nuts and tighten this down, that way there the rotor can't move around. Get the pads out of here. Check your caliper boot. Make sure that looks good. Once you're sure it looks good, we're going to go back here and take a look inside there. If you needed to replace these, your kit is going to come with a new one. So, that's always great. Now, we're just going to take a little pry bar with our hammer, get right under here, and get this off of there.
Now you can see the slider right there. We're going to get that in one second. We'll do the same to this one real quick. There's one slider. Obviously, you need to clean up that rusted area. That one is pretty frozen but not too bad. Let's clean up the rusted area on the wire wheel. Now that we have our sliders nice and cleaned up, we're going to move along to taking out this backside of the boot here. Pops right out. Easy-peasy. Take a look in there. If you need to sand it out because it's extra rusted, make sure you do that now.
Now I'm going to use a peak that looks like this. I'm going to go right inside, and I can feel right where the rubber grommet is. That's another seal right there. I'm just going to carefully pull it out, match it up to the new one, and then install the new one in there. There's also going to be another one of these located towards the other side. We'll get that out as well. All right, so it's time to get our new ones in here. Just going to try to line it up with the hole, help it through one piece at a time here.
You want to make sure it's not twisted around in a circle. That looks really good. Stick my finger in there, make sure it's seated all the way around. And it is. I'm going to do the same to the other one, and then the same for this one up here. Use some of this caliper grease. Go right along in there. And I'm going to come up along this edge right here just like that. That's going to help keep moisture out. I've got this right here. Should be able to just slide it right on. If for some reason you can't, you could find a socket that fits over the top and give it a couple of loving bonks right along this edge. That looks great. Let's do the same to the other one. Use some of our caliper grease on this side now, and get right along the edge of that hole. I've got my little seal here. You want to make it so these little pitons are kind of facing out and away, and the smooth side is facing in.
Make sure it's nice and flush. If you need to use a socket, find one that fits along the edge, and then give it a couple of loving bonks. This one looks great. Let's do the same to this side. And then, of course, we'll do the other calipers as well once it comes along. Let's go ahead and prep this caliper piston. Just get a little bit of grease on there. That's going to help with vibration dampening and noise reduction. We're also going to get both of these ears, the areas where it matches up against the pad. Let's get our pad in here. Push this down. Slide it in.
Let's get the outer pad on. Make sure you match it up with the original one so you have the wear indicator on the same side. Slides right in. Let's take a little bit of that grease. Go right along this edge right here where we sand it down. That's going to help keep moisture from there, and keep it from rusting and rotting like the rest of the truck. Get the caliper on. Perfect. Grab your two sliders that you just cleaned up. Add plenty of lubricant to all sides, and then slide them in. Right in there.
Let's get our sliders in there. We've got our two bolts. If you need to clean up the threads, now is the time to do it. But these look fine. Now that they're both started in, we're going to snug them up, and then we'll torque them to manufacturer's specifications. Torque your slider bolts to 38 foot-pounds. Torqued. Let's get this off of here. We'll get our wheels back on. We're going to put on all the lug nuts. We're going to snug them up in a crisscross manner. Torque these to 120 foot-pounds. It's torqued. We'll get our cover on here. Awesome.
Tools used
Once you have your vehicle safely raised and supported, we're going to remove this center cover right here. This will expose those lug nuts. You can see six lug nuts. We're going to remove all six of them using a 22-millimeter socket. I'm just gonna take one lug nut, leave it on there just so the wheel can't fall off on me. Remove the wheel. Now, something that's super important to remember is you want to have some nice hand protection, eye protection, and a nice bucket to make sure you collect any of that fluid that might come out. You want to make sure you're safe. The next thing we're going to do is take some of these line pinchers. You definitely don't want to use vise grips, and we're going to just pinch off the flow of brake fluid going down the brake hose, and now we can continue. The next thing we're going to do is bounce around a little bit. And the reason why I said that is because what we're going to do is break free this banjo bolt right here, but then we're going to snug it just a teeny bit so it's not leaking. At that point, we'll continue on to taking out the caliper sliders. And then, of course, we'll continue on by replacing or removing the banjo bolt and we won't have to worry about fluid coming out in case we have to give the caliper any bonks.
Okay. That broke free. It doesn't always break free easy like that, that's why I did that before I removed the sliders so the caliper is still nice and sturdy. Use your 3/8ths socket, it's an Allen head. I wanna go right inside here and you should be able to feel it lock in. There we are. We can move the caliper around now. Before we go too far, let's go ahead and remove this. Make sure you have that bucket lined up though because, more than likely, there's going to be some fluid either coming out of the hose still or even out of the reservoir area where the piston is in the caliper. Okay. It's ready to come out. You're going to notice that there should be two gaskets. Sometimes they stick to either the caliper or the banjo bolts or even the hose. So, now, if you look at this banjo bolt, you can see that there's a gasket still stuck on it. You need to remove that. You can use a pocket screwdriver if it doesn't come right off. Take a look inside that banjo bolt. We're going to set it aside. You'll notice that it has a hole, but the caliper actually usually comes with a new banjo bolt and with new gaskets. If you're replacing the caliper and your pads are worn and your rotors are worn, it's a good idea to replace the brakes at this time. Because if you're taking off the caliper, everything else is pretty much going to be falling right off. But if you're not, you will just take one of your lug nuts and put it on here so this holds the rotor up against the hub. That way there, it's less likely for any of the rust from inside the fins falling in between, and, of course, causing the wheel to be off-kilter making an imbalance or even worse.
So, now, your caliper should slide out. If it doesn't, it's probably catching right on here and there or even on the bottom side in the same areas. If you look inside the caliper, you can see the area where fluid's going to come out of. So, just make sure that you completely empty that out into the recycling bucket before you recycle the caliper itself. Okay. So, now I'm just gonna pull this slider out of here. You want to make sure that there's plenty of lubricant all along here and then, of course, inside the area where the two pieces flow together. Super important. If you need some, now's the time to put it in there before you install this into the vehicle. Okay. So, that looks good. Now I'm just gonna take this, I'm going to put it in, and I'm gonna do the same thing to the other side. So, you should notice that your sliders can move in and out. If they don't slide, then you need a little bit more lubricant at this point. It's also a good idea to put a tiny bit of lubricant around the piston right here, the contact point where it's going to connect onto your pad. And then along this ear and this ear right here, also in the same areas where it's going to be contacting the pad, that's going to help with vibration dampening and noise reduction. Some people prefer to do this on the pad directly and they just coat the whole backside of the pad, which doesn't really make much sense because it's a lot of waste and it also accumulates a lot of debris.
Looking at your pads, you're going to notice there's a very big difference. This is going to be on the inside and this side will be on the outside with the ears. These little pins also face towards the top of the caliper, which is facing down right now. Push this down and slide that in. And then you would do the same to this right here. It should lock right in and it should not move around. Let's install this in the vehicle. It's a good idea to clean up this mating surface right here, where the caliper is going to be up near, and then this one right there. Once you're sure they're a nice smooth surface so the caliper can move around, because it does need to move around, you would just apply a thin amount of lubricant. Something to make sure that the metal doesn't, you know, build up any rust or rot or anything. Now it's time to install our cleaned and prepped caliper here. Let's put it right up on. Should slide over and should slide in nice and easy. If you notice the caliper did not want to slide in easy or it's stuck in these areas, you need to re-remove the caliper again and clean those areas. This feels good. It can move around. Push on those slider pins until they kind of seem like they fall into the holes. You can lift up or move around the caliper to line it up. And then, of course, just start it in and then do the same to the other one before you tighten either of them down. Now that we have them both started in, let's tighten them up.
Okay. That just bottomed out. At this point, I'm just going to take the ratchet and go a teeny bit more, and that's good right there. Do the same to the other one. Bottomed out, teeny bit more. Perfect. Now that both of those are nice and tight, we're going to move ahead to removing this orange plug right here. Don't discard it though because we're going to use it in the old caliper. There it is. That just kind of keeps out the debris and moisture so no contaminants make it inside the caliper before it gets to you. Now we're going to move along to installing our new banjo bolt and, of course, the new gaskets. Do not reuse your old gaskets. Take your banjo bolt, put one of the gaskets right on it. Go ahead and grab that hose, put the banjo bolt through like that, and then take your other gasket and put it back on the banjo bolt in between where the line is and the caliper is going to be. Now, we'll connect this in. Start it all in by hand to make sure there's no cross-threading. Now, we're going to tighten it up. Okay. It just bottomed out right there, you give it a teeny bit more. Give it a nice wiggle, make sure that it does not move around in any way. The reason why we tighten this up is because we wanted to make sure that we crush down those gaskets just a teeny bit. Obviously, we don't need to flatten them out to the point that they're going to crush and/or crack, we just wanted to give them that little bit. This feels great. Check your flex hose, make sure that it's not rubbing up against the upper control arm or anywhere near it, because as the suspension goes up and down, there's a potential that it could cause damage.
Let's remove this right here. Move along. So, now that we have the flex hose in here, you want to make sure that you gravity-bleed the system. To do that, you want to make sure that your master cylinder is full, of course, and then you're going to open up this bleeder screw and just watch as air comes out. As air finishes coming out, it should actually kind of turn into a solid amount of fluid and then we'll close it up and then we'll continue with the bleeding process. Looks like it's getting close. All right. So, the fluid's coming out. I'm gonna close this off. Okay. So, now we're gonna need a second person because they're gonna need to pump up the brake for us. They're going to pump it three to five times nice and slow. Then they're going to hold that brake pedal, they're going to let us know they're holding it, we'll open up the bleeder, we're gonna watch for air. Once we've done that and the fluid stops coming out, we're going to close it off. We'll bleed it a couple more times that way until we see no more air bubbles coming out. Okay. Just make sure this is tight. I've got my collection bucket. All right. Do you mind pumping up the brake? So, I'm watching that fluid. I saw a lot of fluid and very little bits of air. So, that's great. But we want to make sure that there's no air. Okay. Clear to pump.
That one looks really good. I didn't see very much air at all. Let's do it one more for good luck. Go ahead and pump. Oh yeah, this looks great. Okay. Let's close this off. Perfect. Clean up your mess. Make sure you put your bleeder screw cover back on there. That's very important. And then, of course, we'll get the wheel on there and torque it to manufacturer specifications. Let's get the wheel on here. Torque your lug nuts to 120 foot-pounds. Torqued. Let's grab that center cover, make sure you line up the holes with the lug nuts, or else you're going to know it when you go to bonk it on. Perfect.