Replaces
This part doesn’t fit a . Select from parts that fit.
Frequently bought together
Part Details
Item Condition:
New
Attention California Customers:
 WARNING: This product can expose you to chemicals including Carbon black(airborne, unbound particles of respirable size), which is known to the State of California to cause cancer. For more information, go to www.P65Warnings.ca.gov.
Lifetime Warranty
This item is backed by our limited lifetime warranty. In the event this item should fail due to manufacturing defects during intended use, we will replace the part free of charge. This warranty covers the cost of the part only.
FREE Shipping is standard on Orders shipped to the lower 48 States (Contiguous United States). Standard shipping charges apply to Hawaii, Alaska and US Territories. Shipping is not available to Canada.
Expedited is available on checkout to the United States, excluding Alaska, Hawaii and US Territories as well as P.O. Boxes and APO/FPO/DPO addresses. Final shipping costs are available at checkout.


Created on:
Tools used
Hi, I’m Mike from 1A Auto. We’ve been selling auto parts for over 30 years!
I'm going to use the 19mm deep socket and breaker bar to loosen the lug nuts before we raise and support the vehicle. Just give them a couple of turns. We'll raise support the vehicle. We've used the two-post lift, but you can use a jack and jack stands. With the vehicle off the ground, you can use the socket to remove the rest of the lug nuts. With the wheel loose, I'm going to hold it to keep it from falling it off. Remove the last lug nut. Put that aside. Take the wheel off and tire. Put this aside.
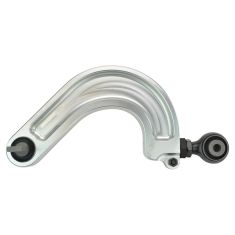
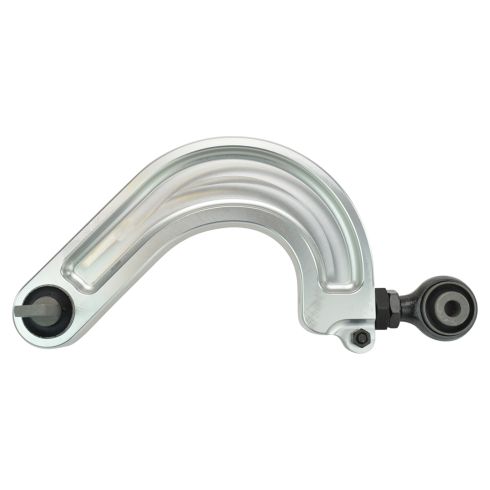
The rear upper control arm is held on with a bolt that goes through the knuckle here, and then two bolts that go up into the body here and here. Be sure to have new bolts on hand before you replace this. I'm going to take some rust penetrant and spray it on here. This nut is captured. It's bolted to the knuckle. I'm going to use a 19mm socket and breaker bar to kind of hold it, and use a 14mm socket on this end of the bolt to loosen it. Spray some rust penetrant in here to help it come out. Use a small punch to help drive this bolt out with a ball peen hammer. Just got to push in on the knuckle. Try to wiggle the bolt out. Just like that. And there's the bolt. There's two bolts holding the upper control arm to the body: one here, and one here. And there's some openings in the body here.
I'm going to spray some rust penetrant up in there to try to get to the threads on the back side. These are 14 mm. I'm going to use the 14mm socket extension and the breaker bar to loosen them. We'll get one loose, and then work on the other one. We'll go this way so I don't punch the control arm. There it is. All right. Spray some more rust penetrant up in here since I have them loose now. We'll switch to a ratchet to make removal a little quicker. These are pretty loose. I'm going to reach up with my hands to get them out. Not quite. A few more turns. That one was so loose, that one fell right out. Just going to grab onto the arm and hold it so it doesn't fall and reach up and get the other bolt out, and we'll just pull the arm right out.
Here is our original control arm from our vehicle, and our brand new one from 1AAuto.com. You can see its exact same design. It has new bushings already in it. These are left and right-specific in the vehicle, so the passenger side one will look slightly different. It's got some extra metal here, but the procedure to remove and install will be exactly the same, but this should work great and fit great for us. Take our new control arm and put it up into place. Have to hold it. Reach one of our bolts in and get that captured. Just thread it in by hand. Make sure it goes in nice and easy and make sure it doesn't cross thread. Do the same for the other bolt.
I'm going to leave these loose for now so that I have movement, and it's easier to line it up with the knuckle and capture this bolt. So you tightened the bolt, you'd have to fight this bushing, but with it loose, I can bend it down, put the bolt through, and then will jack up on the suspension and put vehicle weight on it and torque the bolts down. All right that pushes up into place. Takes some bit of force. You can just tap the bolt in.
We'll start to tighten it up and see the bolt coming out on this side. We'll just get it snug for now. Now I want to tighten the two bolts up on the inside, and we'll just snug these bolts up and bring them up evenly. We're going to jack up on the suspension and torque these down. You can use a floor jack. We're using the standing jack. Just going to put some weight on the suspension before we torque them down. That should be good. Torque for this outer bolt is 79.6 foot-pounds. I've got my torque wrench set for 80.
I'm going to counterhold the other bolt with a 19 mm and a breaker bar. I'm going to torque these bolts to 43 foot-pounds. Try to go evenly. When you hear the click, that's when you stop. We'll lower our jack. Control arm is now replaced. The passenger side will be similar.
We'll reinstall the tire and wheel. Start the lug nuts by hand. Get one threaded on. Use the socket to snug them up because when we lower the vehicle, we'll torque them to spec. Lug nut torque is 79.6 foot pounds. We've got our torque wrench set to 80. We'll tighten them in a cross pattern. The job is complete.
Thanks for watching. Visit us at 1AAuto.com for quality auto parts, fast and free shipping, and the best customer service in the industry.
Tools used